

Introduction: Modified 1870's SLAT BONNET, LUPUS PATIENT HAPPILY GARDENING IN E. TEXAS


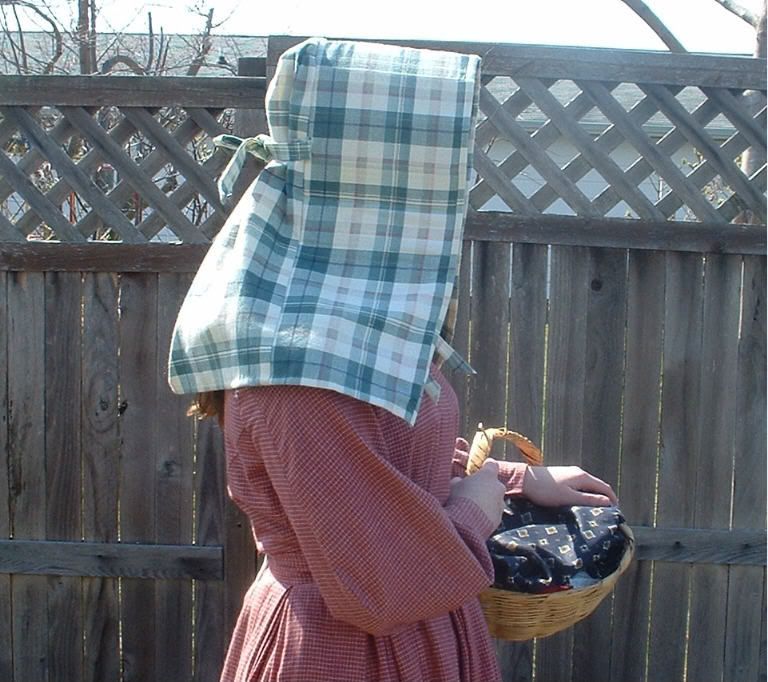
LUPUS PATIENT HAPPILY GARDENING IN E. TEXAS with her 1870's slat bonnet. Sometimes old ideas can be very healthful and useful in this modern age! My sister has Lupus and asked me to make her this bonnet. I made it and mailed it to her and now she is happily gardening in East Texas. Lupus patients need protection from sunlight. The first bonnet needed more re-enforcement so with this pattern I modified it with plastic bags fused together using parchment paper.
Step 1: Supplies


You will need:
1 1/2 yards of fabric for bonnet and lining if you want to line it.
Matching thread
Scissors
Seam ripper
Pattern http://www.mormontrek.net/Pack/PDF/Slats.pdfPlease note if this link does not work for the pattern Read the last page to get another link and the directions. I read where the site is down July 2011.
Found the link here: http://www.thesewingacademy.com/wp-content/uploads/2011/04/2010Slats.pdf
Grocery bags fused together for bonnet rim
Pins
Sewing machine
Iron/ ironing board
Wash/ dry/ iron fabric
Gather all tools
Copy pattern
fuse plastic bags together for the bonnet brim
Step 2: CUT OUT BONNET


Follow the instructions on the pattern. I lined mine so if you want yours lined, cut out 2 of each piece, except for the ties. If you choose to use recycled bags instead of cardboard, fuse together enough bags to make it very stiff. Cut the handles and bottoms off of your bags. Place two layers of bags together between parchment paper and press with an iron on about medium heat until they bond together. NOTE: I saw a video after I fused mine together that said to turn bags inside out. I did not do this and mine turned out great. I assume it was because I used very thick bags. They said the ink comes off if you fuse the bags without turning the print side to the inside. Add another layer of a bag and iron until fused together. When you have the desired thickness achieved set aside. This part is for the bonnet rim. I sewed it directly to the lining brim (wrong side) and omitted the cardboard instructions saving time. The first bonnet I used interfacing instead of cardboard because I wanted it easy to wash. As it turned out the interfacing was not heavy enough, that is why I decided to try the fusible plastic bags.
PLEASE NOTE: Videos are available if you do a Google search on how to fuse plastic bags together. Also be very careful and make sure you iron in a well ventilated area and make sure not to iron the plastic or you will wreck your iron. I used fairly thick bags and they worked out fine.
Step 3: BEGIN SEWING THE BRIM

Follow the pattern instructions OR sew the plastic brim piece to the bonnet lining. Next sew the bonnet lining to the bonnet leaving one long edge open. Turn right side out and press seams flat. Set aside.
Step 4: SEW BONNET SASH OR NECK PIECE

Follow the patterns instructions or for lined bonnet put bonnet neck pieces together matching right sides. Sew all around the curved bonnet neck piece or the part that shades the neck, leaving straight edge open. Turn right side out and press seams flat.
Step 5: SEW THE BONNET BRIM TO THE BONNET NECK PIECE.


Sew the bonnet brim to the bonnet neck piece as shown. Then press the seam flat and fold under the raw edge of the bonnet neck piece and fold it over the brim, iron and pin. Top stitch to finish.
Step 6: SEW BONNETS TIES


Follow the instructions and make the bonnet's ties. I omitted the one tie for the back because my sister lives in a very hot climate and she said it was much cooler to just leave that area open. This bonnet took about 2 hours to make. The pattern was fairly simple. I would hand wash in warm water and line dry.
Step 7: Link for New Pattern
I got this from a forum here: http://thesewingacademy.org/index.php?topic=267.100. The site where I originally printed my pattern is down for some reason. This formu kind of talks about the pattern I used. Someone might post a new link.
http://img.photobucket.com/albums/v663/MrsParker1/slatbonnetside.jpg.
How To Make a Slat Bonnet
(http://img.photobucket.com/albums/v663/MrsParker1/slatbonnetside.jpg)
Slat bonnets were worn commonly to protect women's complexions from the sun. Worn in an era when a pale complexion was considered fashionable and nearly every woman attempted at least some sort of protective measure when being outdoors, slat bonnets were worn in a variety of fabrics and social classes.
Slat bonnets are very easy to make yourself. They require minimum sewing skills and make a nice evenings project.
For durability and practicality, make your slat bonnet out of a sturdy fabric in a plaid or geometrical print. It's fun to play around with different colors for the bonnet and the inner lining--something that suits your complexion and eyes looks very well as an inner lining.
Have fun wearing your bonnet!
Procedure:
Step One: Preparation
To make your slat bonnet, you'll need some sturdy material for slats (either a lightweight wood or some stiff cardboard), about a yard to a yard and a half of material (depending on how large you want your bonnet to be). For the following instructions, I'll give my own measurements but feel free to alter these as you wish. For instance, you might want a longer curtain than I have made, so you'll add a few inches length to the curtain piece and the brim piece. Or, perhaps, you'll want a wider brim to offer better protection from the sun if you are planning to wear your bonnet for heavy-duty outdoor work. So, it's up to you!
From your fabric, you will cut three rectangles of material, these measurements:
• For the brim, cut a rectangle 9" x 40"
• For the back/curtain, cut a rectangle 20" x 30"
• For the inner brim lining, cut a rectangle 9" x 24"
You will also need some scraps of your fabric with which to bind the brim edge and to make ties for the inside of the bonnet, and also the back.
Step Two: Construction
Mark the casing lines in your brim lining piece. To do this, turn under 1/2" to the wrong side on each short side of the brim lining piece, and press. Measure across. Your brim lining piece should now measure 23". On each short side, draw a line 1/2" away from the edge. From line to line your brim lining should measure 22". Make casing lines 2" apart from line to line. There should be 11 casing 'slots' in all when you are finished.
Find the centers of both your brim and brim lining pieces. To do this, fold each piece in half and press. Matching centers, pin brim and brim lining together WRONG sides together. Sew lining to brim 1/4" from lining edge, and then again on the line 1/2" from brim lining edge which you drew in step 1. Sew all casing seams. Press.
Make your slats. If you are using wood, use a scroll saw for the best results, and lightly sand your slats for a smooth finish. If you are using cardboard, mark your slats and carefully cut them with a sharp pair of scissors or a knife. Make eleven slats 8" by 1 3/4". Slide them into the casings.
Take your back piece, and, starting at the edge of the brim, pin upwards towards the center of the brim. When you are a few inches from the center, stop and repeat procedure on opposite side. You will have a fairly large amount of fabric left over in the center, this can be gathered or pleated to fit the remaining area of the brim. Pleating is the easiest. Make a few pleats in the fabric to reach center brim, then repeat on other side. You will have 'points' of fabric sticking up. This is the corner of the rectangle. Just trim off the corners. If you have more fabric left over, make a giant pleat at the center of the brim, and pin. Sew. Turn bonnet right-side-out and press.
Hem the bottom edge of your bonnet by turning under a small hem and securing with a hand running stitch.
To bind the brim, first measure the brim and cut a 2" strip that length plus 1". Turn up 1/2" on each short side of the strip, press. Sew strip to the brim, right sides together. Turn under 1/4" on free side of binding strip, and fold binding to the inside of the bonnet. Slip stitch in place.
Cut four lengths out of your scraps left over about 1 1/2" x 15". Press up 1/4" on each long side of each tie, then fold them in half down the length, wrong sides together, matching edges. Sew about 1/8" from the edge.
Tack two ties to the back of your bonnet to adjust the fit of the crown around the head at about ear-length. Tack the other two to the inside of the brim about jaw-length.
To prevent edges of ties from fraying, cut on an angle, or finish with a narrowly rolled hem.
Here is a pattern to buy if you can't find one. http://www.longago.com/colonialwomen.html.
Enjoy!
Participated in the
Humana Health by Design Contest


