

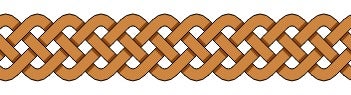
Introduction: Anatomy of a 3D Printed Turk's Head


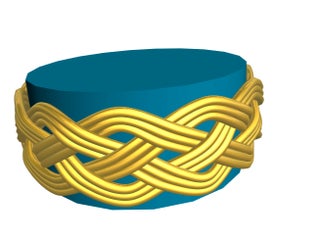
A Turk's head is a decorative woven knot. They come in many shapes and sizes but they all share common properties. I'm currently developing an app that can generate 3D models of Turk's heads for 3D printing. When printed, they make gorgeous rings, bracelets, pendants and more! In this instructable, I'll explain what's involved to create them.
The last step of this instructable has several examples of what my app will be able to create, check em out! If you'd like to keep up with the progress of my app just follow me and I'll keep you posted!
Step 1: The Knot Grid
When designing a Turk's head, you start with a knot grid. You can use standard grid paper to create a knot grid, but I've created a handy tool which does it for you: http://freakinsweetapps.com/knots/knotgrid/advanced.html
A knot grid can represent the structure of any Turk's head. You can use it to generate instructions for how to tie them, or in this case as a starting point for how to represent one in 3D. First, I'll explain the basics. Here we have an empty knot grid with 5 rows and 22 columns (for your standard Turk's heads the number of rows is parts+1 and the number of columns is 2*bights):
This grid can represent the 4 part 11 bight Turk's head pictured in the intro. I'll draw out the knot on the knot grid over a number of steps to help you visualize what's going on. When moving around the knot grid, you always move diagonally. Also, the right and left edges wrap around, so try to visualize the flat grid wrapped around a cylinder. So let's start tying the knot. Starting in the top left, start going to the right and down, connecting the dots until you get to the bottom. This is where our first bight forms by changing directions and going back up. Notice how we continue to bounce between the top and bottom of the knot forming bights. This grid shows the knot just before we cross over our first strand:
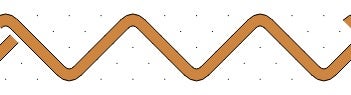
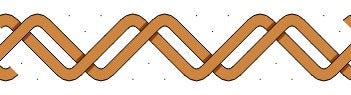
This is where some people get confused. How do you know whether to go over or under? You know by looking at your completed knot grid. In this knot, for the first row of crossings you always want to go over if you're going up, and under if you're going down. For standard Turk's heads you just want to flip that for every other row. Here's the knot after a second and third time around:
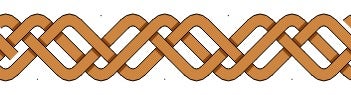
And here's the complete knot after the 4th time around (which is why this is a 4 part knot):
You can get much more complicated with knot grids, but for now we'll just move on to creating a 3D curve with this information.
Step 2: 3D Curve
Now we need to take the knot grid and turn it into 3D curves. Let's start by assigning a local coordinate space for our knot grid.
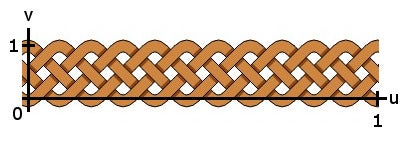
So now we have a (u,v) coordinate for every point in our grid. Keep in mind that the knot wraps around, so a u of 0 will be the same as a u of 1.
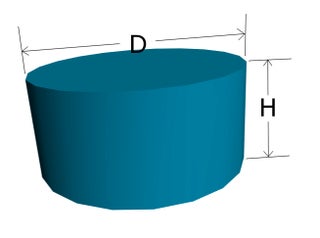
Now, let's define a cylinder with diameter D and height H:
If we set the z-axis to the main axis of the cylinder and put the origin in the center of the cylinder, we can map our (u,v) coordinates to a 3D point with the following equations:
x = D/2*cos(360*u)
y = D/2*sin(360*u)
z = -H/2*(1-v)+H/2*v
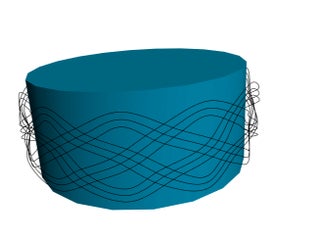
Now we walk through our grid, like we did in the first step and drop a 3D point at each grid point using the above equations. We can then connect the points as a curve using Catmull-Rom interpolation. Note that in the image below H was set to a smaller value than the actual height of the cylinder, which is why the curve doesn't go all the way to the top and bottom.

Now we need to offset the points to account for when we give thickness to the curve as well as the overs and unders. We need to offset the points outward from the cylinder at each grid point. To calculate the direction we need to offset we use equations very similar to above, except z will always be 0 and D is irrelevent as we want a unit length vector:
Nx = cos(360*u);
Ny = sin(360*u);
Nz = 0;
After offsetting the curve we get the following:

Step 3: Create Extra Passes
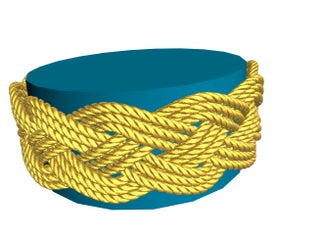
After weaving a Turk's knot, the knot is often followed around again to create extra passes. Three passes usually gives a nice look. To do that we'll add 2 more parallel curves.
Step 4: Extruding a Cross Section
Now it's time to take those curves and give them thickness. We'll extrude a 2D shape along the curve to get various looks. For starters, we'll extrude a circle to create tubes.
We can get fancier and extrude a shape like this while at the same time twisting it to make it look like rope:
Step 5: 3D Print


After being 3D printed in wax and then cast in white gold, it makes a beautiful ring! Here are several other examples of Turk's heads that were generated using similar techniques. I haven't 3D printed all of them as I don't have a 3D printer. Most of the ones I've had printed were ordered from Shapeways. The white gold ring was printed by Kraftwurx. Many of the models can be ordered through my Shapeways shop: http://www.shapeways.com/shops/freakinsweetknots
Follow me to receive updates on the progress of my app, which will allow you to customize and generate these sorts of models on demand.

Participated in the
Jewelry Contest

Participated in the
Epilog Challenge V

Participated in the
3D Printing Contest


