

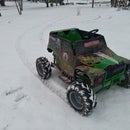
Introduction: Basic 18v Speed Upgrade for 12v Power Wheels


Today I'm going to show you how to over-volt a 12v kid's battery ride on (BPRO) to 18v. This is a fast and inexpensive way to boost speed by 50%, but be warned that it can be hard on motors and gearboxes.
You'll need a few simple hand tools, a pair of batteries and a fuse holder(absolute must-have for safety).
Bare minimum tools, you'll need crimpers and strippers. A soldering iron, mini pliers and mini screwdriver set will open up a lot of potential mods. Multimeters are also great for troubleshooting.
You'll need one 6v battery and one 12v battery. They should have the same Ah(amp hour) rating to ensure even discharge. Ah is a measure of capacity, so batteries with higher Ah ratings will make the BPRO drive longer. I would highly recommend upgrading stock brand batteries to aftermarket SLA (sealed lead acid) batteries. Stock power wheels batteries often have internal thermal fuses that are too sensitive and cause the vehicle to stop randomly.
Let's not overlook the need for a fuse/fuse holder and a few crimp connectors. The fuse holder is vital for this if you're a fan of not setting your kid on fire.
Step 1: Wire the Batteries in Series


Batteries can be wired in series or parallel. Series combines their voltage, which increases speed. Parallel combines Ah, which lengthens run time. This mod is all about speed and bumping from 12v to 18v, so we're wiring in series.
You can see in the first picture how I've connect the batteries from 12v positive to 6v negative. I then connect the 6v positive and 12v negative to the factory wiring. USE A FUSE HOLDER on the positive side, either between the two batteries or right after the batteries.
I made the terminal connections with my crimping tool and various terminal fittings. Here I had the jumper wire between batteries with a ring terminal on one end and a female spade terminal on the other. I then used bullet connectors on the vehicle connections.
Second picture shows how the crimp tool works. The last 1/4" of wire is stripped bare, the fitting is slid over the bare wire and the crimper punctures/crushes the fitting onto the wire. This creates a mechanical joint that is more resistant to vibration and movement than a solder joint. Exactly what we need for a connection on a kids toy that will be bouncing all over the back yard.
Step 2: Trim to Fit the Batteries


My two batteries just barely didn't fit underneath the Jeeps hood. So I test fitted them in a variety of positions, but decided to stand them up like this. I then marked the body and cut out with my multitool/dremel.
Step 3: Fit and Wire Batteries

I then fit the batteries into the newly cut cavity. Make sure they're firmly in place. You might want to add a hold-down strap of some sort. You want to avoid the having the connections come apart.
Then I hooked them to the factory wiring and connected leads for charging via my Noco G4. After pressing the pedal to ensure everything is working, it's ready to go.
Step 4: Add Heatsinks (optional)


Any time I over-volt a BPRO, I'm concerned about dealing with the increased heat and likelihood of failure. So I install cheap heat sinks on my motors to help prevent burning them up. They're only $5 for two pairs on Amazon, so they're a good value in my book.
Pro tip: bend them just a hair with a pair of channel locks before installing them, they'll grip the motor way better and you won't be finding them in the yard when you're trying to mow (at least not as often).
Thanks for checking out my project!


