

Introduction: CUBOTino: a Small, Simple, 3D Printed, Inexpensive Rubik's Cube Solver Robot (Base Version)


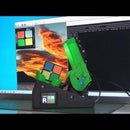

This is my second Rubik's cube solver robot; This time I wanted to make it very small, simple, fully 3D printed, and inexpensive..... to attract more people into robotics, especially students.
The overal project considers the robot, to be scalable, to accomodate different budjet levels.
This instruction relates to the base version; Main info, for this Base version:
- It requires a PC for the cube status entry, via webcam or via mouse, and to "feed" the robot with the cube solution (based on Kociemba solver).
- An ESP32 development board, programmed in Micropython, controls the robot and the two servos used for all the movements.
- The interraction is supported by a GUI, coded in Python; A setting page at GUI helps with the basic robot settings.
- The robot is energized via the microusb port, the same is used for the communications. A more robust solution is to enrgize the servos via an independen power supply (details in the How_to_make_... .pdf file in Step1 below)
By excluding the self solving Rubik's cubes, and the robots requiring modified cubes for gripping, this is one of the smallest Rubik's cube robot I've seen so far.
The name of this robot is CUBOTino: Apart from the obvious CUbe+roBOT, "ino" is the italian suffix standing for small..... a "small" touch recalling my origins and the very small robot dimensions.
The autonomous version of CUBOTino is availbale at: https://www.instructables.com/CUBOTino-Autonomous-Small-3D-Printed-Rubiks-Cube-R/
Credits to Mr. Kociemba, who has made available the cube solver in python; Another credit to him for the GUI, from wich I've based the one for this robot.
Supplies
The material cost should range between 30 to 40 euro, depending if you already some filament
The more expensive parts are:
- Two servos ( TD-8325MG, 180deg 25Kg metal, with metal arm “25T” )
- One ESP32 dev board (30 pins)
- ca 500 grams of filament
Some little electronic components (microUSB breakout board, prototype board, capacitors, connectors, etc), and screws
On the "How_to_make_ .... .pdf" file, at next Step, you also find alternative servos and related info.
On the annex Supplies.pdf file the detailed list, included the link to the shops I've used and related cost
Attachments

Step 1: Read First
The annex "How_to_make_ .... .pdf" provides detailed info on how to build the robot further than many other aspects.
I advise to read the document, in case you're interested to this project.
This document will be updated when needed (filename ends with yyyymmdd).
Step 2: Prepare the Robot Parts


Since October 2022, all the needed files for this project have been uploaded to GitHub: https://github.com/AndreaFavero71/CUBOTino_base_version
The repository also contains the stl files for the 3D printer.
In this way it is much more simple to download the complete project, as well as to setup the ESP32 board and PC.
Step 3: Assemble the Robot

All parts are connected by screws.
Add four self-adhesive rubber feet underneath the base.
In the annex "How_to_make_ .... .pdf", the assembly steps and details are provided.
Step 4: Enjoy the Robot


Step 5: You MADE IT

Step 6: Provide Feedback

If you've enjoyed the project and/or you've suggestions, please feedback


![Tim's Mechanical Spider Leg [LU9685-20CU]](https://content.instructables.com/FFB/5R4I/LVKZ6G6R/FFB5R4ILVKZ6G6R.png?auto=webp&crop=1.2%3A1&frame=1&width=306)


