

Introduction: Camera Robot Controller


This instructables show how to build a ESP32 display controller to control the ESP32 Camera Robot.
Supplies
Any ESP32 dev device that with display and some buttons. I will use Odroid-Go as an example.
Step 1: What Is ESP32 Camera Robot?
ESP32 Camera Robot is my previous projects. It can use any ESP32 Camera dev board add a motor driver board or two 360 servos to build a simple camera robot.
The software is using FSBrowserPlus, it is a tailor-made ESP32 HTTP server that can:
- SoftAP with Captive Portal feature
- Use web base editor ad-hoc edit hosted HTML files
- stream camera video in MJPEG format
- accept motor or GPIO command by HTTP request or WebSocket message
So the ESP32 Camera Robot can control by a mobile phone. But mobile phone is not the only option to control the robot. This time I will show how to use an ESP32 display controller remote control the robot.
Ref.:
https://www.instructables.com/Camera-Robot/
https://www.instructables.com/Strider-Camera-Robot/
https://www.instructables.com/Strider-Camera-Robot-V2/
https://www.instructables.com/Strider-Camera-Robot-V6/
Step 2: Software Preparation
Arduino IDE
Download and install Arduino IDE if you are not yet do it:
https://www.arduino.cc/en/main/software
ESP32 Support
Follow the Installation Instructions to add ESP32 support if you are not yet do it:
https://github.com/espressif/arduino-esp32
Arduino_GFX Library
Download latest Arduino_GFX libraries: (press "Clone or Download" -> "Download ZIP")
https://github.com/moononournation/Arduino_GFX
Import libraries in Arduino IDE. (Arduino IDE "Sketch" Menu -> "Include Library" -> "Add .ZIP Library" -> select downloaded ZIP file)
ESP32 Video Remote
Download latest ESP32 Video Remote source code:
https://github.com/moononournation/ESP32VideoRemote
Step 3: How It Works?
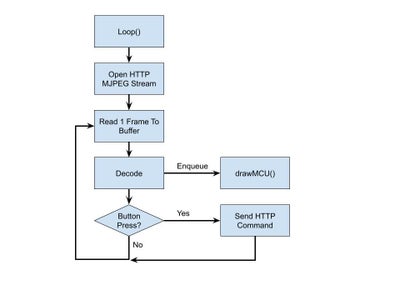
The controller flow is actually very simple. It continuous read 1 frame from MJPEG stream and decode it. The MJPEG class will enqueue the draw task to background. After decoded each frame, it check any button pressed, if yes send corresponding HTTP request command out. Then read another frame and so on.
Step 4: Customization
Use Arduino IDE open file ESP32VideoControllerOdroidGo.ino in ESP32VideoRemote\ESP32VideoControllerOdroidGo folder.
Open ESP32VideoControllerM5Stack.ino or ESP32VideoControllerTWatch.ino instead if you have M5Stack or T-Watch.
If you are not using the above 3 predefined devices, please save as another folder and make some customization.
WiFi
At first 2 lines input your FSBrowserPlus inputted SoftAP SSID and password.
Display
At around line 39, change to your display settings, you may refer to Arduino_GFX Wiki for more details.
Buttons
At around line 70, change to your buttons GPIO initial settings.
At around line 133, change to your buttons read value functions.
Step 5: Enjoy!
It's time to play!


![Tim's Mechanical Spider Leg [LU9685-20CU]](https://content.instructables.com/FFB/5R4I/LVKZ6G6R/FFB5R4ILVKZ6G6R.png?auto=webp&crop=1.2%3A1&frame=1&width=306)


