

Introduction: Converting Power Wheels to Run on 18v Lithium Tool Batteries


Today I'll be converting a Power Wheels battery-powered ride-on toy from 12v sealed lead power to 18v lithium ion power. This is a relatively simple mod that will add about 50% more speed to your kid's BPRO.
Here's an overview of the tool set you'll need to complete a project like this. I don't always use all of them, but some of the handiest stuff is:
Tools:
Soldering Iron, Mini screwdriver set, Wire Strippers, Crimpers, Mini Pliers, magnetic parts dish, Multimeter
Components:
Fuse Holder (absolutely vital), 30A ATC Fuses, 10ga wire, Heat Sinks (optional, but help keep motors cooler for longer life), 18v Batteries (although you ideally have extras of these laying around if you're doing this mod), and either a broken tool or extra battery charger to salvage the battery socket from.
SUPER IMPORTANT: No matter what battery mods you do to a kids ride-on, you need an inline fuse. DO NOT SKIP THE FUSE. Any time you add an aftermarket battery to a BPRO, you NEED a fuse. Stock batteries have internal thermal fuses in them, so changing batteries necessitates adding an inline fuse holder. If you are unsure of any of this, DON'T DO IT.
Secondary Warning: Overvolting is hard on stock drivetrain components. Expect to wear out gearboxes and motors more quickly when you apply extra voltage. Mitigate this by keeping total rider weight as low as possible (don't sit three kids on this thing), do not rapidly shift directions while in motion, allow cooling periods between battery changes, just take it easy and it'll last longer.
Step 1: Gather the Components


Here's the vehicle I'm modifying today. $17 yard sale snag. Power Wheels Kawasaki KFX. 12v pedal with a twist grip turbo throttle. Kids love the turbo feature, which works by running the motors in series for normal speed, parallel for turbo.
Also pictured are the donor bits you need. A sacrificial power tool that fits your brand of batteries( in my case, a broken milwaukee flashlight, but an old charger base would have worked as well). You'll also need an under-used 18v lithium tool battery or three. This 9ah battery will run the KFX for about 40-50minutes of throttle time. Most standard packs are 2-4ah, so you'll have to swap batteries more often.
Because I use them heavily every day, I like Milwaukee M18 tools. But Ryobi, DeWalt, Rigid, etc will also work. Anything 18v and Lithium will be a substantial upgrade. Use the largest capacity (ah) batteries you can spare.
Smaller components you'll need are the fuse holder, wire, solder, crimp-on terminals.
Step 2: Disassemble the Tool With the Donor Socket


First, I split the tool in half by removing the screws in the case. They were Torx T10 screws. The case just pops open easily once the screws are out.
I aligned the socket terminals and the battery to double check the polarity. Yellow is hot, black is neutral. Standard 12v coloring would be red hot, black neutral, but this was wired in yellow for whatever reason.
Then use your soldering iron and pliers to remove the stock wiring from the terminals. 16ga wire was okay for a flashlight, but will just melt and cause major issues if you try to run beefy motors on it.
Step 3: Cut, Drill and Modify the Battery Socket


Getting ready to cut the donor flashlight. I picked my spot right above a screw joint. Going to cut it with the chop saw.
Chop saw cuts very smooth if you go slowly. Emphasis on slowly. Cut too fast and it'll mangle the workpiece at best, mangle you at worst.
Drill a hole through the case to fit the new wires. I ended up using a 5/16 bit and cutting/snapping more interior bits off with mini pliers to make room for all the new wiring.
Step 4: Solder New Leads to the Battery Socket Terminals


I noted the polarity of the wires when I de-soldered the original connections. I then connected my 12ga 30a fuse holder lead to the positive side and my 10ga stranded copper lead to the negative. I'd have prefered to run it all in 10ga, but 12ga were the best I could find locally. Ordered a 10 pack of 10ga fuse holders off Amazon for the same price as one fuse holder from the auto parts store. I'll re-do the positive lead with 10ga when my Amazon order gets here.
I used vise grips to hold the work piece steady as I did the soldering. 10ga stranded copper wire is pretty thick stuff to solder, so I used my bigger iron and started by pre-tinning the wire. Then I carefully lined up the direction the wires need to run before soldering, as 10ga wire doesn't bend very easily.
After it cooled for a bit, I started fitting it into the modified flashlight handle.
Step 5: Reassemble and Test


I reassembled the battery socket by tucking the new wires inside and screwing the case back together.
Then, I crimped some male spade quick connect fittings on the donor flashlight socket to mate with the factory wiring. Now the KFX can run on this 18v lithium pack or the stock 12v with the same vehicle wiring. I can also move this battery to other vehicles that have female spade quick connect fittings.
All that's left now is to put the battery into the battery compartment, hook up the wires and test the function. Everything seems to be working just fine on this build.
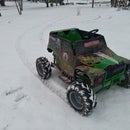
Step 6: Play!

Got my little test pilot ready and let him have at it. He had a blast standing up, leaning forward and trying to twist the rear end around. He just started to get it breaking sideways on grass, it would probably drift like crazy on pavement. He was thrilled with it, much better than stock!
Thanks for looking through our project and best of luck with yours!
If you'd like to see more, Follow us here for completed projects and on www.instagram.com/poppafixit to see sneak peeks of our upcoming projects!


