

Introduction: DIY Epoxy River Rock Table That Glows


In this instructable, I show you how to make a DIY epoxy river table with rocks that glows in the dark.
Even if you don’t need to make an epoxy river table, the DIY tips and woodworking techniques covered in this tutorial can be used for other DIY projects.
Supplies
Step 1: Design Table


First, I designed this epoxy table in Sketchup. This helped me get a visual of how I wanted the river table to look.
Step 2: Mill Wood


The only stationary tool I have in my workshop is my bandsaw. Due to various reasons, I sold all my stationary power tools and elected to use mobile power and hand tools for all my projects. As a result, my local hardwood dealer mills the wood for me when I purchase it for a small fee.
First, they resawed piece of reclaimed cypress into two 2″ slabs. Then, they ran it through their jointer to get a straight side. Next, the 2 wood slabs were ran through their planer to get a flat surface.
Once I arrived home, I cross cut each 2″ cypress slab 3" longer than the final dimensions. To ensure a straight cut, I referenced the flat side agains the rail on my MFT3 table and cut one side. Then, I flipped the wood over and cut the other side.
Step 3: Check Moisture

Before I begin any woodworking project, I check the wood moisture level with a wood moisture meter. I like the wood to be below 10% RH.
Wood is hygroscopic. In other words, wood gains or loses moisture depending on the relative humidity (RH) of the surrounding air.
Essentially, the correct moisture level prevents the wood from moving (shrinking or expanding) after the completion of the project.
Step 4: Build Epoxy Mold

There are many ways to make an epoxy resin mold.
I build my resin moulds based on what I have available in my shop. Often times, I have scrap wood, packing tape, and furniture wax available. So, I used these materials to build it.
First, I place the wood on a flat and level surface.
Next, I completely covered the scrap particle board with packing tape and covered it with furniture wax.
Step 5: Sand Live Edge

Since the cypress wood slab was milled by my hardwood dealer, I only sanded the live edge at this stage of the project. Most live edge wood slabs contain bark or debris which need to be removed.
A soft sanding pad with 220 grit sandpaper works well to clean up the live edge without changing the shape or natural contours.
Step 6: Fill Wood Cracks


While inspecting the wood slabs, I noticed a wood crack on the underside of the cypress slab.
To fill the wood cracks and knots with epoxy, I mixed 12 ounces of epoxy resin along with a 1 drop of brown dye and 1 drop of black dye. These colors matches the small streaks of dark grain and the live edge.
Step 7: Secure Wood to Mold


As a final step before the resin pour, I positioned the cypress wood slabs on the resin mould.
I like to position the slabs 2″ wider than the final dimensions. This allows me 1″ on each side to trim later in the project. I don’t have to worry about damaging the ends or sides during the build process.
Next, I cover 2 pieces end pieces of scrap wood with tape wider than the width of the river. I secured them to each end of the epoxy river. Then, I seal around the perimeter of each wood slab to prevent leaking.
Lastly, I use scrap 2x4s with clamps to secure the wood slabs in place. I make sure to perform this step immediately after sealing in order to compress the silicone caulk for a better seal.
Step 8: Mix Epoxy Resin


For the first epoxy resin pour, I used multiple mixing containers and a total of 192 ounces of epoxy. The multiple mixing containers make it easy to properly mix large batches with 2:1 mixing ratios such as this epoxy.
First, I poured 64 ounces of part A in 2 containers for a total of 128 ounces of part A.
Next, I poured 32 ounces of part B in 2 containers for a total of 64 ounces of part B.
Then, I poured 1 64 ounce container of part A and one 32 ounce container of part B into 1 large mixing container.
I repeated the process for the other containers. So, I ended up with 2 96 ounce containers for a total of 192 ounces.
As a quick epoxy mixing tip, always mix the material until it turns clear as this is a sign it is ready to be poured. The container at the top of the picture below has not been mixed. Conversely, the container below it has already been mixed and very clear.
Step 9: Add Glow Powder


Once each container was mixed, I added blue epoxy glow powder to each mixture. This fluorescent blue glow powder is blue while at rest and produces a blue glow.
Other glow powder colors tend to be a pearl white at rest and turn colors while glowing. First, I poured roughly half of the 8 ounce bag in one resin batch. The epoxy glow powder clumps together at the bottom and releases bubbles which produces a satisfying look.
I mixed the material in each container for roughly 3 minutes.
My favorite epoxy mixing technique starts with 3 circles clockwise. Then, 3 circles counterclockwise followed by 3 bottom scrapes.
Once I finished mixing the epoxy and glow powder, I poured half of one container in the other. Then, I mixed the half full container to make sure no blue glow powder stuck to the bottom. Next, I repeated the process with the other container.
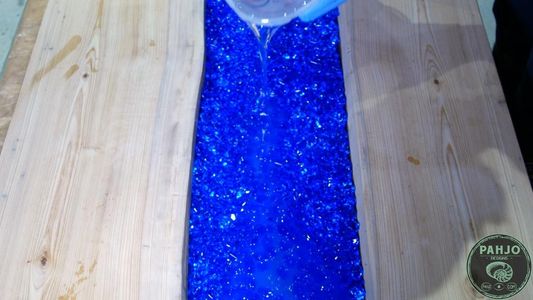
Step 10: Epoxy Base Layer


After the glow powder and epoxy were fully mixed, I poured each container to from the base layer of the transparent epoxy river table with rocks. Next, I removed the bubbles with my mini torch. Surprisingly, this deep pour epoxy did not produce many air bubbles at all.
The picture shows the blue epoxy glow powder glowing in the dark after the first pour.
Step 11: Add Acrylic Rocks


As I mentioned earlier in this DIY tutorial, I used acrylic rocks for this epoxy river desk.
The acrylic rocks will be covered with transparent clear resin to create a unique visual – especially when the epoxy river desk glows. After the base layer cured for 48 hours, I spread the blue acrylic rocks on top of the epoxy glow powder layer.
This transparent epoxy river table with rocks required to bags of blue acrylic rock to cover the surface of the river.
Step 12: Clear Epoxy Pour


After I evenly spread the acrylic rocks and they were about 1″ below the surface of the table, I started the second pour. First, I labeled my buckets from the first pour.
It may be an issue if I use the part B bucket from the first pour for part A in the second epoxy pour. Next, I mixed 96 ounces of resin using the same procedure as the first epoxy pour.
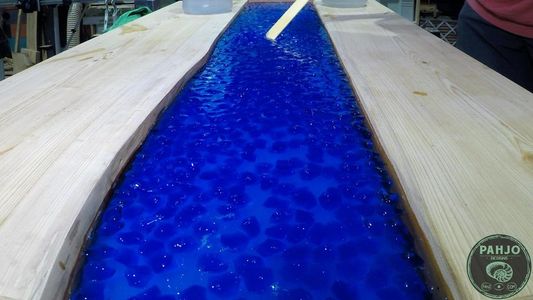
I poured the resin on top of the acrylic rocks. While pouring the resin, I noticed the acrylic rocks floated to the surface.
I’m not sure why I didn’t anticipate this happening. Consequently, I will need to stop about 1/2″ from the top and perform an extra pour to reach the top of the wood slabs.
A paint stick worked perfectly to spread the rocks evenly across the transparent epoxy river table with rocks. After I spread the rocks, I used my mini torch to remove the small amount of air bubbles.
Since the acrylic rocks float, I used my level to make certain I didn’t have a protruding rock on the surface.
Also, I used the 4′ level to make sure the epoxy river desk was level.
Step 13: Final Epoxy Pour


After 3 full days, I prepared the final epoxy pour. I mixed 192 ounces of resin and filled the remaining 3/4″ until the epoxy was level with the surface of the wood slabs. This epoxy covers the surface well and it is very clear. I really enjoyed working with it.
Step 14: Optional: Flatten Table With Router Sled


This step is optional. I flattened the table with my router sled b/c it was slightly uneven.
My wood flattening jig consists of 2 90 degree aluminum corner pieces with a 2×2 wood block on each end.
The wood blocks are 1/8″ wider than the base of my router to prevent sticking and kickback.
Step 15: Remove Epoxy Mold

After I flattened the epoxy river table with rocks, I removed it from the epoxy mould.
Step 16: Sand Epoxy Resin


After I finished removing the cured epoxy from the underside of the epoxy river desk with rocks, I started sanding. my Festool RO 125 makes sanding any epoxy or wood project much easier.
The Festool RO 125 is a dual-mode sander with a coarse and fine setting for sanding a variety of surfaces. Also, it works great as a polisher as well.
Most importantly, I use a pattern when sanding resin with each grit to prevent swirls and other sanding mishaps.
First, I choose a 3 foot by 3 foot section. Next, I sand from east to west and overlap about an inch. Then, I sand from north to south with the same amount of overlap.
Finally, I sand in roughly a 6″ circle and move to the next 3′ by 3′ section.
Step 17: Trim to Final Dimensions


Once I finished sanding, I trimmed the epoxy resin river rock table to the final dimensions.
The final dimensions of this transparent epoxy river table with rocks is 48″x28″x28″x1.75″ (LxWxHxTH).
Step 18: Roundover Edges

To soften the edges of the DIY epoxy river table with rocks, I used a router with a 1/2″ roundover bit.
An orbital sander or block plane works as well to soften table edges.
Step 19: Install Hairpin Legs


I prefer to attach the legs and complete all work on the underside of the table before applying the finish. First, I flipped the table over and placed the hairpin legs on each corner.
Next, I used a nail punch to mark the holes. Then, I marked the depth of the screw with a piece of tape on a 1/4″ drill bit. I used my drill and gently drilled on the marks up to the line.
I placed the hairpin legs back on the table and slowly screwed them in place. I find it best to tighten the 2 inside screws first and then the 2 outside screws.
Step 20: Install UV Lights


In the event the epoxy river table with rocks does not have access to light, I installed black UV LED strip lights on the underside. Essentially, the black UV LED lights exist to charge the blue epoxy glow powder.
First, I placed the LED strip lights to the underside of the table where the epoxy river and wood meet. I used the clips supplied with the UV LED strip lights along with hot glue to secure them in place.
Also, the clips helped me secure the end of the LED strip lights near a hairpin leg. This will hide the power supply and wall outlet wire.
I used a pair of scissors to cut the LED strip lights between the copper dots on the cut line.
It is important to cut the LED lights at this location in order for the excess to work. Plus, it makes it easier to solder the LED lights if needed.
I flipped the epoxy river table with rocks over and didn’t like the look of the one LED strip. Consequently, I decided to add another LED strip on the opposite side.
Step 21: Solder LED Light Strip


To join the lights together between the 2 sides without having lights cross the river, I soldered black and red wire to each LED strip.
My helping hands held the 2 wires in place while I soldered them together. I soldered the black wires together and the red wires together. The black and red wires were long enough to stretch across the epoxy river.
Next, I pushed the sleeve over the solder and brazed it with my mini torch. Ideally, a heat gun works best to shrink the electrical sleeve as the torch could damage the wires.
I secured the second light strip using a hot glue gun to the opposite side.
Step 22: Apply Finish


Finally, time to apply finish to this epoxy river desk with rocks. For this table, I used Rubio Monocoat Oil Pure.
First, I mixed rubio monocoat according to the instructions and poured it on the table. This stuff goes a long way, so I didn’t mix too much. Next, I used a plastic spreader and worked the material across the epoxy river. Also, I allow a small bead of finish to drip over the edge of the table to cover the sides.
Then, I used a microfiber towel to remove the excess as best as I could.
Step 23: Buff Finish


I used my Festool RO 125 with the polishing pad and sheepskin in coarse mode to buff away any finish left behind by the towel. As a quick tip, I highly recommend purchasing this spur tool to clean any polishing or buffing pad. I simply turn on the machine and place the spur tool on the sheepskin or pad.
Step 24: Conclusion


I hope this instructable provided you with value. Please feel free to leave a comment if you have any questions - I'm happy to help.
Be sure to checkout my YouTube channel and my website for more DIY tutorials.

Participated in the
Anything Goes Contest


