

Introduction: DIY Knife Sharpening Jig (Guided Knife Sharpener)

This is a DIY guided knife sharpening jig made of wood. It is inspired by several commercial models, plus all the variations that many other DIY enthusiasts have posted over the years.
This is my version 2 model. The goals for the update were:
- Use magnets instead of a clamp to hold the blade. Clamping proved fiddly on my version 1 jig.
- Make the base larger (10" x 10") for stability, but still compact overall for use on a kitchen countertop, and for storage.
- Mostly wood - easy to make with ordinary woodworking tools.
- Minimal hardware, minimal complexity. This is dedicated mostly to sharpening kitchen knives, so I reduced it to the bare minimum for that purpose: an angled platform to hold the blade, and a tool rest to maintain a consistent sharpening angle.
Supplies


I used repurposed walnut from an old door jamb, which is 3/4" thick. I cut everything to size on my table saw, but you could also use straight 1" x 4" and 1" x 2" boards of any available wood, and cut them to length with a hand saw.
The diamond sharpening plates are UltraSharp brand, 6" x 2", 300-grit and 1200-grit.
The rest of the hardware is simple:
- Four neodymium magnets. These have a countersunk hole for a mounting screw, and are encased in a nickel-plated steel cup for robustness (these types of magnets are brittle). They are about 5/8" in diameter, and a bit under 1/4" thick. They come with small stainless steel screws to mount them.
- Two 1/4" x 2" long brass bolts (one per tool rest).
- One 1/4" wing nut.
- Six 1-1/4" deck screws to assemble everything.
- Four small rubber feet, as used for cutting boards.
Sources:
Diamond sharpeners: https://www.bestsharpeningstones.com/product_details.php?category_name=Diamond%20Sharpening%20Stones&product_id=122
Neodymium magnets: https://www.amazon.com/dp/B0BJ1B8LFH
Rubber feet for cutting boards: https://www.amazon.com/dp/B07PMF77TW
Step 1: Review of Version 1


First, a quick view of the version 1 jig. It uses a spring clamp to hold the blade on the platform. Small sections of bicycle innertube were used on the blade platform and the tips of the clamp to keep things from slipping (perhaps even vinyl electrical tape would have worked also).
It looked simple and elegant enough, and it worked just fine to maintain a consistent sharpening angle (my sister and my daughter, both avid from-scratch cooks, used theirs for 2+ years to maintain their kitchen knives).
However, it had some flaws:
- The jig's stance on the countertop was too high and too narrow, and it would tip over sideways as you sharpened the tip of a medium sized or longer knife, requiring you to support the jig with your other hand.
- It was a bit fiddly to get the blade clamped: you needed one hand to hold the clamp, one to hold the knife, and if the jig moved or tilted, you wished for a third hand to hold the jig.
- With a narrow-bladed knife (e.g. paring or boning), there was usually *barely* enough room to clamp the spine of the knife without the tip of the clamp interfering with the diamond sharpening plate. For small pocket knives or fillet knives, there was no hope of using the clamp, and you just had to manually hold the knife in place with one hand.
- It had no means of adjusting the sharpening angle.
It was my daughter mentioning that the jig would work even better if it had magnets to hold the knife that inspired me to re-think the design.
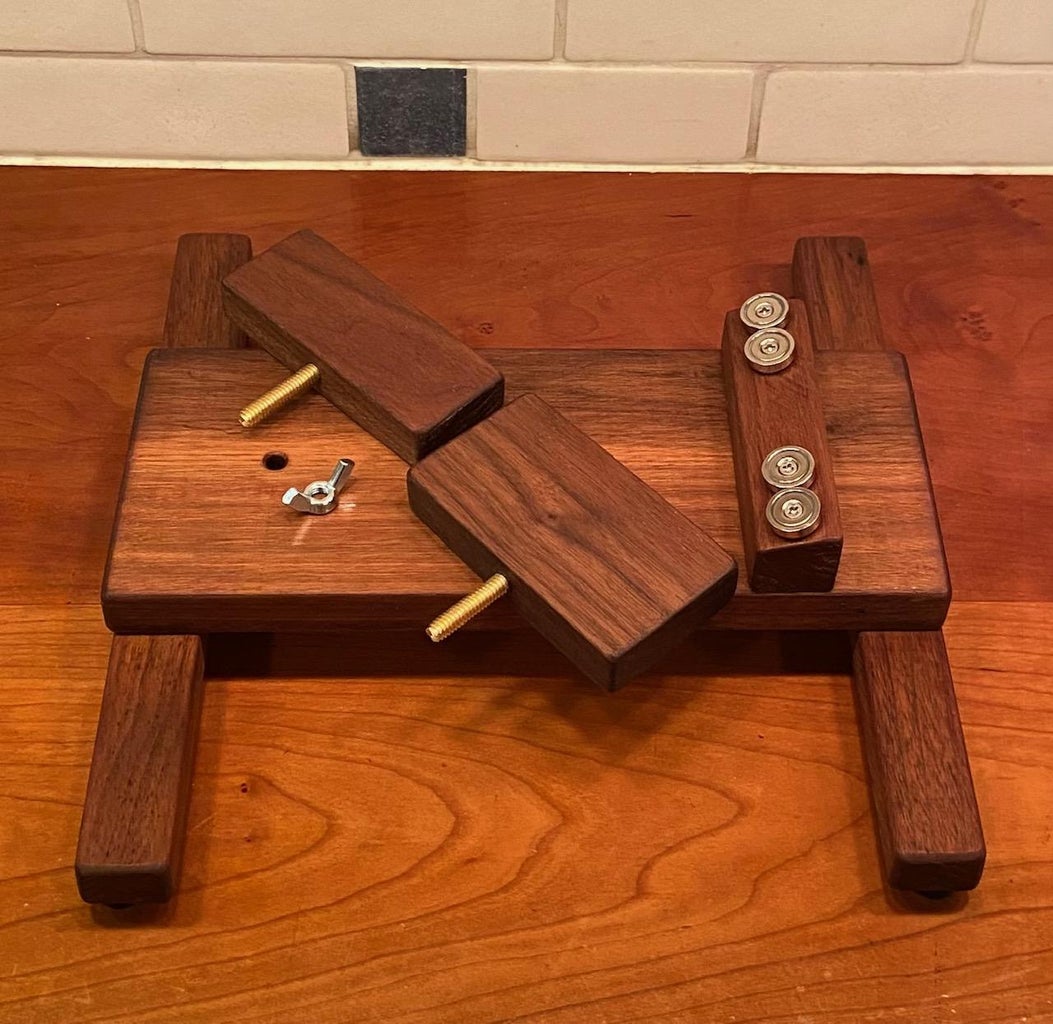
Step 2: Cutting Wood to Size


As mentioned previously, the wood stock is 3/4" thick.
The main center rail of the jig is cut to a size of 4" x 10".
The crossbars for the feet are cut to 1" x 10".
The blade platform block is 4" long to match the width of the center rail.
- The top of the blade platform is cut to a 16 degree angle (discussion as to why is below). I did this on the table saw, but you could carefully cut the angle with a hand plane, using a protractor for reference and a straight edge.
- I needed more thickness for this block of wood, so I glued up two layers of stock (i.e. it was 1-1/2" thick until I cut the angle, leaving it about 1" thick at the higher edge). You can see the layers in the photo.
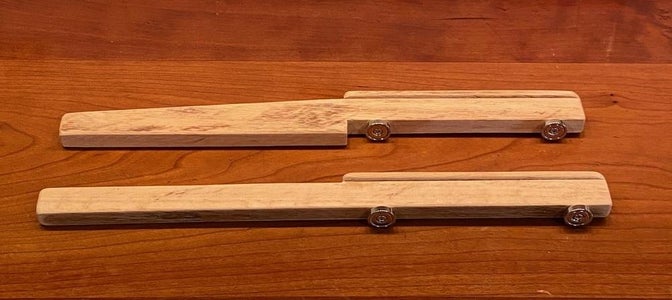
The tool rests are also 4" long to match the width of the center rail. I made them in two heights for two different sharpening angles, but this is optional if you only want a single setup. See the next step for how I determined the heights of the tool rests.
I forgot to take a photo of them unassembled, but the guide tails epoxied to the backs of the diamond sharpening plates are 1/2" x 3/4" x 13" long. This is because the sharpening plates are 6" long, and the distance between the blade edge and the tool rest is 6-1/2". I glued a 1/8" strip of wood to the upper surface, slightly wider than the guide tail, in order to improve the finger grip when holding it.
Step 3: Assembly

To assemble the jig:
Clamp a crossbar in place, centered and flush with the end of the center rail. Drill, countersink, and install two 1-1/4" deck screws from below to secure it. Repeat for the other crossbar.
I used a carpenter's square and drew a line 1-1/4" back from the end of the center rail. I lined up the taller edge of the angled blade platform with the line, then drilled and screwed from below.
At this point you can make a simplifying choice: If you don't need or want multiple sharpening angles (i.e. all your knives are either German steel or Japanese steel), you can simply screw a single tool rest in place, drilling and screwing from below just like the angled blade platform.
Space the tool rest so that there is a 6-1/2" distance to the blade edge (see the sketch in a later step for reference).
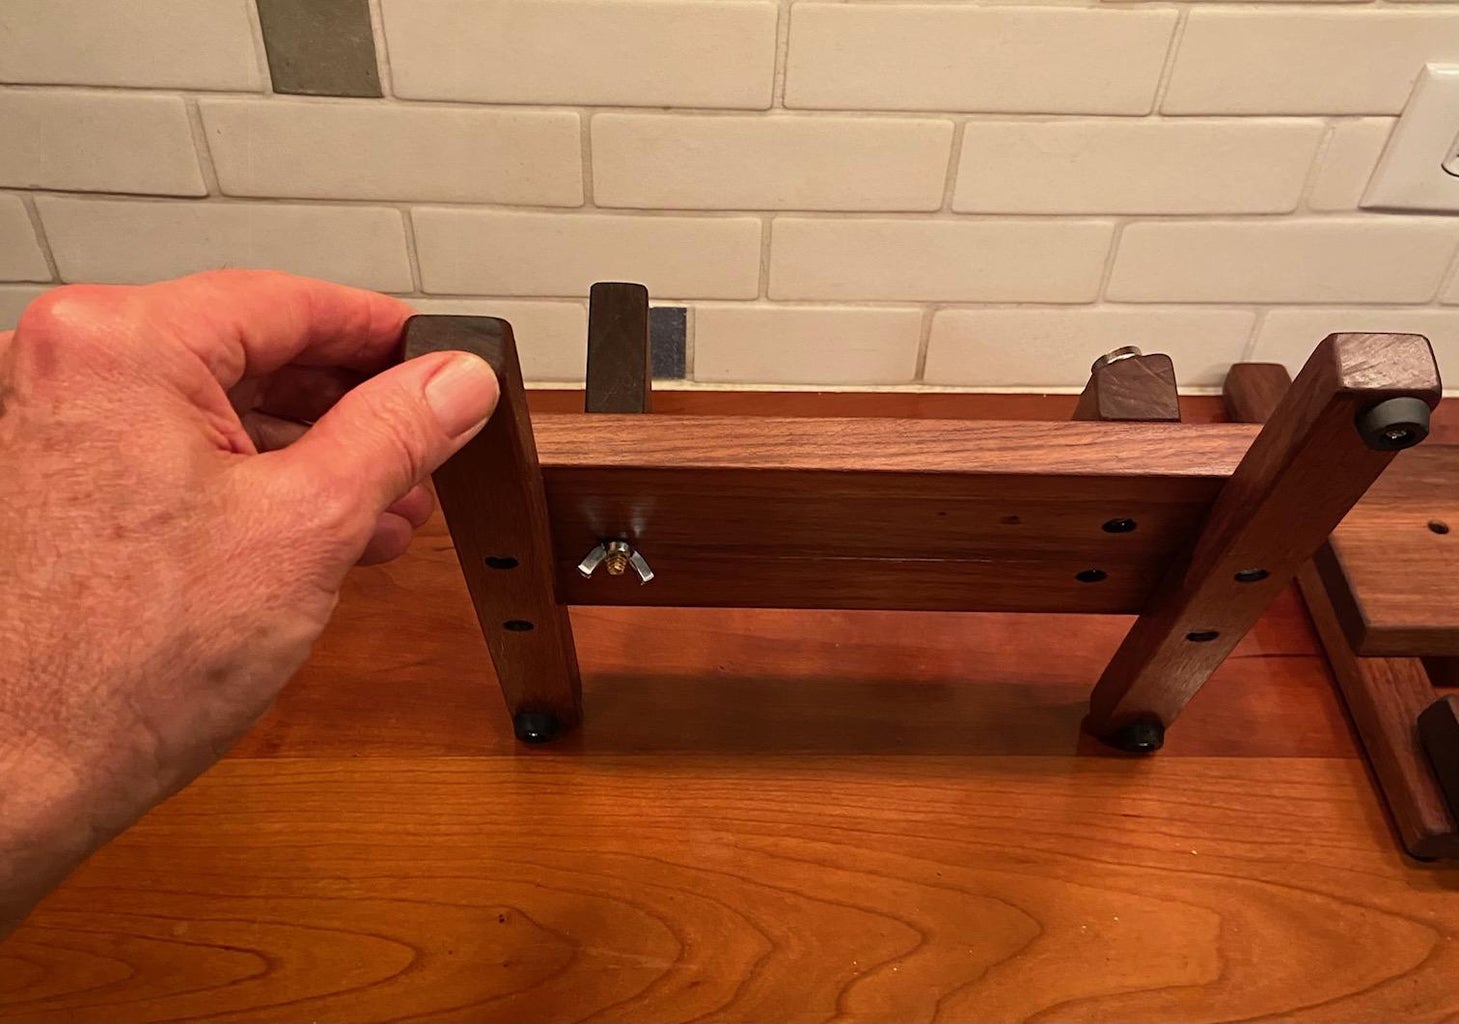
Since I am using two different heights of tool rests, mine are easily removable without tools:
- I drilled a 1/4" diameter hole, 3/4" deep, in the bottom edge of each tool rest, then epoxied a 2" brass bolt into the hole. After it cured, I cut off the bolt head with a hacksaw, which leaves it long enough to reach the wing nut under the center rail.
- After determining the 6-1/2" distance behind the blade edge, I added another 3/8" (half the thickness of the tool rest), and drilled a 1/4" hole in the center rail for mounting the tool rest.
- I used a drill press when drilling these holes so they are perpendicular to the boards. If you only have a handheld drill, then use a drill guide if possible.
Epoxy the guide tails to the backs of the diamond sharpening plates.
Screw the rubber feet under the ends of the crossbars.
Screw the magnets onto the blade platform. IMPORTANT: as I mentioned, neodymium magnets are brittle. Even being encased in the steel cup, I cracked one magnet by over-tightening the screw. Just snug the screws gently.
Once assembled, I rubbed it down with mineral oil (butcher block oil) as a simple renewable finish. If you use a drying finish (e.g. tung oil or varnish), you should apply the finish before installing the magnets.
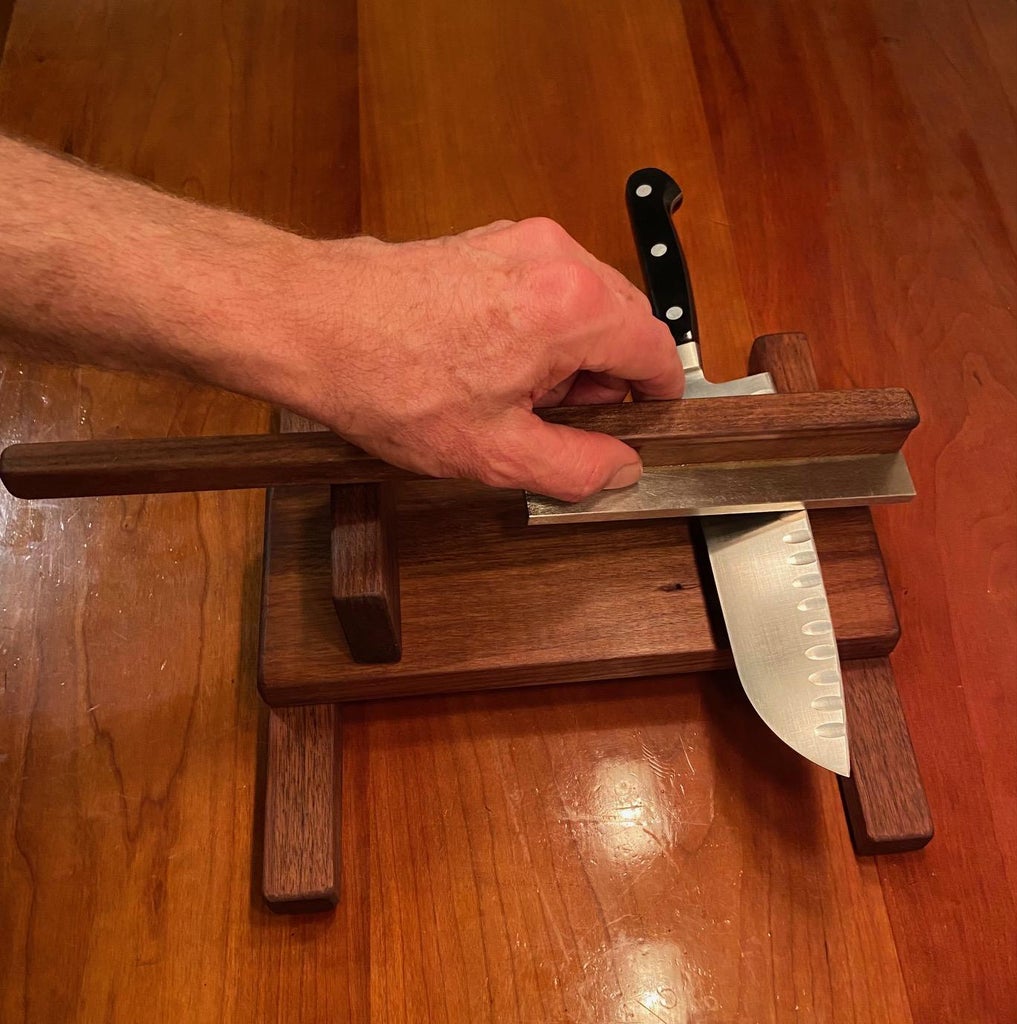
Step 4: How the Jig Controls Sharpening Angle

Here is a side view of the jig, with the shorter tool rest in place, and a knife on the blade platform. You can see that with the guide tail in contact with the tool rest, the sharpening plate's angle with the blade is fixed, allowing you to sharpen it to a crisp and consistent angle.
This view also demonstrates why I chose to make the blade platform angled on my jigs: as you work, the sharpening plate moves in a roughly horizontal plane, and there are no interference problems with the countertop. Also, it keeps the vertical dimensions of the jig small enough to store in a small kitchen drawer even without disassembly.
Step 5: Determining Sharpening Angle

Here is a sketch and my reasoning for setting the angle of the blade platform to 16 degrees, and how I then determined the heights of the tool rests:
- Notice in the sketch that the centerline of the blade's cross-section is actually tilted up a bit from the face of the magnet, to a degree that depends on the angle of the grind.
- Some knives are flat ground (full width of the blade), and for some the grind area is only a portion of the blade width.
- I took careful thickness and grind width measurements from several knives: a couple Henckels knives (an 8" chef's knife and a 7" Santoku) which are typical of forged German kitchen knives, and a couple Japanese knives (a 210mm Gyuto and a 180mm Santoku).
- I could then calculate the angle of the grind faces (i.e. what will be held against the magnets). The thin Gyuto and flat-ground Henckels Santoku are tilted up about 1.5 degrees on the magnets. The flat-ground but thicker Henckels chef's knife is tilted up about 2 degrees. And the Japanese Santoku, despite being thin, has a grind area less than half the width of the blade, tilting the blade up about 2.5 degrees on the magnet.
When the diamond sharpening plate is perfectly horizontal (i.e. parallel to the center rail), the actual effective sharpening angle therefore becomes roughly 14 degrees per side (i.e. 16 degrees for the blade platform, minus the tilt from the angled blade face). This is a good angle for the harder steel of Japanese knives.
To get this set up as precisely as possible, I did the final sizing of the tool rests last, after assembling the rest of the jig:
- I installed the angled blade platform block on the center rail, and screwed the magnets on top.
- I then placed a thin blade on top of the magnets, and measured the height of the blade edge (I align it with the edge of the platform block), which was 1-1/4".
- The lower tool rest (which holds the sharpener horizontal) is 1-1/2" high instead of also 1-1/4", because of the added 1/4" thickness of the diamond sharpening plates.
The higher tool rest is 1/2" taller, at 2" tall. The distance between the tool rest and the blade edge is 6-1/2", so the 1/2" increase in height increases the sharpening angle by 4.5 degrees, to 20.5 degrees nominal. With the reduction due to the angle of the blade face discussed above, the effective sharpening angle becomes approximately 18.5 degrees per side, appropriate for a softer steel (20 degrees per side has been common for forged German knives, but I prefer to sharpen them a bit keener than that).
Step 6: Usage


In this example I am sharpening a Henckels Santoku (German steel, hardness about 56 HRC), so I installed the taller tool rest by inserting its bolt in the hole, and tightened the wing nut underneath. It takes very little pressure to secure the tool rest in place.
To place the knife on the magnets, hold the knife at about a 45 degree angle, place its edge along the higher edge of the angled knife platform, then roll the knife back into full contact with the magnets.
NOTE: if you drag the knife around on the magnets to align it to the jig, it can scratch the face of the blade. If this is important to you, cover the magnets with a short strip of Scotch tape to prevent scratching.
Step 7: Usage

The same general technique applies whether you are sharpening freehand on a bench stone, or have flipped the process upside down by using this type of guided sharpening jig.
The most important thing is to keep the guide tail in contact with the top of the tool rest to maintain a consistent sharpening angle. The diamond plate is then stroked over the edge of the blade. There is no need to apply much pressure.
Hold the sharpening plate from behind by the guide tail, so your fingers are protected from the sharp edge of the knife. I ended up gluing a slightly wider strip on the top edge of the guide tail to improve the finger grip. It would also work to glue a short strip of sandpaper in the finger hold locations on both sides.
The first time you sharpen a knife on the jig, you need to establish the new bevel on the edge. I use the 300-grit plate for this, which cuts aggressively, and only takes a few minutes at most. Then I use the 1200-grit plate for the finish sharpening. It only takes perhaps 6 or 8 strokes to polish out the coarser scratches from the 300-grit plate. For any subsequent sharpening sessions, you already have the bevel at an angle that matches the jig, so generally you can just take a few strokes with the 1200-grit plate on each side to re-sharpen.
From reading the articles (and seeing the scanning electron microscope images!) at scienceofsharp.com, it is fairly clear that it is best to do most sharpening with "edge leading" strokes to minimize excess burr formation. When sharpening freehand (moving the knife over the stone) "edge leading" is self-explanatory, i.e. moving the blade as if you are cutting or shaving the stone. With the jig, the equivalent is to move the diamond plate towards the blade (i.e. the pulling direction in the photo above).
Finish up the sharpening with just a half dozen or so "edge trailing" strokes (the pushing direction in the photo above) with very little pressure (just the weight of the sharpening plate), flipping the blade over every couple of strokes, ending with one very light stroke per side. From the evidence at scienceofsharp.com, this direction helps make the edge keener, and if limited to a few strokes doesn't develop a large burr.
Ideally, finish by taking a few strokes on a leather or fabric strop loaded with polishing compound. This helps remove any remaining burr and improves the keenness of the blade further.
Step 8: Version 2.1

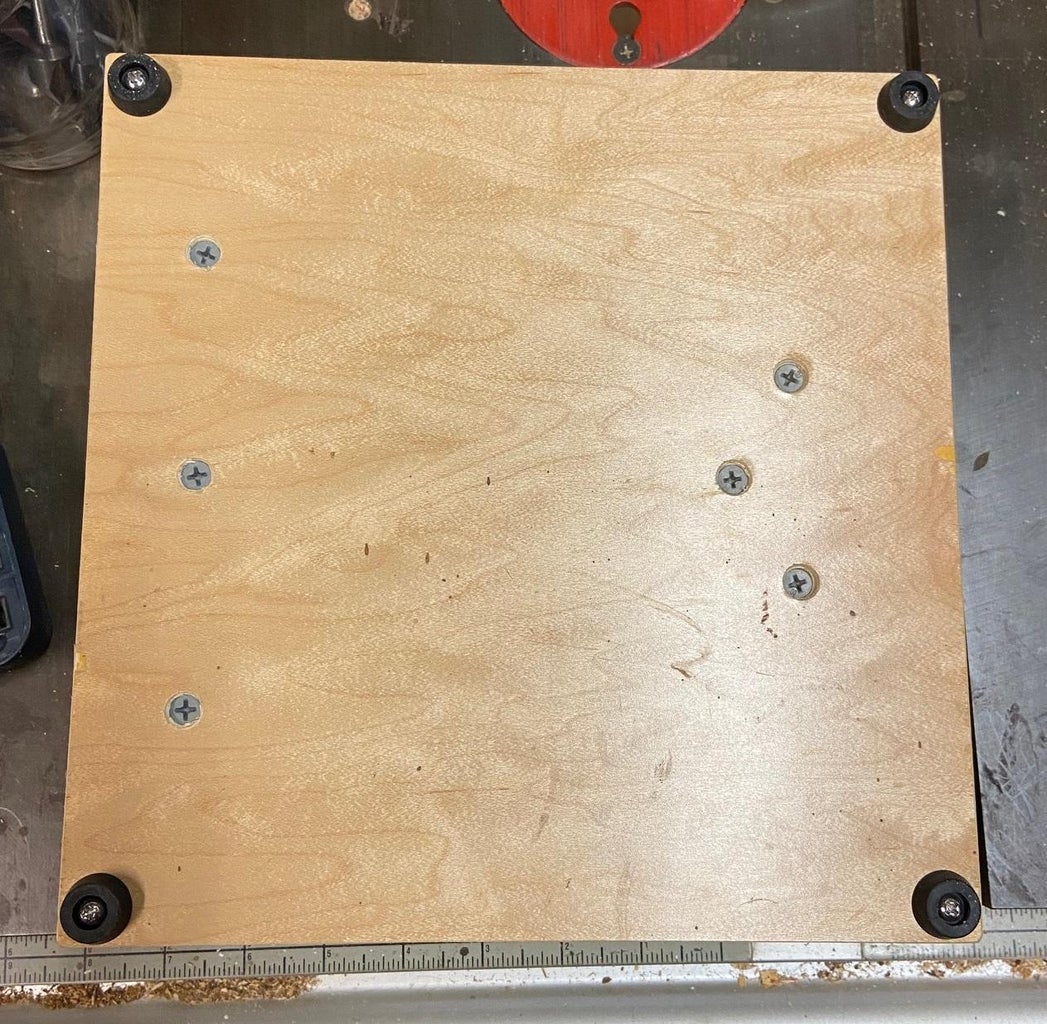

Here is another variation. If the walnut example above is the Craftsman / Mission Style version, this is the Mid-Century Modern / Danish Furniture version :-)
Exactly the same geometry, but the base is simplified to a single 10" x 10" piece of plywood. The other pieces are from a scrap of white oak floor board. Rather than gluing up two layers for the blade platform, at first I cut it from a single layer. Then I second-guessed myself (concerned about it being stable enough) and glued the second block to its base. I needn't have bothered... the tool rest is rock solid, and the blade platform would have been also without the complication. Oh well, live and learn.
With the wide plywood baseplate, I could make the tool rest much wider. Note that it is a single fixed-height tool rest this time.
Step 9: Version 2.1 Guide Tails


Rather than epoxying the guide tails onto the diamond sharpening plates, this time I used magnets.
This then gave me the opportunity to use different offsets of the guide tail to adjust the sharpening angle, despite the fixed-height tool rest. This pair of guide tails has a difference in offset (relative to the face of the plate) of 3/8", which changes the sharpening angle by about 3 degrees.
Step 10: Version 2.1 Sharpening


Here are side views, where you can easily see how the different offsets of the guide tails changes the sharpening angle.
Also, the last photo shows the advantage of the wider tool rest - you don't have to pay as much attention to keeping the tail from falling off the edge of the tool rest as you work.
Step 11: Another Variation


Andsetinn suggested eliminating the angled blade platform and simply putting the magnets at the end of the baseplate, which would certainly simplify construction. This is an option I had considered, and many other DIY variants posted online use an arrangement very similar to this.
While making the angled blade platform is the most complicated part of the construction, I personally prefer that it keeps the sharpening plates roughly horizontal in use. Nonetheless, I decided to make at least a scale sketch of the side view without an angled platform, so people can decide whether this option works for their situation. This would only work with the version using the 4" wide center rail, so that the handle of the knife hangs off to the side. With the plywood baseplate version, the knife handle would strike the baseplate, and the blade could not sit flat on the magnets.
As you can see, at a 20 degree angle the sharpening plate would just about hit the countertop at the end of its stroke. If the jig was set up for a 16 degree angle, there would be roughly 1/2" of counter clearance. To be certain to avoid marring the countertop (diamond abrasives will scratch anything), you would want to work at the edge of the counter, on top of a cutting board, or at least on top of a dish towel (dampened to prevent slipping).
Note that the tool rest must be considerably taller in this arrangement, and that the guide tail bears on a sharp corner. You'd actually have to make the tool rest about 3-1/8" tall and round the corner to a generous radius so it doesn't wear quickly.
SergiiZ4 suggested a moveable tool rest as an alternate way to adjust the sharpening angle for this arrangement. I've added a sketch showing the tool rest moving 1-3/4" to change the sharpening angle from 20 degrees to 16 degrees. You could either use a slot as SergiiZ4 suggested, or two or three holes for a few discrete settings (e.g. 20, 18, and 16 degrees). It does require that the baseplate and guide tails be about 2" longer to accommodate the change in distance.


