

Introduction: DIY Vintage Streaming Radio With a Raspberry Pi


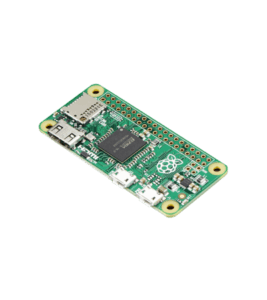
The Raspberry Pi Zero W is an incredible bite-sized linux computer that opens the door to so many cool projects and possibilities. I thought it'd be cool to make a Spotify streaming radio, but with a bit of flare. The goal is to make it look like a retro radio with working knobs that displays the album art of the song that's currently playing.
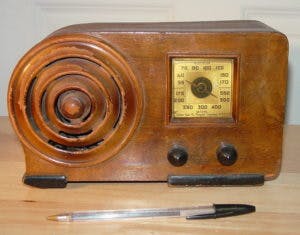
As for the radio design itself, I saw the 1938 Emerson AX212 radio, and thought that it was a very unique design, and the clock face would make a perfect location for an LCD screen. Since I don't have an AX212 on hand, I'll need to design and make one of my own. It's an ambitious goal, but let's see how close I can get.
Don't feel like reading through the entire article? Then watch the video instead!
Step 1: The Idea
The Raspberry Pi Zero W is an incredible bite-sized linux computer that opens the door to so many cool projects and possibilities. I thought it'd be cool to make a Spotify streaming radio, but with a bit of flare. The goal is to make it look like a retro radio with working knobs that displays the album art of the song that's currently playing.
As for the radio design itself, I saw the 1938 Emerson AX212 radio, and thought that it was a very unique design, and the clock face would make a perfect location for an LCD screen. Since I don't have an AX212 on hand, I'll need to design and make one of my own. It's an ambitious goal, but let's see how close I can get.
Step 2: Acquiring the Parts


It took a lot of trial, error, and epic fails to come up with this final list of parts, but here's what the final product uses:
- 1 x Raspberry Pi Zero W
- 1 x Adafruit MAX98357A Mono Amplifier
- 1 x 1.8" TFT LCD Screen
- 1 x Raspberry Pi Zero "Bonnet"
- 1 x Full Range Speaker
- 2 x Rotary Encoders
- 1 x Ultra Slim 2500mah Power Bank
- 1 x SPDT mini switch
- 1 x Wire
And here are the tools I used for this project
- Wire Cutter/Stripper
- Soldering Equipment
- 3D Printer
Step 3: Setting Up the Pi


If you've never used a Raspberry Pi before, it's basically a tiny Linux computer. So, as with all Linux computers, we need to install an Operating System. You can click here to download the Raspbian Operating System for the Raspberry Pi. You will need to burn it to a micro-SD card using the free Etcher program. Once it's on the SD Card, insert it into your Raspberry Pi along with a monitor, keyboard, mouse, and power and let it boot up.
It should boot directly to the desktop. The first thing that you want to do here is connect it to your wireless internet. To do this, click on the wireless icon in the upper right and select your wireless network to connect to. Once connected, right-click on that same wireless icon and choose "Wireless & Wired Network Settings". From there you can, set a static IP address that we can connect to later.
Finally, click on the Menu icon in the upper left and go to Preferences > Raspberry Pi Configuration. Under the "Interfaces" tab, make sure both SPI and SSH are turned on. Now you can reboot your PI. From now on, we can connect to it remotely using SSH. On Mac and Linux, just open up a terminal and type "ssh pi@your_static_ip" to connect to it. On Windows, you can use the free Putty program.
Step 4: Making It Speak
The most obvious aspect of a radio is it's ability to play music. And you would think to do this on the Pi Zero would be as simple as plugging in some speakers. But as you go to do that, you realize that the Pi Zero doesn't have an audio output jack (at least at the writing of this tutorial).
There are a few options for remedying this:
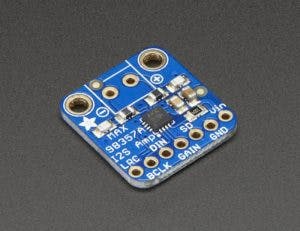
I decided to go with the pre-made amp chip, but you can go with which-ever option best works for you. The chip I settled on is the Adafruit MAX 98357. It's a mono amp chip, but I'm not intending to have stereo speakers so it'll work fine for my needs.
To keep things organized and easy to connect, I'm using the Adafruit perma-proto "bonnet" for the Pi Zero. You can use any generic proto-board that you want, but I found that this one made connecting things to the Pi very easy. Here's how you wire it up:
- Amp Vin to Raspbery Pi 5V
- Amp GND to Raspbery Pi GND
- Amp DIN to Raspbery Pi #21
- Amp BCLK to Raspbery Pi #18
- Amp LRCLK to Raspbery Pi #19
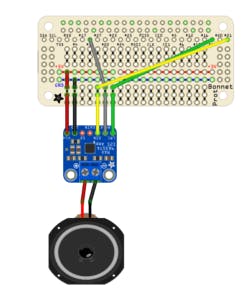
After that, you can connect a speaker to it. The type of speaker you use really depends on the quality you want. I went with a full range speaker and connected it up to the audio output of the MAX98357
Now that it's all wired up, we have to do a simple software tweak to get it running. Connect to your Pi through SSH and run this script:
curl -sS https://raw.githubusercontent.com/adafruit/Raspberry-Pi-Installer-Scripts/master/i2samp.sh | bashand then reboot the pi
sudo rebootWhen it comes back up, you can run a test audio file to see if it all works
speaker-test -c2 --test=wav -w /usr/share/sounds/alsa/Front_Center.wav
If it doesn't work or you have any issues, you can refer to this guide over on the Adafruit website.
Step 5: Adding the LCD
The key to make my streaming radio stand out and give it a unique touch is to have a screen that displays the album art of the current song that is playing. Obviously this is going to require an LCD, so I decided going with a 1.8" TFT LCD screen. You can go with a larger LCD if you want, but I'm wanting to keep this project small, so 1.8" should work fine.
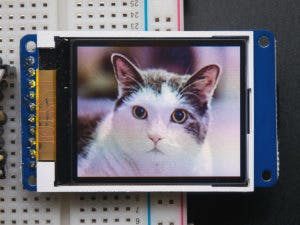
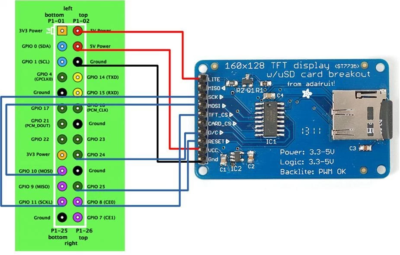
This screen as well can be powered through the Raspberry Pi GPIO pins. So now the Pi, the amp, and the LCD screen can all be powered through a single source and can be self contained. Here's a diagram of how to wire the LCD to the Pi Zero
- LITE >> 3.3v (or 5v)
- MISO >> (none)
- SCK >> GPIO 11 (SCKL)
- MOSI >> GPIO 10 (MOSI)
- TFT CS >> GPIO 8 (CE0)
- CARD CS >> (none)
- O/C >> GPIO 24
- Reset >> GPIO 25
- VCC >> 3.3v (or 5v)
- GND >> GND

To get the LCD working, you need to run a few command line scripts. So again, open up an SSH terminal and type these commands:
sudo raspi-config(go to Interface options and enable SPI)
sudo modprobe bcm2835-v4l2
sudo modprobe fbtft_device name=adafruit18then you can download an image and push it to the LCD screen
wget http://static.musictoday.com/store/bands/1346/product_medium/BGCDMS02.JPG
sudo fbi -T 2 -d /dev/fb1 -noverbose -a BGCDMS02.jpg
Step 6: Installing the Spotify Software


Now it's time to add the magic smoke! Since the goal here is to have a radio that streams Spotify, we'll need to find some software that connects to it and plays whatever song we choose. Another requirement is that we essentially want this to run in "headless" mode, which means we want the software to run automatically and startup with no user intervention.
At first, the logical solution would be to use the Spotify web API. This would allow us to write a program that can get song information, get playlists, play songs, etc. The biggest issue is, however, that the song tracks are limited to 30 seconds, so that essentially takes it off the list as a viable candidate.
After doing more research, I stumbled across Mopidy, which is a python based music playing application for the Raspberry Pi. It can play music from several sources, including locally, Google Music, Soundcloud, and of course Spotify. The only catch, however, is that it requries a Spotify Premium account.
Setting up Mopidy with the Spotify client on the raspberry Pi is super simple. Just run the command below:pip install Mopidy-SpotifyNow we'll need to edit some of the configuration settings to make sure it connects and plays correctly.
nano ~/.config/mopidy/mopidy.confScroll down to the [spotify] section and enter in your username and password.
[spotify]
enabled = true
username = your_username
password = your_password
Also, check the [mpd] section to make sure it's enabled and set to the correct host and port names, like below.
[mpd]
enabled = true
hostname = 0.0.0.0
port = 6600
password =
Then type CTRL+X to exit the nano editor, and Y to save the changes. Then reboot your Pi with
sudo rebootAfter the Pi comes back up, and you can establish another SSH session, you can start Mopidy simply by typing
mopidy
It will start up the mopidy server so that you can connect to it....but how do you connect to it?
Mopidy is also a Music Player Daemon (MPD) server. And MPD has many different clients across many different platforms. So you can download an MPD client on Windows, Mac, Linux, iOS, and Andriod and use that to control your music in Mopidy. You can use whichever one works best for you.
So with the Mopidy server running on your Pi, you should be able to enter the Pi's IP address (that we set earlier) into the settings of the MPD software to connect to it. Then you can remotely control what's playing on your Pi.
To make it so that Mopidy automatically starts up when the Raspberry Pi starts up, you first need to copy over our config settings to the mopidyctl user
sudo cp /etc/mopidyctl/mopidy.conf /etc/mopidyctl/mopidy_baksudo cp ~/.config/mopidy/mopidy.conf

/etc/mopidyctl/mopidy.conf
Then just run this command to auto-start it!
sudo systemctl enable mopidy
Step 7: Adding Physical Knob Controls
What would a radio be without physical knobs that you turn to control it? But adding custom physical controls to a computer can sometimes be tricky. First, let's decide what these knobs will do. I'd like to have two, and I want one that can control the volume and one that can power the Pi on and off (although that can be tricky in itself).
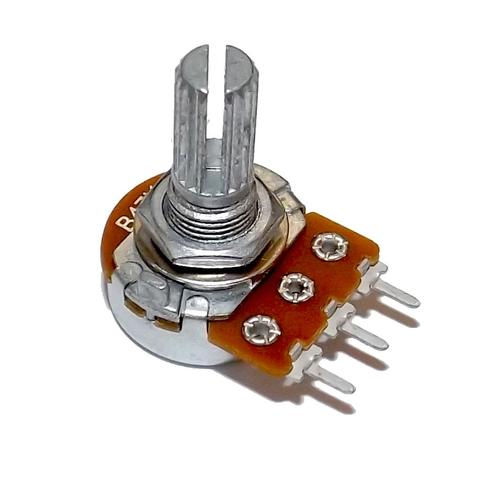
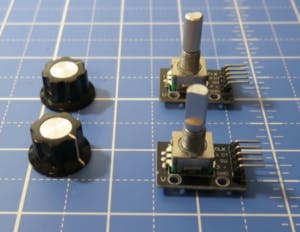
My first thought was to grab a couple of potentiometers and control the Pi with them. But potentiometers are analog controls, which means we'd need some type of extra converter (ex. Arduino) to convert the analog signal to digital. Then I stumbled across a better option: rotary encoders, which are very similar, except the output is digital. There are even rotary encoders that also act as a push-button as well. So let's see how we can use these to make our controls
Step 8: Power Controls
As I mentioned before, adding a physical shutdown/power up switch for the Raspberry Pi can be tricky. If we simply added a switch between the Pi and a power supply, this will essentially cut all power to the Pi while it's running, which can cause damage to the software and hardware of the Pi. So a better way would be to add a button that sends the Pi the shutdown command to power it down. Then we can use that switch to kill the power once it's been safely shutdown.
With that in mind, I found this great guide on gilyes.com for adding a shutdown/reset button on the Raspberry pi. The guide and code is for use with a push-button, and luckily the rotary encoders I purchased also have a push-button function. So instead of turning the knob to turn it off/on, you have to push the knob. But hey, it works and keeps the aesthetic. Here's how to connect it up:
- GND >> GND
- SW >> GPIO 3 (SCL)
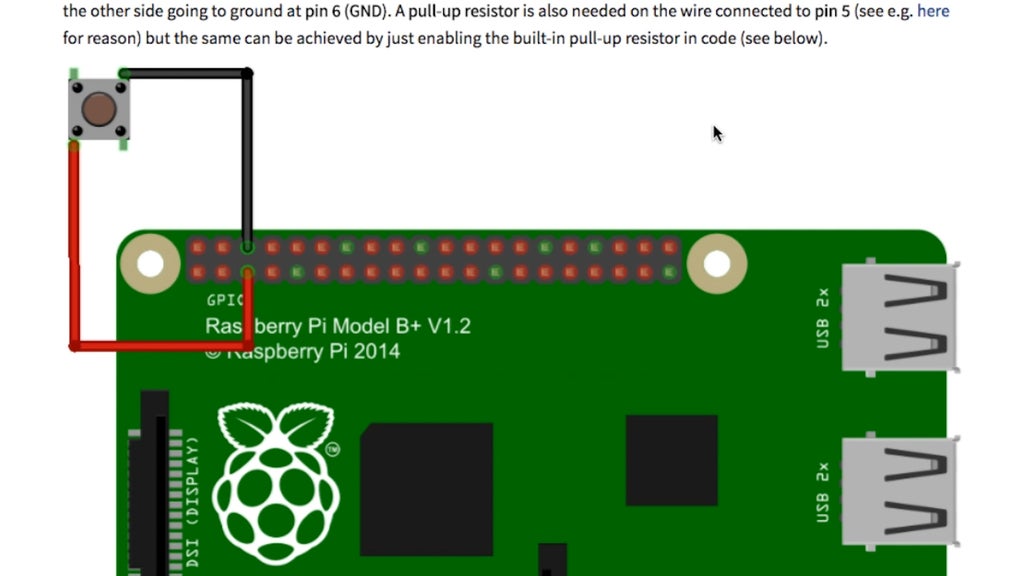
Download the Fritzing diagram here
With the encoder connected, the last thing to do is add a little script and set it to start whenever the computer starts up. Start by making a scripts directory:
mkdir scripts
Then clone the pi-shutdown script to your raspberry pi and move it to our scripts folder.
git clone https://github.com/gilyes/pi-shutdown.git
cd pi-shutdown
sudo mv pishutdown.py scripts/pishutdown.py
Next, create a new "systemd" service called "pishutdown.service"
sudo nano /etc/systemd/system/pishutdown.service
And put this in the new files contents:
[Service]
ExecStart=/usr/bin/python /home/pi/scripts/pishutdown.py
WorkingDirectory=/home/pi/scripts/
Restart=always
StandardOutput=syslog
StandardError=syslog
SyslogIdentifier=pishutdown
User=root
Group=root

[Install]
WantedBy=multi-user.target
Now we can enable the service by typing this:
sudo systemctl enable pishutdown.service
and then starting the service will keep it running even after a reboot:
sudo systemctl start pishutdown.service
sudo reboot
After the reboot, you should be able to press the encoder button quickly to restart the Pi, and then hold it down for 5 seconds or more to shut it down. If you want to start it back up, just press the button again.
Step 9: Volume Control
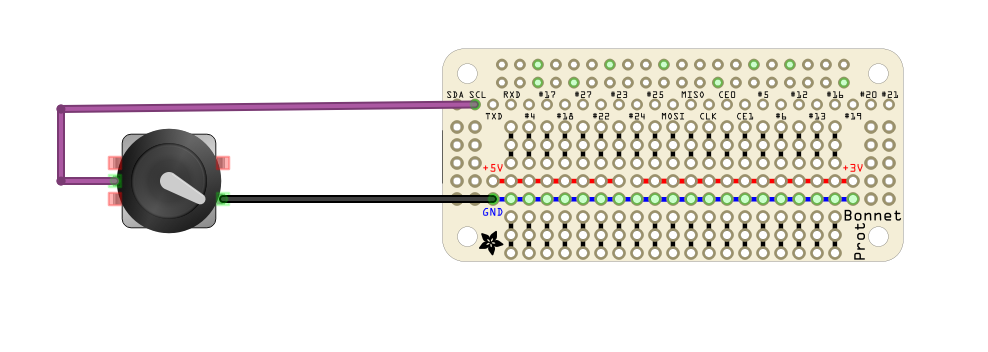
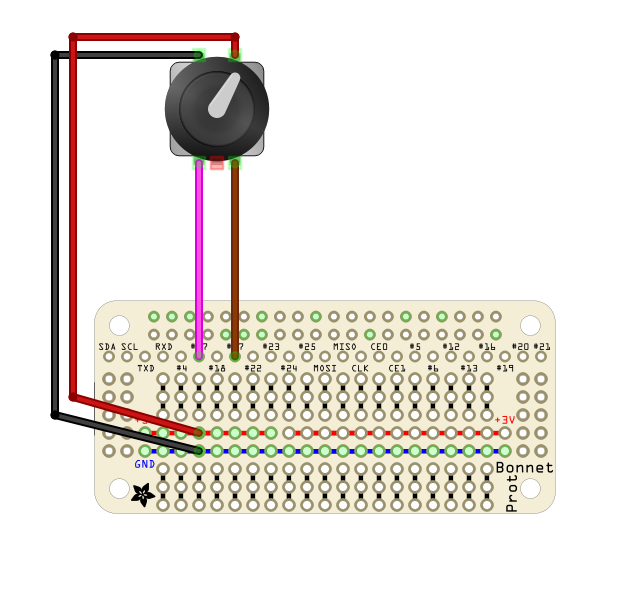
One knob down, one more to go! Time to tackle the volume knob. Using another rotary encoder, I was able to find this guide on modmypi.com for letting it control the volume on the Pi. I changed the guide a little to fit my design more (pin 18 was already being used), so here's how I connected it up:
- GND >> GND
- + >> 3.3v
- DT >> GPIO 27
- CLK >> GPIO 17
Download Fritzing diagram here
And now for the code that makes it work (adapted from the ModMyPi code). You can also view it online at my Github page.
cd ~
git clone https://github.com/gigafide/raspberrypi_spotify_radio.git
cd raspberrypi_spotify_radio
mv volume.py scripts/volume.py
Then, like before, let's create a new service for it so that it automatically boots with Raspbian.
sudo nano /etc/systemd/system/volume_control.service
And put this in the new files contents:
[Service]
ExecStart=/usr/bin/python /home/pi/scripts/volume.py
WorkingDirectory=/home/pi/scripts/
Restart=always
StandardOutput=syslog
StandardError=syslog
SyslogIdentifier=volume_control
User=root
Group=root

[Install]
WantedBy=multi-user.target
Now we can enable the service by typing this:
sudo systemctl enable volume_control.service
and then starting the service will keep it running even after a reboot:
sudo systemctl start volume_control.service <br>sudo reboot
To test it out, launch your favorite MPD client and start some music playing. Then use the encoder knob to adjust it!
Step 10: Creating the Cover Art Software
pip install python-mpd2In it's library you can use calls like
MPDClient.currentsong()['artist']to get the artist name, and
MPDClient.currentsong()['artist']to get the album name. Also, we will need to install the python "urllib" so that we can retrieve images from a URL.
pip install urllib2And with that, I was able to combine those libraries to create this script on github: https://github.com/gigafide/raspberrypi_spotify_radio/blob/master/cover-art.py If you've already downloaded the volume control script in the previous step, then you already have a copy of my cover-art.py script on your Pi. So let's set it to start on boot.
cd~
cd raspberrypi_spotify_radio
mv volume.py scripts/volume.py
Then, like before, let's create a new service for it so that it automatically boots with Raspbian.
sudo nano /etc/systemd/system/coverart.serviceAnd put this in the new files contents:
[Service]
ExecStart=/usr/bin/python /home/pi/scripts/cover-art.py
WorkingDirectory=/home/pi/scripts/
 Restart=always
StandardOutput=syslog
StandardError=syslog
SyslogIdentifier=coverart
User=root
Group=root
[Install]
WantedBy=multi-user.target
Now we can enable the service by typing this:
sudo systemctl enable coverart.serviceand then starting the service will keep it running even after a reboot:
sudo systemctl start coverart.service
sudo reboot
Now whenever you play a song on the Pi, it should download the album art and display it on the screen!
Step 11: Powering It All Up


The great thing about the Raspberry Pi is that it uses very little power. It can easily be run by using a power bank that's normally used to charge cell phones. I found a 2500 maH power bank on Amazon. And the first thing I did was remove the casing leaving just the battery and the charging board. I then de-soldered the USB cable and added a slide switch, so that it can easily cut the power to the Pi. Finally, I extended the leads between the battery and the charging board so that it could fit better in the casing (which will get to in the last step).
Step 12: 3D Printing the Case


Finally it's time for the fun stuff (not that it hasn't been fun up to this part)! To give this project the "vintage radio" asthetic, we need to make a nice looking case. If you have an old vintage radio laying around, your welcome to shove all these components into it and resurrect it as a streaming radio, but in my case, I needed to make my own. Browsing online for inspiration, I found this cool looking Emerson AX-212.
With this as my muse, I opened up Tinkercad and designed a 3D model that mimics the design, but is scaled to fit the Raspberry Pi, LCD, Speaker, and all the other components (I took a ton of measurements). Then it was just a matter of downloading it as an STL file and 3D printing it. To give it a more Antique look, I spray painted it with a "hammered metal" textured spray paint.
Then it was just a matter of fitting in all the different components. Finally, it's time to flip the switch to turn it on, connect to it with your favorite MPD client, and let the music play!

Participated in the
Internet of Things Contest 2017

Participated in the
Invention Challenge 2017

Participated in the
Power Supply Contest


