

Introduction: ESP-NOW Remote Control


Universal remote control for small vehicles or robots, using the ESP-NOW-protocol, which is similar to the low-power 2.4GHz wireless connectivity.
Up, down, right, left, button.
Small, simple, with control LED.
Basic knowledge for Arduino IDE is required.
ESP-NOW Remote mini
Supplies

ESP32 or ESP8266
Joystick (5 pins)
5V power supply
optional: 1 micro LED + 150 Ohm resistor
buck-boost converter 3.3V + LiPo battery
housing (wood, plastic, cardboard ...)
cables, soldering iron, Arduino IDE
If you want to use the tiny ESP32-C3, this instructable will help you.
Step 1: Hardware: Transmitter
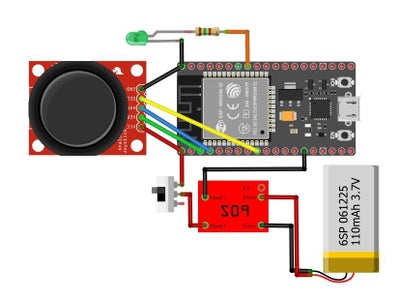
In the basic configuration, all you have to do is connect the pins of the joystick to the ESP32 or ESP8266 correctly (see illustration).
An LED, a switch and a converter for the LiPo battery are optional.
- Joystick -- microcontroler
- GND --> GND
- 5V --> 3.3V
- x --> SP
- y --> SN
- SW(itch) > G25
For the battery I used a buck-boost converter that changes the voltages from 1.8V - 5V to 3.3V.
The easy way:
Instead of using a battery, simply connect the ESP to a power bank with a USB cable.
Step 2: Software
For signal transmission, we use ESP-NOW, a protocol that works on a WiFi basis, but without registration, therefore faster and with a greater range. Only the MAC address of the addressee must be known to pair the devices.
A great description of ESP-NOW can be found at:
https://randomnerdtutorials.com/esp-now-esp32-arduino-ide/
Many thanks to Sara Santos and Rui Santos!
Transmitter
The microcontroller (transmitter) detects the movements of the joystick and transmits the signal via Wifi to a device with a specific MAC address. It receives a confirmation of receipt from the receiver, and the LED on the remote control lights up as a check.
Receiver (see Step 3)
The receiver sends an acknowledgement of receipt as soon as a signal arrives. Further processing takes place in this second microcontroler.
Attachments

Step 3: Prepare the Receiver
Now you can set up another ESP8266 / ESP32 (for example in a toy car) as receiver. Don't forget to match the MAC address of the transmitter and receiver.
Attachments
Step 4: Software Upload
Basic knowledge for Arduino IDE is required.
Download Arduino IDE for free at https://www.arduino.cc/
Step 5: Case
A housing for the remote control depends very much on which microcontroller and which power source you use. Solid cardboard or plastic plates will protect the electronics properly.
If you are also using an ESP32 D1 and a small LiPo battery, I will be happy to share the 3D print files with you.
Attachments


Participated in the
Battery-Powered Contest

![Tim's Mechanical Spider Leg [LU9685-20CU]](https://content.instructables.com/FFB/5R4I/LVKZ6G6R/FFB5R4ILVKZ6G6R.png?auto=webp&crop=1.2%3A1&frame=1&width=306)


