

Introduction: Electric Diddley Bow Bass


One of the easier ways to create a stringed musical instrument, is to make a Diddley Bow.
There are no strict rules as to how it is has to be, creativity is allowed to be the boss.
Any way you can take what you have and assemble it, will give you many hours of fun and joy.
Step 1: What I Had to Work With

You need a few things,
a guitar string,
a neck, I had a curtain rod,
a tuner,
a body, I had a box that had contained exotic fruits from Christmas and some plywood,
a bridge, I had a nut and a bolt,
a nut, I used a ring bolt,
a Piezo and a 1/4" jack since I wanted it to be electric.
Step 2: Fit the Neck and Body


To get a body that could surround the neck, I planned to glue my box to the plywood.
Since the box did not have exact dimensions, or was entirely straight, I measured it many places and drew straight lines on the plywood where I wanted the box to be.
I started by cutting the plywood to be slightly larger than the box.
Then I could use my favorite tool, I think it is called a Japanese rasp, it is very effective in removing material.
Then a turn with the flat side of a wooden file, to get straight edges.
I then measured the inside height of the box to get the size of the rod that would fit inside the box.
I left some space between the lid and the rod, which I came to slightly regret and altered later as knowledge was gained.
Then the rod was cut by splitting it with a hand saw, leaving the height of the rod I planned to fit it the box.
I left a good length of the rod outside the box, for attaching the string, planning to cut it to length later.
Placing the rod on the plywood, measuring to get it centered, I drew a line on each side to mark where it should be mounted.
These lines was then used to add marks to the lid, where I wanted the rod to enter and leave the box.
I used a small hack saw to make the first cut in the box, to prevent it from splitting further than where the rod goes.
The height of the rod was used to mark where the edge of the rod would go.
This left some material left of the end wall of the box, so it will not break too easy.
Drilling a few holes removed most of the excess material, and I used a knife to remove most of the rest.
The round side of the wood file was perfect to finish the notch in the box, to fit the rods curve.
Two wood screws was added to fasten the rod to the plywood.
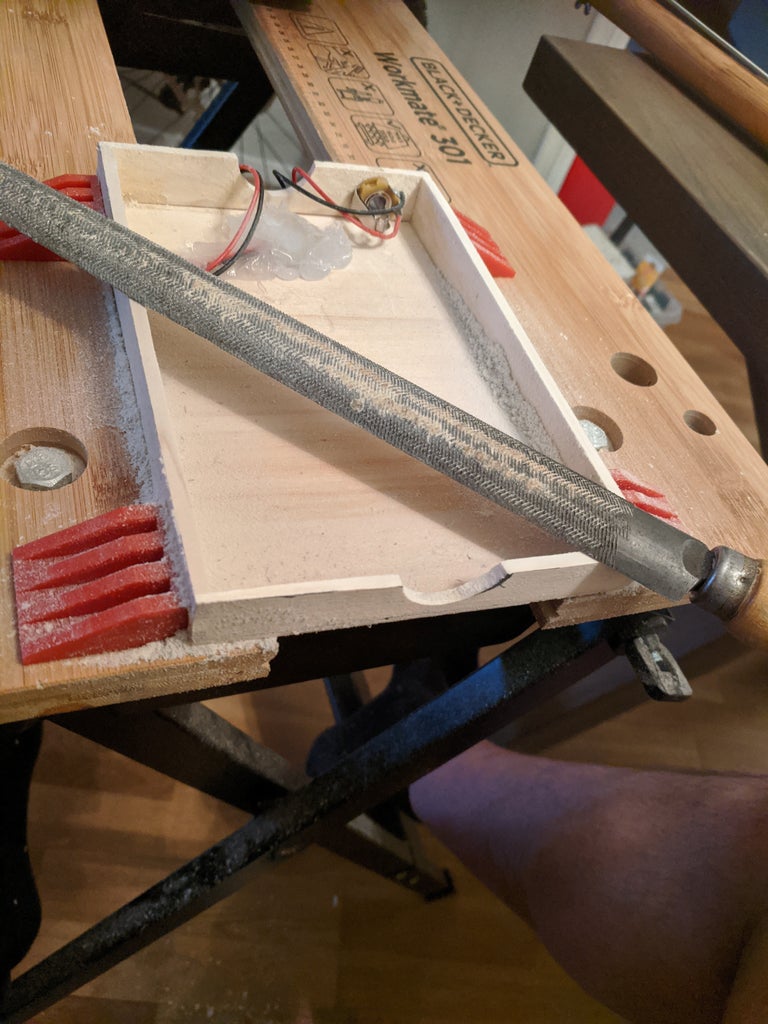
Step 3: Electronics


I had a Piezo with wires pre-soldered to them, so all I had to do was to solder the wires to the jack.
The sleeve is negative and the inner connector is positive.
I had a stereo jack, so I just soldered one of the lugs, since I will be using a mono plug.
A third hand is very helpful, to hold everything steady when soldering.
I drilled a hole in the lower back short end box, to get the least tension on the external wire.
Then I added a good layer of hot glue in the back end of the lid, and pressed the Piezo into it, making sure it was all covered, as well as 5mm on all sides.
More hot glue on top of the Piezo to fill the entire gap up to where the rod will be.
Since I had made the notches on both the sides of the lid, I could use the cut out bit of the rod to press down into the hot glue, making it the exact shape that would fit the rod.
I placed a layer of plastic between the hot glue and the rod cutout, to avoid gluing it all together.
Step 4: Mounting the String


Now is when I should have had the knowledge gained later.
The position of the bridge, to get the best sound, is directly above the Piezo.
Not too far from where it is in the picture, only slightly further in on the box.
I tried to measure the angle the string will have to be able to fasten it by threading it though a hole in the rod.
I soon realized that that would create quite a strain on the rod where the string bends, so I decided to add a hose clamp to support the string.
I should have made the decision before I drilled the hole for the string, then I would have drilled it slightly closer to the box.
I used a small part of the cutout bit of the rod to make the hose clamp fit the easiest, doubling as a holder for a washer I added, to make the end of the hole as solid as possible.
Since the string I had was the beefy B-string of a 5 string bass, the scale length is pretty much decided by the string.
It should have the full thickness passed the nut, but not into the tuner.
I added the nut where I thought it to be appropriate, when the string is tuned.
The string needs to have an angle from the nut to the tuner, so I laid the tuner on the side of the rod, eyeing where I thought it appropriate to mount.
The rod was then cut at the angle I had envisioned.
The tuner has a range of head thicknesses it supports, so I made a parallel cut on the back side, before drilling a hole in the head, I could slide the tuner through.
Now, nothing really mounted finally yet, it is time for a sound check.
The string is tightened, holding the bridge in place, until it has a nice solid twangy sound.
Connect it to the amplifier, and lo and behold, it sounds good.
Happiness and optimism rules the room for a while.
Step 5: Optimization


Intoxicated by the sound of the bass, I forgot to check if everything was as optimal or even properly positioned.
The first piece of useful knowledge gained, was that the height of the box over the rod sooner or later will make the string buzz against the box.
I my case this happened from about where the 12th fret would be.
The box needed to be lowered in the front end.
Lowering it 5mm made it buzz at the 19th fret, still not enough.
Lowering it so the lid touches the rod, made it possible to play 24 frets without buzz, this is how it should have been designed in the first place.
I taped the wires to the lid, to avoid harming them when filing the box down.
When I felt that the notch started to reach the minimum material left of the side wall, I removed material from the rod in stead.
Fiddling with it a bit made me realize the string height was higher than I would prefer, making the string a bit hard to press down to the neck.
I replaced the bridge with a smaller nut and bolt, and lowered the nut into the neck until it was approximately 1 mm above the neck.
Step 6: Gluing It All Up and Branding It
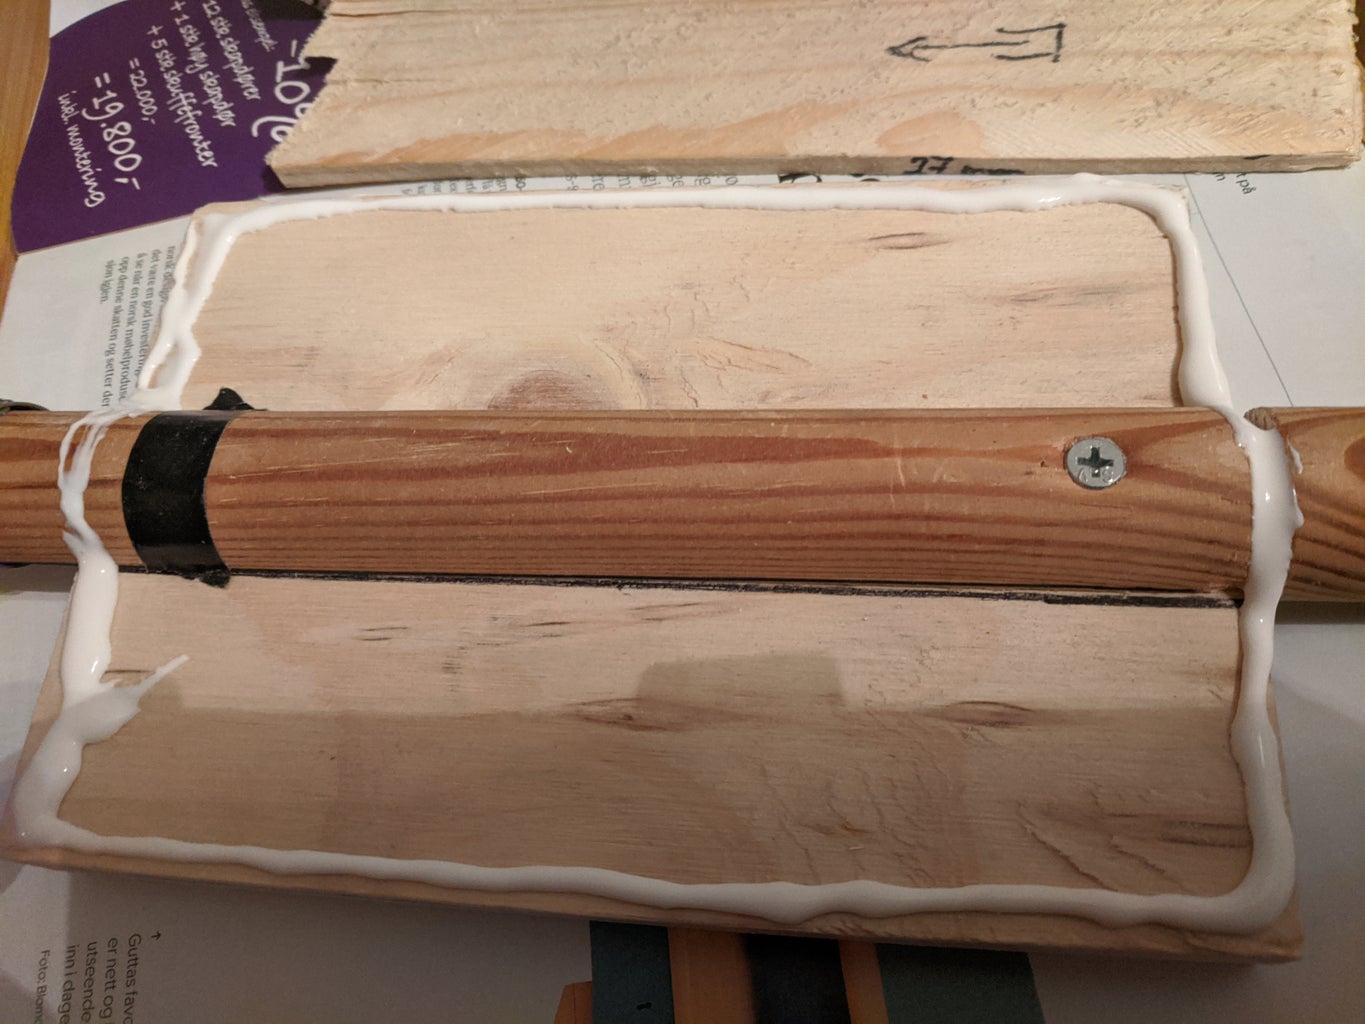


Deciding it all was as good as I could reasonably expect, I glued the box to the rest.
I added a piece of electrical tape over the screw placed near the Piezo, to make sure it will not be able to create a short.
Some scrap wood between the box and the clamps, avoided the clamps leaving marks on the guitar.
A guitar deserves a name and number.
I name my guitars after the place I grew up, a place with a lot of musical history.
I use my soldering iron with a thin pointy tip to burn marks into the wood.
Step 7: Fretless Frets


Since I do not know how to play a guitar, I wanted to add some help in finding the notes.
I do not want frets, I like the way you unhindered can create sliding sounds with the round neck.
But I would like fret marks.
Again, I could have checked the position of the notes with the string in tune, before marking them on the neck.
I assumed a 86cm scale length, pushed the bridge all the way back on the box, and used a fret calculator to give the exact location of all the frets.
I marked 24 fret positions on the neck, and used a hose clamp to guide the pen all around the neck.
Happy about the end result, I plugged the guitar into the amp, and silence emerged where there had been beefy bass notes.
After later repositioning the bridge to its optimal place, learning about the utter importance of this, all the fret marks were now way off.
This allowed me to add the smooth sanded finish the guitar deserve, the one I had been to lazy to do in the first place.
I now checked all the notes position on the neck, before attempting to make any marks again.
This time I used the other bass guitar I have made, to verify the notes position.
I added zip ties to the fret locations.
I started with frets 3, 5, 7, 9 and 12, since they are the main ones in the first octave.
I then added fret 2, 4 and 11, to be able to play a scale, and listen to the notes.
Then I did the same with fret 15, 17, 19, 21 and 24, making the notes sound in tune.
I now added a mark for all the fret positions I had verified, marking the main ones with one or two dots.
I used a needle to press down the zip ties lock, allowing me to slide them open, reusable for another time.
Now it sounds good, I can easily press the string down on the neck at positions I can see.
It is time to go to the terrace, measuring the neighbors acceptance level to funky bass sounds/intolerable noise.


