

Introduction: Getting Started With the Epilog Laser Cutter


The Epilog Laser can cut or etch many materials.

Step 1: Approved Materials for the Epilog Laser Cutter
Banned Materials
- PVC
- Thick Lexan
- ABS
- HDPE
- Polypropylene
- Fiberglass and Carbon Fiber
IF YOU ARE WORKING AT PIER 9, ALWAYS CONSULT THE CHART BEFORE CUTTING OR ETCHING ANY MATERIAL ON THE LASER.
See shop staff if material is not listed.
Materials are banned due to do potential fires or the release of toxic gases when heated.
If you are working from another studio or workshop, refer to the tool's instruction manual to see if your desired material is suitable for tool use.
Step 2: Safety

Step 3: Ventilation & Optics
Good ventilation helps keep the optics clean.


VENTILATION & EXHAUST
If you are working from another studio or workshop, consult Shop Staff for proper operation of the ventilation system.
- The vent system must be on for all laser work. At Pier 9, the control is to the left of the power washing station.
- The fan status light must be lit.
- To start the fan, press the black fan start button.
- Keep the button down until the green light comes on.
- Wait for the display to reach a value between -1.40 and -1.70.

BLAST GATES
- At Pier 9, each laser has a blast gate that must be open
while in use.
- In case of fire, close the blast gate to stop the ventilation system from bringing fresh air to the fire.
- Pull to open.
- Push to close.
OPTICS
Inspect the optics before using the laser.
Put on nitrile gloves before inspecting the optics.

Inspect the mirror
- Loosen the thumb screw.
- Remove the mirror, and inspect.
- If the mirror is dirty, wipe it with a cotton swab dipped in the correct cleaner.
- Return the mirror to its holder.
- Gently snug the thumbscrew.
Inspect the lens
- Unscrew the two screws of the lens assembly (attached to the X axis).
- Inspect the lens for smudges.
- If smudged, find a member of Shop Staff to clean the lens. Do not attempt on your own.
- Reinstall the lens assembly into the carriage and snugging the two screws.
Note: See Instructable:Pier 9 Guide: Cleaning the Epilog Lens for more information.
Step 4: Using the Control Panel
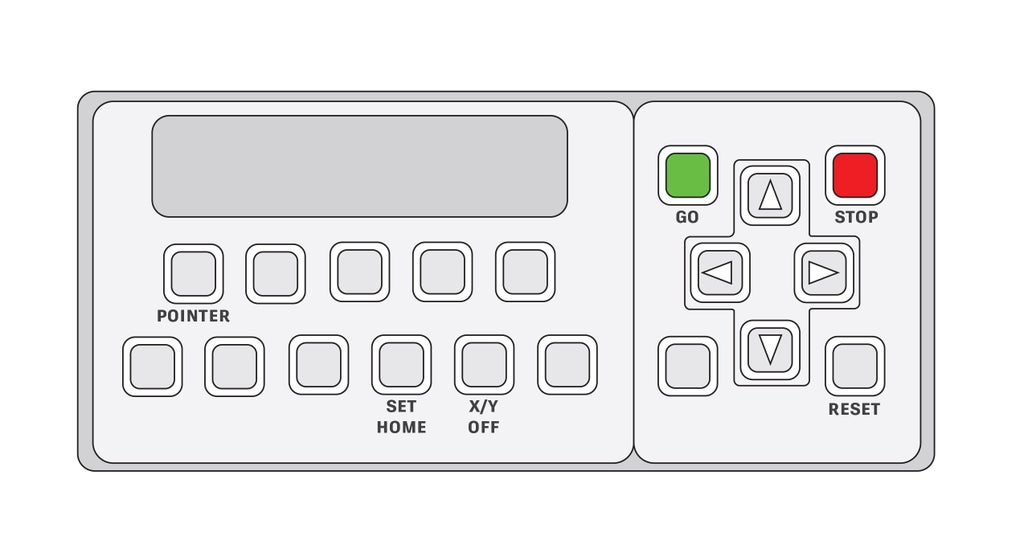
BUTTONS NEEDED FOR BASIC USE
GO - starts the laser job.
- Resumes a job paused with the STOP button.
- Answers “yes” to questions on the display.
STOP - pauses the laser job at the end of the current line.
- Answers “no” to questions on the display.
- Arrows (up, down, left, and right) - used to navigate menus.
RESET - Resets the current operation.
- Sends the laser home, or to user defined home.
- Exits current mode.
POINTER - turns on the red dot (non-cutting) laser.
- This shows where the cutting laser is pointing.
SET HOME - allows you to move the gantry and set user defined home.
- Use X/Y Off to disable the gantry motor and move to the desired location first.
X/Y OFF - allows moving the laser carriage by hand.
- Press X/Y Off.
- Press the green GO button to confirm, and release the gantry motors.
- The laser cutter is a precision machine; be gentle when moving the gantry.
STOP pauses the job at the end of the line.
- To instantly stop the cutting laser, lift the
lid.
- The gantry will continue to move.
- To instantly shut off the machine, press the E-stop.


