

Introduction: Guitar With Built in Amp and Speaker


When I used to live in London, I used to go down Charing Cross rd a lot to visit all the music stores along the street. In one of the stores I spied a guitar which I thought was super cool. It had a built in amp and speaker so you could just turn it on and you’re ready to go. The guy I was hangin’ out with told me not to waste my money as they sounded terrible. Ever since then I wanted to get my hands on one but haven’t crossed paths with another – till now…
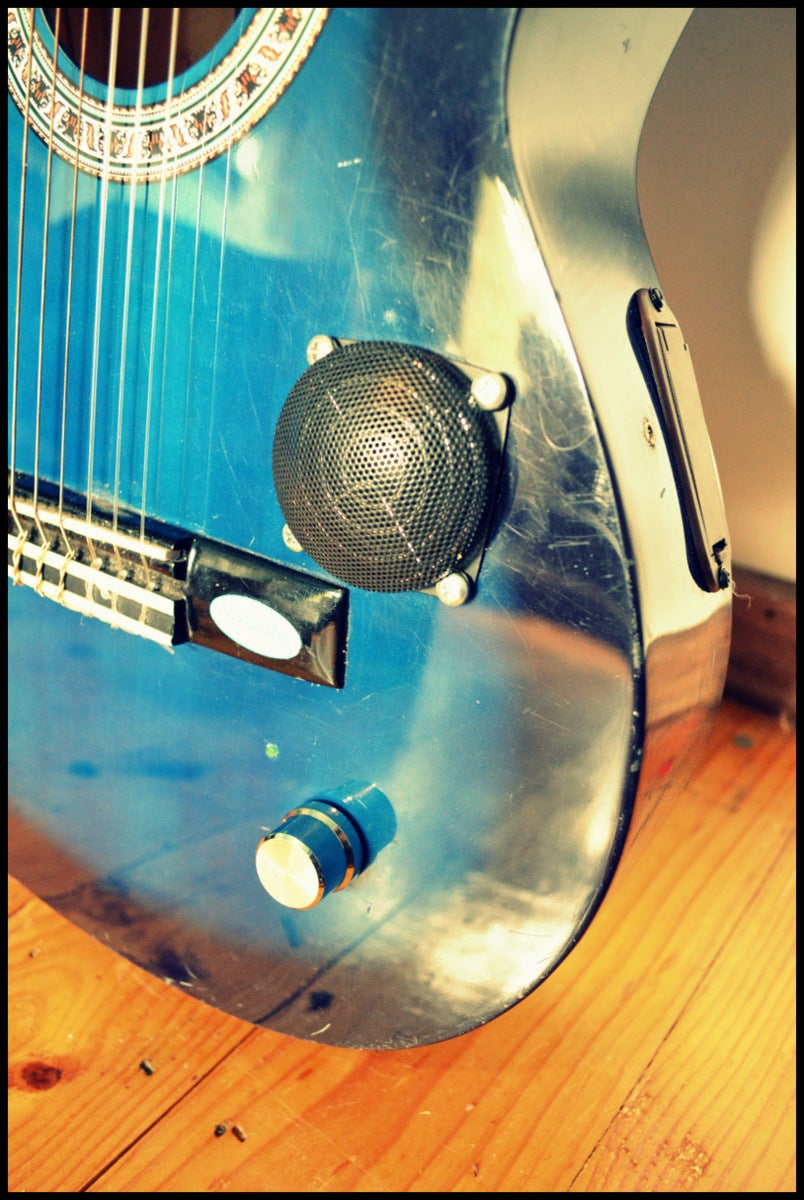
It’s not as sweet as the one in Charing Cross but it’d definitely a guitar with a built in amp and speaker.
As I like to build on the cheap whenever I can, I decided to hack a PC speaker and turn this into my amp. Some of you might have noticed that this is the same speaker that I used in my last ible’, “Hack a PC Speaker into a Guitar Amp” and that’s because it is! I decided to re-use the speaker again and modified it so I could attach a Piezo pick-up to it. The other benefit to using the PC speaker is I can also play music through it and play along at the same time. Good way to learn a song.
You could always just buy a mini amp kit and use this which is something I might try in another guitar I have. The guitar I used in this mod is a nylon string travel guitar (3/4 length). I guess I didn’t want to use my other guitar as it as some sentimental value attached to it and I didn’t want to take the chance of destroying it.
Overall I’m really happy with how this ible’ turned out. I didn’t destroy the guitar, it sounds great (more like a steel sting now then a nylon), and it also looks pretty damn cool as well.
Step 1: Things to Gather


Parts:
1. Guitar – Don’t use something expensive, I’d hate to be the cause of a major guitar failure.
2. PC Speaker – eBay. You could also just use a mini amp kit which you can also get from eBay. I just went with the PC speaker as I wanted to re-use something that was going to be thrown away anyhow (got it down the tip)
3. Piezo pick-up – eBay
4. Wires
5. 9v batter holder – eBay
6. 9v battery
7. 9v Battery connector – eBay
8. 3.5mm Female jack - eBay. So you can also play music through the speaker
Tools
1. Drill
2. Hole saw bit (for the speaker so the size will depend on the size of the speaker you are using)
3. Dremel
4. Superglue
5. The usual screwdrivers, spanners etc
6. Soldering iron
7. Plyers
Step 2: Check Out Your Speaker


There are a tonne of these computer speakers made. Chances are you probably don't have the same one as me. No big deal, it's not about the type you have , it's about what's inside that counts. The speakers in most cases come in pairs, one will usually just be a speaker in a outer case and the other will contain the amp. The one your interested in is the one with the amp which will have the volume and probably the on/off switch. Maybe your also been blessed with bass and treble switches too. The more the merrier as this will give you the ability to get some interesting sounds out of your amp
Most of these PC speakers I'd have to admit are pretty damn ugly, but as a practice amp, they work a treat.
Step 3: Break Open the PC Speaker


Steps:
1. Un-screw the speaker case and remove the cover. Be careful not to break anything inside. On this particular speaker, the front was held on with screws, the rest was glued together. I had to get my hands inside the hole and pry apart. Luckily it came apart pretty easily.
2. Keep the screws and any parts - you'll probably need them later.
3. Un-screw the speaker and circuit board and remove everything from the body of the speaker. These things are pretty simple so you shouldn't have any issue pulling one apart
Step 4: Check the Circuit Board Out


There are 3 things that you need to find on the circuit board to enable you to hack it. Even though no 2 boards are alike, you shouldn't have any real issues locating the parts below.
Power
First thing to do is to locate where the power is connected to the circuit board. This is pretty easy as you can either just follow the wires from the power adapter to the circuit board or if it is battery powered, you can just use the battery terminals. Usually positive has a red wire, while the negative has a black. Mine even said "power" on the board.
Jack (audio input) - for playing music through the speaker
All of these speakers should have a male jack that is used to plug into the computer. Every set of headphones you own has one of these at the end of the wire.
Volume Potentiometer- for playing guitar through the speaker
This is easy to locate as it's just the volume knob. What you need to find however is the solder points on the potentionmeter. This is all you really need to find on the circuit board - now lets get started on wiring-up the power
Step 5: The First Cut Is the Deepest.


Place the circuit board and speaker aside for the moment – it’s time to make some cuts into the guitar.
Steps:
1. Work out where you want to add the speaker, volume and 9v battery holder. Remember, you need to be able to stick your hand into the guitar through the sound hole and place the parts inside the guitar.
2. Once you have decided on where to place everything, it’s time to start cutting. For the speaker I used a hole saw bit and made the hole so the speaker could fit.
3. Next decide where the volume knob is to be located and drill a small hole for the pot (volume knob) to come through. My PC speaker amp also had an LED indicator so I also drilled a small hole for this as well
4. Lastly you will need to make a rectangle hole for the 9V battery holder. I used my dremel and cut out the hole with a small grinding wheel. Worked really well
Step 6: Jumping Jack Flash - Attach the Female Jack to the Amp


Most if not all of these computer speakers also have an male audio input jack. This is usually a wire that comes out of the speaker. You will need to cut off the male jack end and attach a female one.
Steps:
1. Turn on the amp (make sure that you have a battery in place).
2. Plug one end of the 3.5mm audio cable (everyone should have one of these lying around) into your iPhone or whatever you use for music. Start to play music from your iPhone.
3. Next grab the Female socket connector and plug the other end of the audio cable into it.
4. Next, touch the wire ends that used to be attached to the input jack to the solder points on the Female Socket Connector. If your don't hear any music, try a different combination until you hear music some out of the speaker.
5. Solder on the wires to the solder points on the Female Socket Connector.
Step 7: Adding the Piezo Pick-up


The Piezo needs to be attached to the circuit board. First though you will need to attach it to the guitar.
Steps:
1. I found that if the piezo pick-up is too close to the circuit board, you’ll get feedback. So try and place the pick-up away from the circuit board as much as possible. Drill a small hole for the wire from the Piezo to go through the guitar
2. Next you need to solder the wires to the circuit board. Remember how we found the solder points on the Potentiometer, well you will need to utilize one of these along with a negative solder pad.
3. First, solder on one of the wires from the piezo pick-up to a negative solder pad. You can always just solder it onto the battery negative terminal if you want to.
4. Next, add some power to the amp, turn it on and strum the guitar. Make sure that the pick-up is sitting on the guitar.
5. Touch the other wire from the pick-up to one f the solder points on the volume knob. Did you hear anything from the speaker? If not, try another until you do hear the guitar in the speaker. Once you have located the correct solder point, solder the wire from the pick-up to it.
Step 8: Power to the People - Powering Up You Amp


Most of these types of amps will work off different voltage amounts. For example, the amp that I am using used to run off 12v mains. I now run it off 9v and it works fine. 9v’s is the easiest ti use as you can buy 9v battery holders that are made for guitars.
Steps:
1. Secure the 9v battery holder onto the guitar with the screws provided
2. Next, if necessary, solder on a couple of longer wires from the positive/ negative solder points on the circuit board.
3. Next, push the wires from the circuit board through the battery holder and solder on a 9v battery terminal. Make sure you use some heat-shrink tubing to cover up any naked wires.
4. Lastly, plug a battery in and test that the amp works.
Step 9: Blinded by the Light - Extend the LED Wires


If your amp has an LED indicator, you will need to expend the wires to you can have the LED showing.
Steps:
1. De-solder or cut the LED away from the circuit board. Make sure you take note of the polarity of the LED.
2. Solder a couple of wires to the LED legs and solder the other ends to the solder pads on the circuit board
Step 10: Sounds of Silence (hopefully Not!) - the Speaker


The speaker wires will need to be extended and I also added a cover to the speaker using the original mesh and a computer fan cover
Steps:
Extending the wires
1. De solder the wires from the speaker
2. Attach some longer wires to the original ones and add heat shrink if necessary
3. Now push the wires through the speaker hole in the guitar and re-solder onto the speaker
Making a Cover
1. If you just wanted to use the computer grill, then that would work fine as well. Just bend the mounts until they match-up to the holes in the speaker.
2. To add the mesh as well, first bend the little tabs on the mesh so they are straight.
3. Next, place the mesh over the computer grill and secure in place with the mesh tabs.
4. Once it is secure, make sure that the mounts on the grill align with the holes on the speaker. Bend where necessary.
Step 11: Attach the Amp to the Guitar


This can be a little tricky as you need to get your hand into the sound hole and get the amp into place. Just take your time and you’ll eventually get it. You’ll also need to get the LED on indicator in place as well.
Steps:
1. Carefully push the amp inside the guitar with the volume knob pointing up
2. Manoeuvre the amp through the guitar until you are at the hole you made for the volume potentiometer to go through. Push it through the hole and secure it in place with the original nut.
3. Next, find the LED indicator and push this through the hole you made for it. Add a little superglue to hold it in place
Step 12: Putting the Rest Together


Now you have the amp in place, the next thing to do is to attach the rest of the parts.
Steps:
1. Secure the speaker into place by using some self-tapping screws. If you decided to add a cover to the speaker, then secure this too.
2. If you haven’t already, drill a hole for the female input socket (for audio) and push the socket through the hole. Add some superglue to keep it in place
Time to test.
Add a battery, turn on the amp to full and tap on your guitar (your stings won’t be strung yet). Hopefully you are hearing the guitar through the speaker. If so, then you know that all your wiring etc is good and your good to start to attach the strings again. If you are getting feedback, try moving the pick-up slightly until you find a place where you don’t get feedback. Secure in place.
Done!

Runner Up in the
Green Electronics Contest 2016

Runner Up in the
Make Noise Challenge


![Tim's Mechanical Spider Leg [LU9685-20CU]](https://content.instructables.com/FFB/5R4I/LVKZ6G6R/FFB5R4ILVKZ6G6R.png?auto=webp&crop=1.2%3A1&frame=1&width=306)


