

Introduction: How to Build a Big DC Motor From Cardboard and Paper That Works


Hi Readers! Are you a fan of DIY projects and looking for a fun activity for a weekend? In this instructable, i will show you how to build a big DC motor using cardboard, inspired by a small DVD motor.
With some basic materials and tools, you can create a working motor that spins, all while learning about the principles of electromagnetism and engineering. So, let's start with the basics of small dc motors.
Small toy DC motors are low-cost, compact electric motors commonly used in small toys and gadgets, such as pocket mp3 players, DVD players, remote-controlled cars, and drones.
These motors typically run on low-voltage DC power, ranging from 1.5V to 6V, and can be powered by batteries or other DC power sources.
They come in different sizes and configurations but almost every motor works on the same principle..
Small toy DC motors are often simply brushed motors, with a permanent magnet rotor(fixed inside motor frame/body) and a wound coil stator(shaft/spinning part).
As we are building a bigger version all the materials used in building small motors might be difficult to available or unavailable, As a solution for this problem and to ensure a 100% working project i will be using a 775 dc motor that will be placed in the core of this big dc motor.
These were some of the basics of dc motor, now let us head on to building this project
Supplies


Most of the supplies can be found easily in your home, well here is the list of everything you need to build this
- Cardboard
- Small dc motor(for reference)
- A4 sheet of paper
- Ruler
- Scissors
- Compass and pencil
- Ice cream sticks
- 775 dc motor
- Small length of wire
- Battery holder and speed controller
- Old selfie stick
- Paper glue and super glue
- Hot glue
- White and silver paint and a paintbrush
- Cutting mat
Step 1: Making Template for Frame


To make the bigger version resemble almost exactly to the small motor i have made a template considering the measurements from the small dc motor
If you are building this project I would highly recommend using the exact same DVD motor that I am using so that you can catch up on all the instructions that we will be discussing forward in this instructable
You can directly use the template that I will be using in making this project.
Here is how i made this template
The radius of my motor measured around 1.1cm, i have neglected .1 and considered 1cm
So now the top and bottom frame of the motor will be 20cm in diameter
Just mark 10cm on the compass and draw a circle on a white sheet of paper
Tip: You can find the center of the paper by folding the paper twice(either sideways) you can follow the steps i have given in the image if you still did not get it!
Draw the circle on this obtained midpoint, After this to allow the shaft to pass through draw another 1cm radius on the same point this becomes our top frame.
End of this step we have a top frame ready, now for bottom just draw a 10cm radius circle
Step 2: Cutting Top and Bottom Frame


Once we have the paper template ready we can transfer them to cardboard.
You can either stick the paper on the cardboard or directly draw this template on the cardboard you can follow whichever method you find easier.
Once we have the top and bottom frames drawn on the cardboard you can cut them using the scissors, to cut the center part of the top frame will using a hobby cutter.
Note that you have to cut the edges properly without leaving any small over or undercut.
If you do so it might affect later at the time of adding side frames.
Step 3: Inside Support for Dc Motor


I will be using the standard 775 motors in this project, you can directly use my template if you are using the same model.
These are the motor supports that will be used inside the frame/casing.
I have made 2 different types of rings, This is because the dc motor base has some extended shaft part so to keep it hovering from the ground I have made these 2 different sets of rings
One ring is less in size compared to the body of the motor and the other one being fit to the size of a dc motor
Make 3 rings each totaling 6 rings at the end of this step
3x2.2cm will fit the frame
3x2cm will be the base
To make the passage for motor wires cut a small groove in one of the 3x2cm frame
Step 4: Building Inner Supports


As I mentioned earlier using hot glue stick this groove part first to the base of the bottom frame.
After you have one ring glued repeat the same step for the other 2 rings.
We used up the 3x2cm rings, now we are left with 3x2.2cm rings.
Glue these rings one over the other to have a set of 3 combined into one.
Step 5: Fixing DC Motor


775 motors do not come with pre-soldered wires, so make sure you solder good-quality wires to their slots.
Any loose connection will lead to problems later, don't forget to test the dc motor after soldering the wires.
If everything is good first insert the larger-sized rings into the wires and insert the wires into the grooves on the base part.
Use hot glue to stick the bases, now for the top part add a decent amount of hot glue to the frame and stick it to the top part of the motor.
Now we end up with the motor partially ready
Step 6: Side Supports


For finishing the sides of the motor body I will be using a popsicle stick or as some call candy sticks.
To begin with cut the top curved part of the ice cream sticks, Measure 7.5 CM on the ruler, and mark the spot.
Cut the Marked area using Scissors you might need to prepare a couple of these(around 10 to 15 is better)
Note that when you cut the ice cream sticks all the stick lengths should be the same.
Step 7: Sides


Place these sticks in between the top and bottom frame, use a drop of super Glue to fix them together, and Repeat the same steps until you finally think that the motor sides are strong enough
For the sides, I recommend using chart paper as we know the thickness of chart paper is much greater than the A4 sheet.
Cut an 8 cm strip of chart paper and cover the sides starting from one corner and slowly start adding drops of super glue until you couple everything to the top and bottom frame.
Step 8: Painting


I will be using silver-colored paint to finish the outer body of this DC motor.
To make the silver color much more highlighting, at first, I will be painting the cardboard with white fabric paint after it is dry you can again apply a coat of silver paint.
You can paint multiple coats for a better finish.
Since we are painting on a much larger area it will use some of your time, so paint with patience
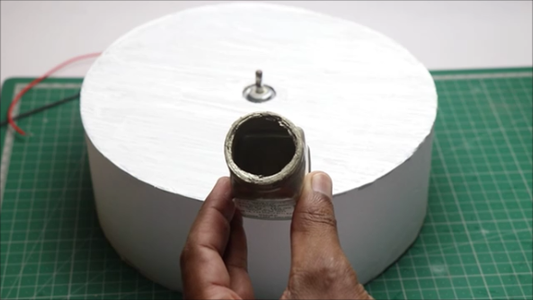
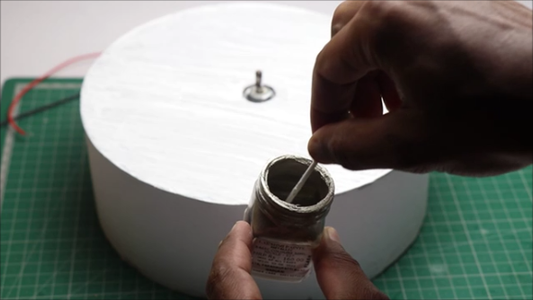
Step 9: Finishing


After the paint is completely dry we can add a shaft to the motor shaft.
I will be using A tube of aluminum that I found on my selfie stick but the problem was these didn't fit the shaft of the motor directly.
so to make it fit properly I added a piece of paper rolled and later inserted it into the shaft of the 775 DC motor.
I recommend using hot glue on the parts of the motor.
After the parts are dry we can test the motor.
If we connect 7.4v i.e. from 2 lithium-ion batteries the shaft spins very fast causing a vibration so to keep everything under control we will be using a dc motor speed controller.
Connect batteries to speed control boards followed by connecting wires of the dc motor, Slowly increase the speed of the motor shaft and watch your motor spinning.
Note that as we are using a very long shaft some vibration will usually be there, you can ignore this.
This was all about building this project, hope you liked the idea, if you any questions those can be asked in comments.
Step 10: Working Video
Hope you enjoyed reading my project, Don't miss to watch this video that shows step-by-step video instructions and also includes a working video.
You can watch this video in any browser by just copying and pasting this link https://youtu.be/tGB5HSPGnEk
Thanks for your interest, Have a great day

Participated in the
Big and Small Contest


![Tim's Mechanical Spider Leg [LU9685-20CU]](https://content.instructables.com/FFB/5R4I/LVKZ6G6R/FFB5R4ILVKZ6G6R.png?auto=webp&crop=1.2%3A1&frame=1&width=306)


