

Introduction: How to Create a Gallery Wall


People seem to have very opposite views about gallery walls. Either it's "what, you just slap some frames on the wall and call it good right?" or it's "omg that's way too hard, I'll just leave my walls blank thankyouverymuch" In reality, it's somewhere in between. It's 100% totally doable by anybody, but it does require a little work and planning. We break it down into 6 steps. We'll go over everything here, but if you're a more visual learner I think the video will be the most useful!
For this project you'll need:
Step 1: Measure Wall Space


There are a lot of tips and tricks to hang gallery walls, but we think the easiest way is to measure your wall, mark out those measurements on the floor, and arrange your actual frames there. So step one is measuring your wall. We measured the wall AND the space within the wall that we wanted to frames to take up.
Step 2: Sketch Frame Layout


This step is optional, but I like to have an idea of what type of frame layout I'm going to do before I start moving around actual frames on the floor. It helps to sketch out your space and any features of your wall that might affect the frame layout, like the chair rail that was on this wall.
There are LOTS of different ways you can lay out your frames, and if you have an artistic eye you can probably just wing it. But if you're not sure where to start, here are a few options.
Option 1, Bottom Aligned: The bottoms of all your frames are level with each other, and the tops are staggered. This is what we chose because then there was even spacing between the chair rail and the bottom of each frame.
Option 1, Top AND Bottom Aligned: This is harder to do because you kinda need the perfect sized frames. You could probably swing it if you just bought 1-2 frame sizes to mix in.
Option 1, Top Aligned: This is the method we normally go with. The tops of the frames form a level line and the bottoms are staggered.
Option 1, Middle Aligned: This option is the most organic looking, but it can easily come off as messy. There is an imaginary middle line drawn through your gallery wall - some frames go up from that middle line, some go down from that middle line, but the middle line is consistent.
Again, you could always just do your frames randomly (no alignment involved), but if you're looking for a starting point these are great options.
Side note, we like to keep spacing as even between frames as we can. We did 1 inch for this gallery wall, but sometimes we will go to two inches in between frames if they are large frames.
Step 3: Mark Space on Floor

Mark the space you measured earlier out on your floor. We used measuring tape to act as the bottom and mark the two ends of our space.
Step 4: Lay Out Frames

Now it's the fun part! Lay out your frames in the space you marked on the floor. We aligned the bottoms against our measuring tape, spaced the frames out evenly with an inch in between them wherever possible, and tried to strike a balance between large and small frames without being obviously symmetrical.
In the video you'll see that we arrange, and rearrange, quite a few times. It can take a few tries before you get things the way you want them.
Step 5: Measure


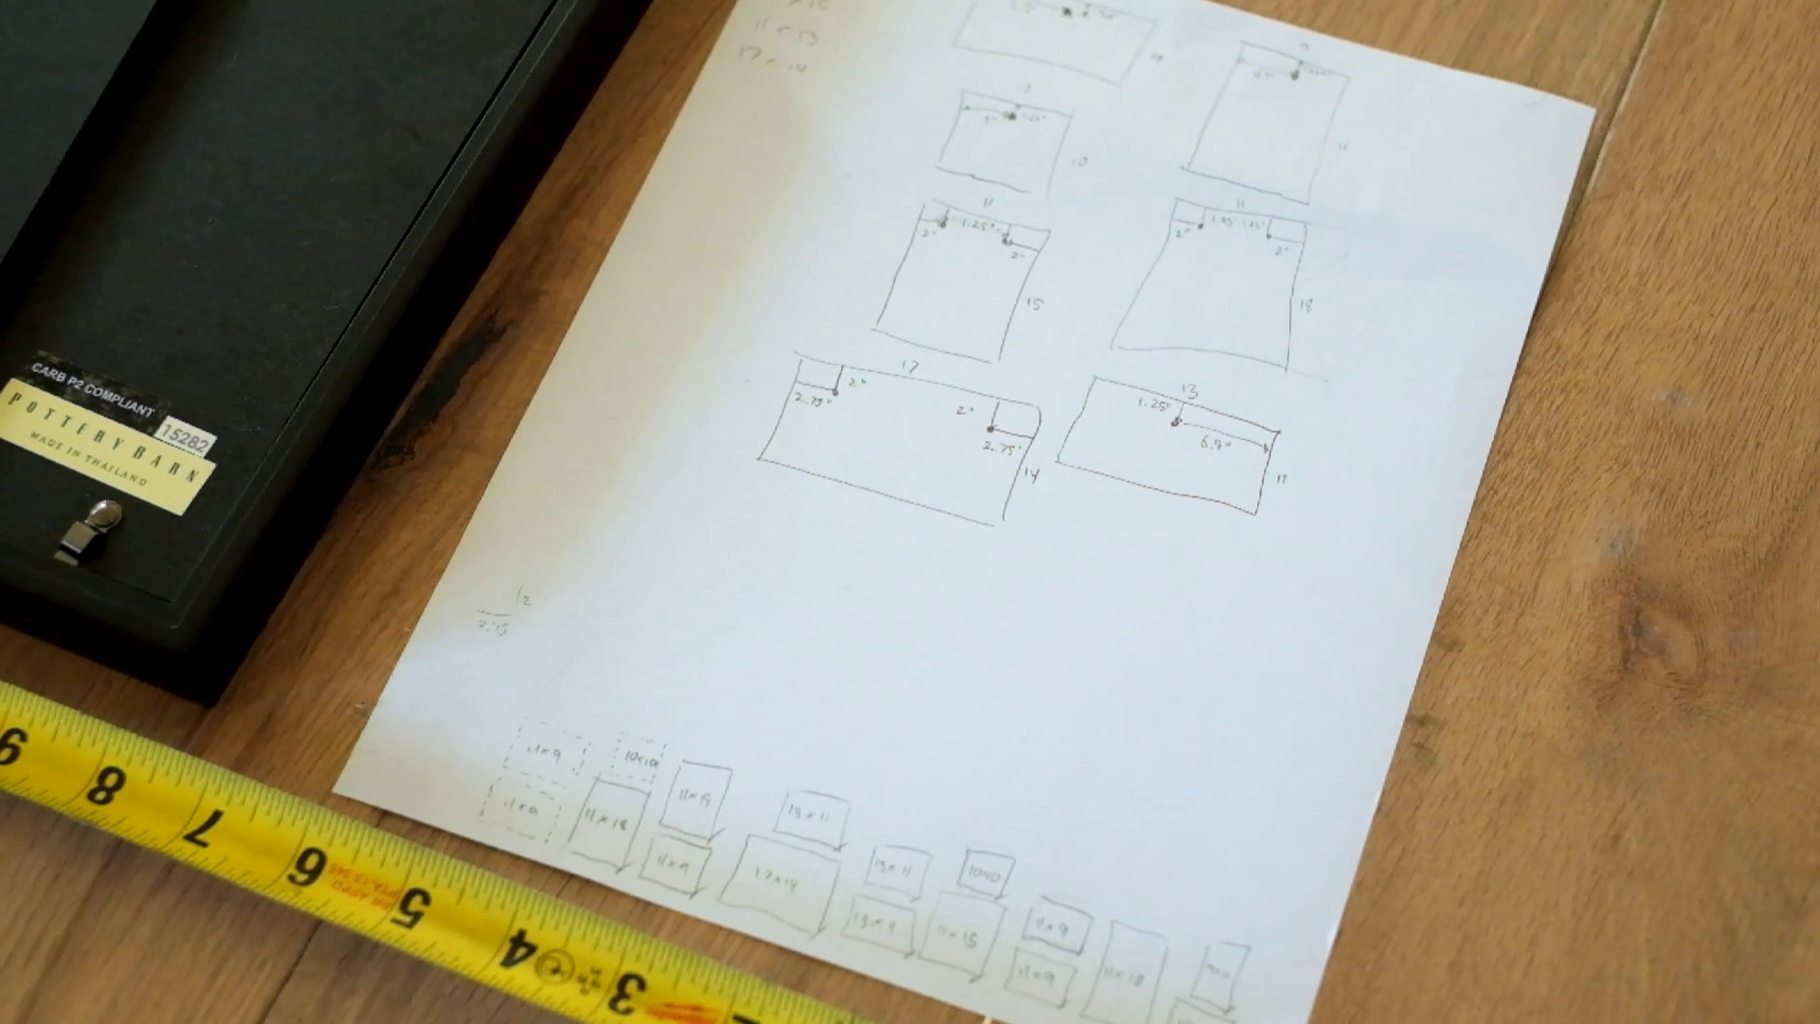
Next flip all the frames over in place. You're going to measure each frame size and where the nail needs to go for each frame. We only had a handful of different frame sizes that were repeated so we measured the size of each of those and where the nail needed to be (ie 1.5" down from the top, 5.5" in from either side).
It 100% helps to sketch out a layout of your frames and write down the measurements and where the nail goes for each frame in that layout. It might seem a little tedious, but it's going to make it WAY easier when it comes time to put holes in your wall.
Step 6: Hang Frames


Now that you have your measurements, this part is pretty easy. It helps to start with a frame that's against your alignment point (so for us, one of the bottom frames since our gallery was going to be bottom aligned). We started with the bottom right frame and worked our way to the left. Make sure you know how far in from the wall you need to start your frame so that the whole gallery is centered.
I'll go nitty gritty here for a minute. Let's say your nail needs to be 5.5" from the sides of your frame, and 7" from the bottom of your frame (I'm giving a bottom measurement since we are doing bottom aligned). To find where to place your nail, you'll need to add those measurements to whatever distance away you want to be from edge of the wall (and in our case, chair rail). So if you want to be 8.5" from the edge of the wall and the nail is 5.5" in from the side of the frame, the nail will be 14" in from the edge of the wall. We wanted our frames to have 3" of space between them and the chair rail, so we added 3" to 7" and knew our nail needed to be 10" up from the chair rail. So we placed our first nail 14" in from the edge of the wall, and 10" up from the chair rail.
Whew! Again, this makes a little more sense seeing it in the video, so if that was confusing hopefully the video will help.
Some other tips:
After your first couple frames, you'll get to a point where you're using other frames as your reference points that your measuring from instead of things like the edge of the wall, a chair rail, or the ceiling. Make sure when doing this you add in the distance that you've determined as your spacing between frames (in our case, 1")
Also, DON'T do all your nails at once. Do one frame at a time and hang each frame as you go. That way, if you mess up, you only have to redo a single nail, not at entire wall of nail holes.
Lastly, we use simple finishing nails for this because they make small holes and are still strong enough to hold up most frames.
Step 7: Enjoy!


All done! Once you have this method figured out, you should be able to do all sorts of gallery walls, mix art and photos, do various arrangements, etc. We have 5-6 gallery walls in our house now: we're addicted!
………………………………………………………………
You can also find us at:
YouTube (all our DIY videos)
Instagram (sneak peeks @evanandkatelyn)
Patreon (if you wanna support us, but no pressure!)
Our website (includes tutorials from our pre-YouTube days)
Pinterest (stuff that inspires us)
Twitter (us, in 140 character doses)
Facebook (be our friend)
………………………………………………………………
Note: This post contains affiliate links. Thank you for supporting us!


