

Introduction: How to Make Arduino Powered Fish Feeder


Do you own a fish and wondering how to automate the task of fish feeding if yes then you are at the right place to know how you can do that.
In this instructable, I will show you how you can make your own Arduino-powered automatic fish feeder device that can take care of the hunger of the fish inside the aquarium.
The working logic is very simple here, we have the feeder mechanism attached to the shafts of the stepper motor, and when an obstacle is detected by an ultrasonic sensor the stepper motor gets activated as a result of which the feeder moves and drops grains of food inside the aquarium.
You can set various parameters like the quality of food that should be dispensed and others by altering the program.
This device can be attached to almost all types of aquariums where you have your fish pets, the size of the feeder can also be expanded depending on the requirements, This being said now let us begin with the materials required to build this feeder.
Supplies


Stepper motor
Arduino Uno/nano
Stepper motor driver
Complete Kit for Building this project is Here
Ultrasonic distance sensor
Jumper wires
Glass bottle(you can use an aquarium)
Zip ties
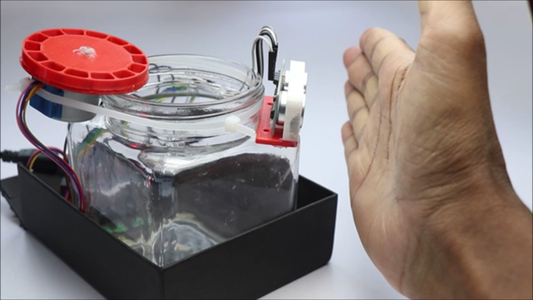
Small box to hold the glass(not needed if you are using this on an aquarium)
3D Printer and PLA filament
Arduino IDE and programming cable
Step 1: 3D Printing


The parts that will be used to dispense the food were 3d printed this was because by this we can expect no wastage that may occur due to spillage in some cases.
You can use the STL files given below, make a note that I will not be using any rafts or supports for printing these parts.
The choice of PLA filament color is left to you, in my opinion, this color looks great, You can refer to the images in the above steps to have a look at the exact settings I followed to print this model.
This design is made for 28BYJ-48 Stepper Motor and will not fit directly to other motors unless you make some modifications to the final design.
After you have the 3d printed parts we can head over to building the circuit for this hardware.


Step 2: Circuit Diagram and Programs


Here we can divide the circuit into 2 parts, The first part is the stepper motor and the other is the ultrasonic sensor part.
Connect the stepper motor to the driver and the pins of the driver to arduino as given below.
In1 to D2
In2 to D3
In3 to D4
In4 to D5
The + and - pin is connected to the 5v and GND pins of the Uno board.
The ultrasonic sensor has 4 pins, Vcc, Gnd, Trig, and Echo, Connect the pins as given below.
Vcc to 3v pin, Gnd to Gnd
Trig to D9 and Echo to D10 pin on Uno, This completes the circuit now connect the arduino to the computer via USB cable.
Open IDE and use the below program, make sure to select proper port and type of board and click on the upload button after this is done our circuitry part is complete and we can proceed further.
You also can simplify this circuit with a Simple small PCB, Complete your electronic projects in the best way from PCBWay
Why them? They have provided me with the best PCB and The quality is just amazing compared to other providers in the market
They are raining shipping discounts for assembled orders click here to get your discount offer.
Check Here for Rigid-flex Pcbs with this your circuit becomes flexible! I have added the images to this step kindly check.
A revolutionary solution that combines the best of both rigid and flexible circuitry to elevate your electronic projects to new heights.
They have good discounts on 3d printing check here to know more
With their expertise in advanced manufacturing techniques, they offer a seamless integration of rigid and flexible components, ensuring enhanced reliability, durability, and space-saving benefits
Attachments

Step 3: Adding the Stepper Feeding Mechanism


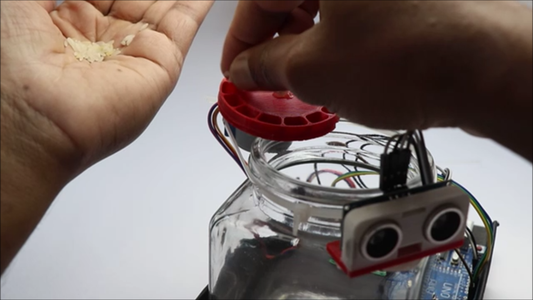
This is very easy yet the most important part, start by adding the glue to the stepper motor and place the base of 3d printed feeder part and press firmly, and hold it for some time.
When the glue is dry completely we can add the top part that has slots, This is the main part and we might need to add a tiny amount of hot glue to the joining point to ensure good strength.
Here you can place the base opposite to the area where the stepper motor has wires, This will be helpful whenever you are placing this feeder in the aquarium.
One more thing here is to make sure the gap is very small between the base and the rotating part which in another case may lead to leakage of food.
Step 4: Finishing


To make the feeder look beautiful i will use a 3d printed frame for the ultrasonic sensor, It is a press fir type of thing i connected this to the hcsr04 and you can see already how good the project looks now.
To place the stepper motor on to the aquarium i will use zip ties, Since the type of aquarium is a circle this is best way, If you are using square type i would suggest to go with clip type of holders.
Be generous with the amount of zip ties and trim of the excess ties and for the sensor i used hot glue.
The type of materials differ and hence i would recommend being flexible and choose the right thing that best suits your needs
Step 5: How to Use

Using this is not dedicated to one type, Since this is a programmable feeder you can use it in many ways but now ill tell you what outcome you can expect from our project.
I will add grains of rice to each slot here that needs to be dispensed, in your case you can add fish food, after all the slots are filled with food make sure the ultrasonic sensor is not pointed towards any obstacle.
Connect the arduino to a power source and now when you just place the hand in front of the sensor the food will be dropped inside the water so that the fish can have some food!
This was all about this project you can alter this project as per your needs, Thanks for reading.
Step 6: Working Video
Apart from written instructions it would be good if there would be a working video and tutorial showing the project making, and yes i heard it so i have made a detailed tutorial too.
Watch this video so you will not have any confusions if you are planning to build this, and also if you want to discuss something related to this project comment box is always there to connect us.


