

Introduction: Insect Collection Case and Introduction to Entomology


Entomology is the scientific study of insects which are a class of invertebrates within the arthropodphylum that have a chitinous exoskeleton, a three-part body (head, thorax and abdomen), three pairs of jointed legs, compound eyes and one pair of antennae.
I just finished my first year of biology studies. Traditionally when the summer begins all the nature related college students have field trips. This allows applying the knowledge learned during the year into real life. As you probably guessed I took an entomology practicum. At first, I was bit skeptical but it turned out to be a really fun week. We learned many different aspects of catching, preserving and determining different insects and I would like to share what I learned and just maybe someone reading this finds a new hobby!
And as there was a possibility to make personal insect collection I decided to craft my own insect collection case. Buying one was not an option because I am a massive DIY fan and the cost with shipping would have been quite a blow to my wallet. I managed to build my case with around 7 euros (compared to 30 on amazon +shipping)
I would say that this is quite a simple project but not probably one for a person who only has screwdrivers and allen keys in his/her home. Only required power tool for this build is a table saw. A miter saw is also a big help but not essential.
Stay with me as I show how I built mine insect collection case! In the end, I will also make a brief introduction to entomology.
If you like my work be sure to follow me here on Instructables or on youtube and if you are interested in my daily projects follow me on Instagram @kammsuhu
Step 1: Tools and Materials

As I said the only power tool needed for this build is a table saw. If your table saw also has miter gauge you got all you need. When not, you need a miter saw.
Here are tools that I used to build my case:
- Table saw
- Miter saw
- Belt sander ( or hand sanding)
- Brad nailer (regular hammer and nails work too!)
And materials:
- Laminated pine wood
- Thin plywood
- Glass
- Thin styrofoam
- Cork panel
- Wood glue
- Duct tape
- Stain and varnish
- Two screws and thin wire (to hang the case on the wall)
As I said it was quite cheap to build. Thin plywood for back and laminated wood for walls I already had. Decorative cork wall panels and thin styrofoam I found at my local hardware store. I was looking for really thin styrofoam and found a sheet of 5 mm thick footstep sound insulation for parquet flooring to be perfect for this. Together with 3mm thick cork it made a nice (and functioning) backing for the pins.
Step 2: The Box
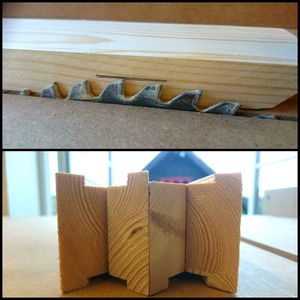


To begin with, I ripped my laminate pine board into 5 cm wide pieces. After that, I set my miter saw to 45-degree angle and cut the final length. Then I went back to the table saw to cut grooves for the back plywood and front glass.
Start off with the back as it does not need to be so precise. Set your blade height to half of your material thickness. Set your fence and slowly creep up to get the desired groove. If the plywood sits flush in the groove move up to the top side. For this, you need to know the thickness of the glass you plan to use. I went with 3 mm. Make the groove just tiny bit bigger so that the glass could slide but would still make somewhat airtight seal. This is needed because the insects smell quite badly. It also helps with preserving. On one of the sides raise the blade to make a trough cut. From there you will later slide in the glass.
To glue the sides together connect all the outside corners with duct tape. Add glue and connect the corners to form a box. The tape is enough to hold the joint firmly in place to allow the glue to dry. I also decided to try out splines. This is not necessary but it will add strength. I threw together a quick jig for that. the splines were also cut from the same pine wood. To fill any imperfections I used wood filler. Later on, I used a belt sander with 120 grit to make it all smooth. I decided to stain my case dark brown. Before I did that I glued and nailed on the back plywood.
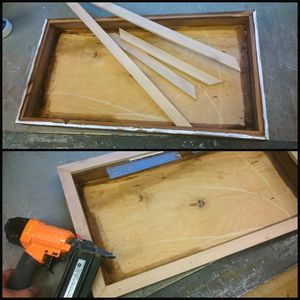
Next on I made the moldings. I ripped some alder and once again cut the desired length on the miter saw. I used glue and brad nails to attach them to the box. Make sure you do not block the groove of the glass with a nail. Regular hammer and nails would probably perform better at this task. On the side where glass slides in the mold has to have a gap under it. To do this add some glue to the ends and precisely tap in few nails. This will hold up good enough.
Step 3: Glass and Background


At first, I planned to scavenge my glass from old windows. This was not worth it! It was a big hassle. I ended up with a big pile of broken glass and few panels that had really sharp and ugly edges. I gave up and went to the computer to write few emails to professional companies. I ended up getting 4 panels for only 8.5 euros. This makes a bit over 2 euros for a panel and tons of saved nerves. I suggest you also skip the glass cutting step unless you really know what you are doing.
After gluing on the backing I finished the case with spray lacquer. I only did this to my case. On the other ones, I applied regular water based furniture lacquer. "Other cases?" you ask. Yes, I also made three cases for my colleagues.
I had a bit of a fail with gluing the backing. I am quite used to contact cement and of course, my first thought was to use this glue. To my disappointment, the glue started to eat away the styrofoam. I should have known it, but no worries - the cork panel saved my project. The glue was quite harsh as you can see from the pictures. It even managed to make some big holes. So no need to mention that you should not use it. On the other cases, I decided to try regular silicone. This worked much better. It is black because this was the only one I had at the moment.
Step 4: Introduction to Entomology


Of course, when you already have an insect collection case you also need something to put in there. For this, you need some equipment, patience and a quiet spot in nature.
I can not give you all the information on this subject but I hope it is enough to get you interested. And there is always a place called the Internet when you can get all the knowledge you need.
Collecting insects does not leave a big mark on nature since insect´s reproduction rate is very high. You can not say same about mammals for example. Still, I please you not to wantonly collect insects - 50 from one species when you only need one or two for your collection. And of course, as common sense says do not collect endangered species!
Step 5: Stuff You Will Need

Some things are essential to start off with entomology. I will list them and explain what they are used for and where you can get them.
Following list is from this site. I have edited the text quite a bit and added a few comments.
1. Insect net
Insect nets can be bought from amazon, a biological supply company or from a hobby shop. There are two basic kinds of nets — aerial nets and sweep nets. The lighter bag on an aerial net is designed to capture insects in flight or at rest. The heavier bag on a sweep net is designed to collect insects in tall grass or shrubs by sweeping or beating through the plants.
2. Killing jar
You can make your own killing jar with common household materials: wide-mouth pint, quart, or similar glass jar with a tight-fitting screw lid a cotton pad, wire, tape and parisethyl acetate (finger nail polish remover). Professional insect collectors use chloroform to kill insects. Regular people like you and me most likely do not have access to such chemicals. To substitute this one can also use nail polish remover. Another alternative is to also use a deep freezer. If you do this be sure to leave the insects in there for at least three days. You might also be tempted to use regular insecticide. Do not do this as it will leave a terrible smell to the insects and make working with them really unpleasant.
To use chloroform or parisethyl acetate take lid of a big jar, poke two holes in it and attach a cotton pad with a wire to it. Seal the holes from the top with some tape to make it airtight. Otherwise, these chemicals evaporate super fast. Pour some of the juice on the cotton pad and you are ready to go. Seal the jar lid tightly and try not to breathe in the fumes.
When it takes noticeably longer to kill specimens in your killing jar, recharge the jar by adding more juice.
3. Forceps
You risk damaging specimens whenever you handle insects by hand. Forceps minimize the damage and can be bought from a biological supply company or amazon. Tweezers can be used but are not designed to handle insects and are more likely to accidentally injure specimens than forceps.
4. Relaxing jar
It is best to pin insects soon after they die and while they are still relaxed to minimize breaking any body parts. If this is not possible, you can soften insects in a relaxing jar. A relaxing jar, like a killing jar, should have a wide mouth (to easily place and remove specimens) and a tightly fitting lid. Place an absorbent layer (such as sand, cotton, cloth, sponge) in the bottom of the jar. Saturate the material with water and add a little ethyl acetate to inhibit fungus development. Place a protective layer (such as cork, cardboard) over the absorbent material. Place insects that need to be softened on the top layer for several days until they are relaxed.
When you are planning to pin the insects soon you can also just place a moist cotton pad in a jar. We used this method and found that it kept the animals from drying.
5. Spreading board and pinning block
Spreading boards are useful for laying the wings of insects out flat and holding them in place while the specimen dries. They can be bought from a biological supply company or amazon. A pinning block can be any piece of styrofoam (styrofoam used for packing appliances in boxes, for instance). A pinning block is useful to position legs and other body parts before the insect dries. A pinning block can also be used as a mounting board by cutting a rectangular slit large enough to position an insect's body and allow the wings to lay flat. Different-sized slits are necessary for different-sized insects.Watch this fun video on how to properly pin insects
6. Insect pins and labels
Insect pins are long, slender pins made specifically for mounting insects. They are available from a biological supply company or amazon. Size #2 and #3 are the most useful for general collectors. Labels for pinned specimens should be made on relatively heavy stock paper (about 120 pound). You can purchase blank labels from a biological supply company or you can make your own with unlined index cards or heavy paper. Each label should be approximately 1/2 x 3/4 inch in size or smaller. For neatness, all labels should be close to the same size. The following information should be included on your labels: location (nearest town, county, and state), date specimen was collected (day, month, and year)and the name of the collector. If you also determine the insect you should also write the name of the insect in latin and name of the determiner. Use a permanent ink pen or pencil to write on labels. Computer printing is also acceptable. Do not use ball point ink or other nonpermanent ink that can run or smear when wet. The smaller insects that can not be pinned are glued to a white piece of paper with regular PVA glue. Later the paper is pinned with the other labels.
7. Microscope
If you are planning on determining all your insects, it is a good idea to also find yourself a microscope. The bigger insects can easily be seen with a magnifying glass but smaller ones need a microscope. And with many look alike species the only way to distinguish them is to look at the small details - for example shape of the legs. This site explains the difference between microscopes.
Step 6: How It Works


The process looks something like that:
- Find a good spot filled with insects and spend some time collecting them
- Take your treasures back and sort out the ones you want to preserve
- Place the ones you can not pin at the moment in a jar with a moist cotton pad
- Stretch butterflies and dragonflies, pin all other insects
- Determine the species using books or internet
- Label the insects
- Place insects in your collection case
- Admire your work!
Insects can be found anywhere but the best spot would probably be a field. Night catching can also be done using a white blanket and a black light or with special insect collecting bucket. This article explains various ways.
Step 7: Tips


I would also like to share some tips and tricks that I learned while being out on the field.
Tip 1: Wear long boots and long thick pants. You will never know what kind of dangerous plant or animal hides in the next brush.
Tip 2: When using aerial net make a quick whip towards an insect and then turn the net so that the little guy gets trapped inside. See the second picture. Inspect the insect through the net and do not look inside from above. Insects have the instinct to fly upwards which means you have a good chance of losing your catch. If you want to transfer the insect slip in the jar and get the insect in there. Put on the lid so that the net stays between the jar and the lid. This will numb it and you can easily take out the jar and put on the lid.
Tip 3: This is probably the most important tip. No matter how pretty the insect, do not get carried away when chasing it. This is exactly what happened to me. I saw a stunning yellow butterfly and started chasing it. I got so carried away that at one moment I lost my balance and found myself in a brush. Scratched my side lightly.
Tip 4:The butterflies and dragonflies should dry on a stretching board for at least a week. But if you are in a hurry, you can also use an oven. Just set the temperature to 60 degrees Celsius (140 degrees Fahrenheit) and let them dry for 3 hours. The wings should not move when removing the pins and they should also make dry, crispy sound.
Step 8: The End
As always, I hope I have inspired you! Go out to your workshop and build something!
Here are few videos and links on entomology
Taxonomy: An introduction to Insect Orders
Youtube playlist on entomology
Entomology 101: Study of Insects
If you like my work be sure to follow me here on Instructables or on youtube and if you are interested in my daily projects follow me on Instagram @kammsuhu

Participated in the
Outside Contest 2016

Participated in the
Summer Fun Contest 2016


