

Introduction: Iridescent Crystals Using Simple Materials


Hey guys!
In this Instructable, we’re turning ordinary rocks and aluminium foil into what looks like iridescent crystals or minerals.
All you will need is clear nail polish and water! Science will do the rest :)
The project is quite fun and could be enjoyed by kids as well. The results remind me of peacock ore / Bornite!
Supplies

- clear nail polish
- a container with water (as wide and deep as possible)
- rocks (with lots of texture) or aluminium foil
- optionally: acrylic paint
- optionally: tooth pick
I recommend good lighting as well so you can see the rainbows better
Step 1: Science!


Did you know that you can create rainbows by dripping clear nail polish into water?
This project got inspired by these Instructables about how to make iridescent paper:
https://www.instructables.com/Iridescent-Art/
https://www.instructables.com/Rainbow-Nail-Polish-Paper-Experiment-and-Craft/
The first Instructable explains the science in detail, but here is my summary:
When a drop of clear nail polish hits water, it spreads out and creates a very thin film that reflects the light on its top and its bottom surface. Those reflected light waves interfere with each other and what we see is called "iridescence".
You’ve probably also seen iridescence on oil films, feathers, seashells, soap bubbles and more.
More details can be found on Wikipedia:
https://en.wikipedia.org/wiki/Thin-film_interference
https://en.wikipedia.org/wiki/Iridescence
Step 2: Dipping Black Paper


You can transfer this film onto black paper for example. The thickness of the paper doesn't matter per se, but the thicker the paper, the less it warps.
It really helps to have good lighting so you can see where the film is and what the colors look like.
There are different ways to dip things in this film, but I like to get under the film and raise my object into it from below. The film is very fragile when it’s wet, so try not to touch it until it has dried.
I believe that smaller drops of nail polish make better rainbows. Also, if the nail polish is dropped from too high, the nail polish just sinks to the bottom of the container and solidifies. So it's best to hold the brush close to the water.
I just let the paper dry on silicone mats. Probably everything would dry faster on fabric (be aware that some paper stains when it's wet).
Step 3: More Experiments


I already love the rainbow paper, but I wanted to know more: Like, what does the effect look like on other colors?
After some experiments, my conclusion is: Other colors work too, but the rainbows stand out the most on dark colors (see last picture: black, dark blue & purple paper).
More experiments included black sandpaper and black craft foam, which is actually my favorite.
In general, I believe anything with pores/texture is good for the film to cling onto.
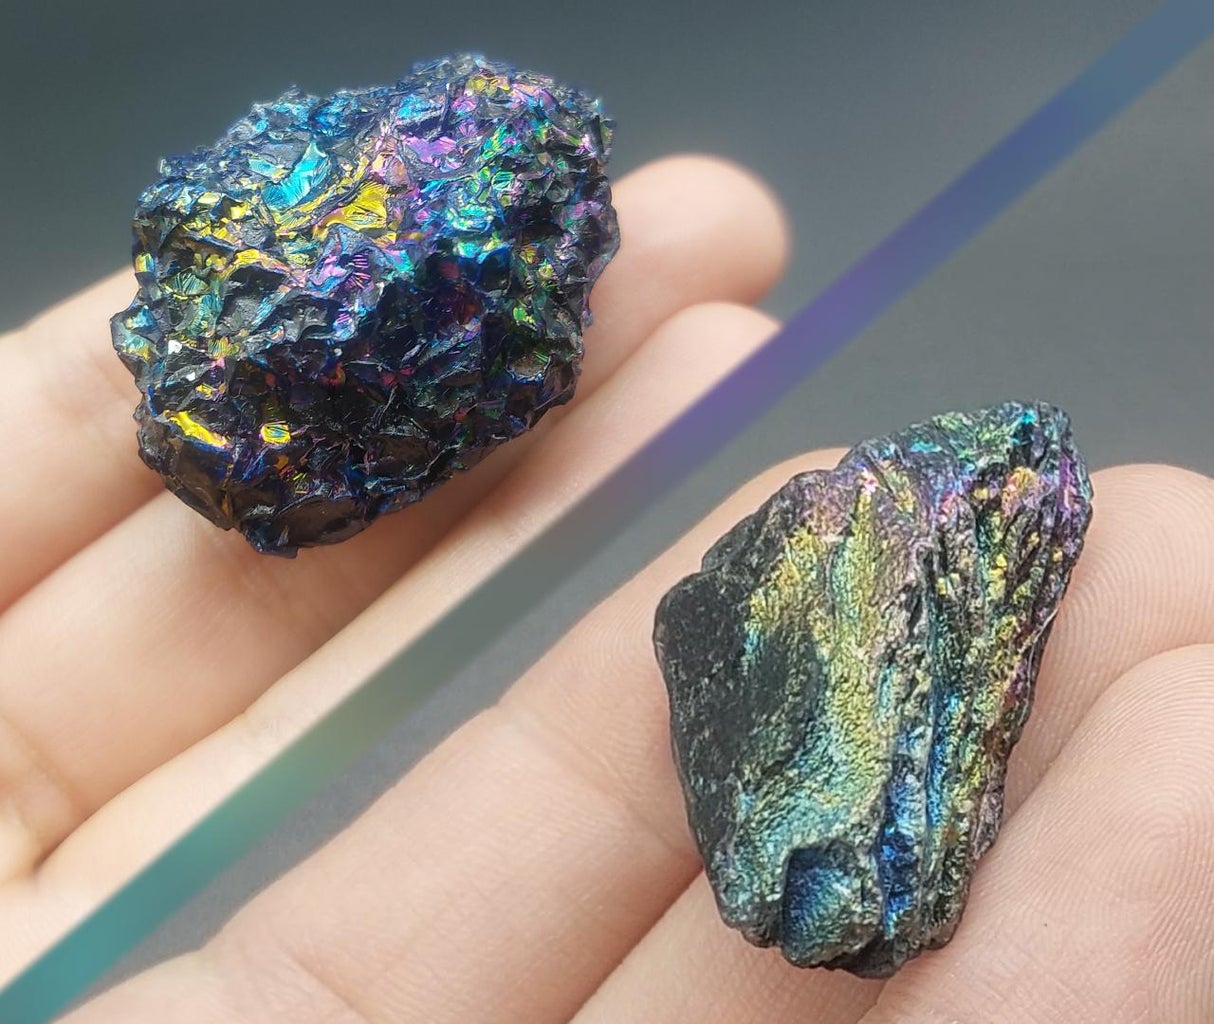
Step 4: Transforming Rocks


I knew I had to try making crystals of some sort, so I wondered: What if you dip rocks in this magical water?
After some tests, I got the best results when I used rocks with a lot of texture. If the rock is too smooth, the iridescent effect will sometimes not show at all.
You can also paint the rocks with acrylic paint, especially if you’re using brightly colored rocks.
Look for a nice spot in the rainbow and carefully lift the rock into the film from below. I used gloves for dipping smaller things so I didn't have to keep washing nail polish off my hands.
A toothpick or something similar will help you to remove any excess film. You can also remove excess film once the stone has dried.
Step 5: Alternative - Aluminium Foil


If you can’t find any rocks, you can also crumple up some aluminium foil and make it look like a rock. I’m trying to keep the foil quite rough because the iridescent film shows best on bigger gaps.
I like to give the rocks a coat of black acrylic paint first and once that has dried, I add some color to make it more interesting. Make sure the paint is completely dry before you dip the fake rock.
Step 6: Dipping the Fake Rock


When I first attempted to dip the "rock", the rainbow was a bit faint and I also picked a boring spot in the film, so it didn’t look super rainbowy in the end. So I just dipped it again on the other side!
That was a good lesson to learn: If the film looks bad on the water, it won't look much better when it's dry. So if you're not happy with it, just remove it with something like a toothpick and start over!
In case you're wondering: I don't think the film can be coated without losing the rainbow effect. But it shouldn't be necessary if you just use these stones as decoration. I'm curious to see how the effect will look after a year or so.
I hope you found this as mesmerizing as I did and maybe you’ll try it out for yourself!

Participated in the
Anything Goes Contest


