

Introduction: Leather Hardware: Rivets


Now that we've learned how to cut and fold leather, we're going to learn how to attach pieces of leather to each other by one of the simplest methods: riveting. Riveting requires hole punching, so we'll also take a look at a few different tools for punching holes. Then we'll put all these skills together to assemble our wallet!
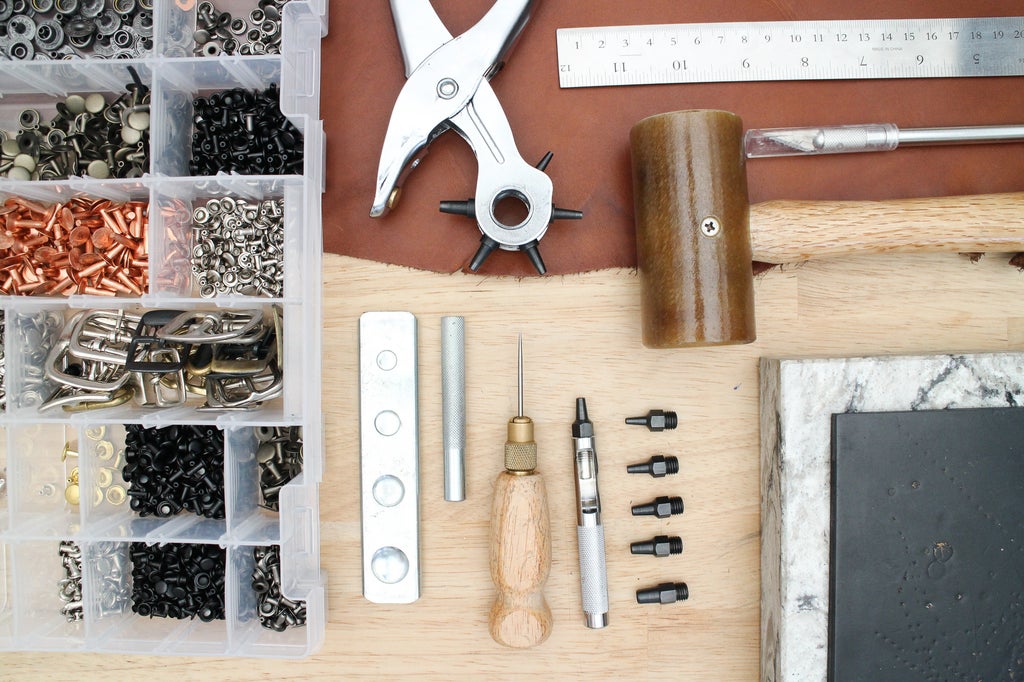
In this lesson I'll be using:
Step 1: Punching Holes With Rotary and Manual Punches

In order to attach rivets, snaps and other hardware to leather, first you need to punch holes. Punching holes in strategic places can also be helpful when you need to cut out slots or other complex internal shapes. There are a few different tools for hole punching that are better for different applications.
The Rotary Punch is the easiest to use and most convenient tool for punching holes. It has a rotating head with different punching blades to create holes of various sizes. To punch a hole, you just squeeze down on the handles until you press the punch through the leather. Rotary punches are great for punching holes in straps and other easily accessible areas, but they can only punch a hole about 1 1/2"-2" from the edge of a piece of leather (or a little more if the leather is flexible enough to gather). Also they are not great for punching through very thick leather because you can only apply so much force by squeezing the tool with your hand.
Like most tools, rotary punches only work well if they are sharp, so keep yours sharp or buy replacement blades when they get dull. If your punch isn't making a clean cut all the way through your leather, swiveling the leather around while clamping down on the punch will sometimes help it cut through.
![]()
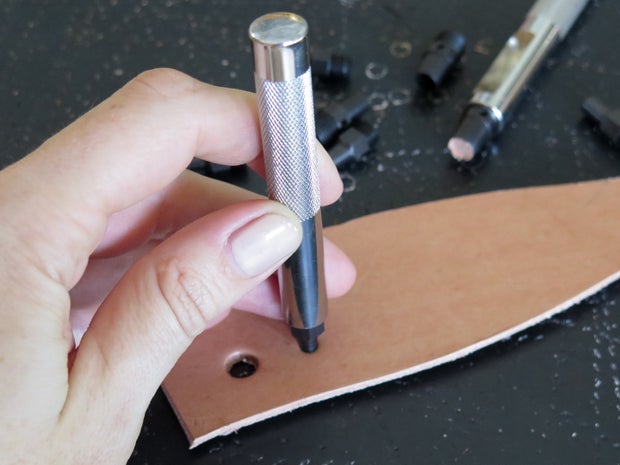
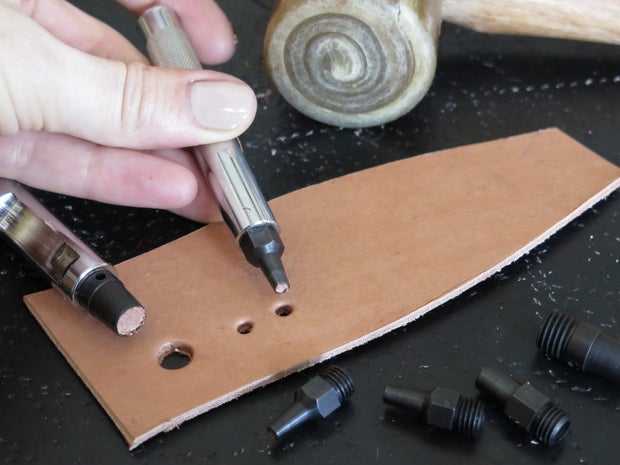
Manual Punches are a more versatile, if slightly less convenient way to punch holes. They allow you to punch in hard to reach places far from leather edges, and they can punch through very tough leather. The set I have has a single shaft that comes with interchangeable heads of different sizes.
To punch a hole with a manual punch, place your leather over your poundo board or other soft punching surface. Hold your punch straight up and down on top of your leather where you want to punch a hole, then hit it with a mallet. One strike with the mallet should be plenty to punch through, though with thicker leather you sometimes need to strike again.
Never punch directly on top of a hard surface like your metal anvil or quartz. This will dull your punches very quickly. It is also not a good idea to hit a metal tool with a metal hammer or mallet. This will eventually distort the top end of the tool making it harder to use.
You can find punches in different shapes, like ovals for attaching buckles, or even decorative shapes like stars. Punches like this can be useful and fun for creating cut-out filigree patterns.
Step 2: Rivets

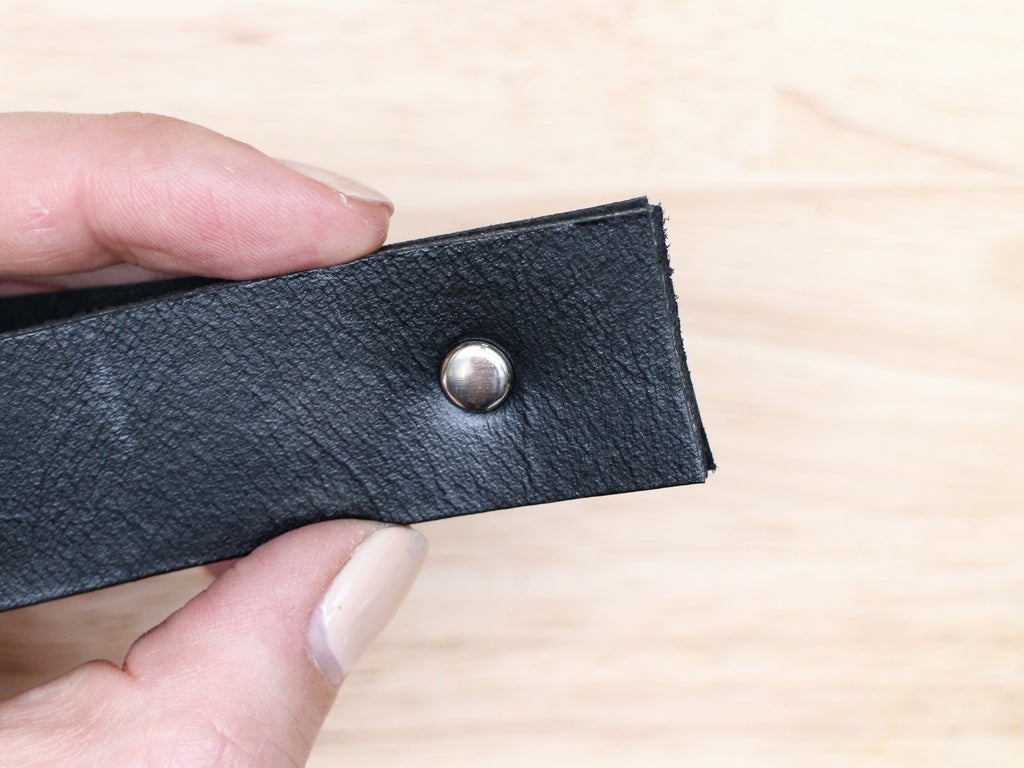
Rivets are one of my favorite leatherworking tools because they are just so easy to use, and I love the way they look. Rivets let you attach two or more pieces of leather together when they are set through holes in the leather. They come in a variety of finishes so you can choose rivets that intentionally stand out against your leather or rivets that blend in. There are a few different kinds, but I'm just going to show you the easiest for now.
Rapid Rivets:
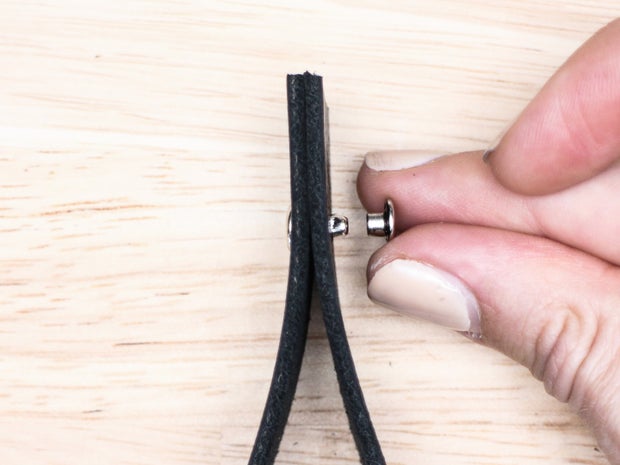
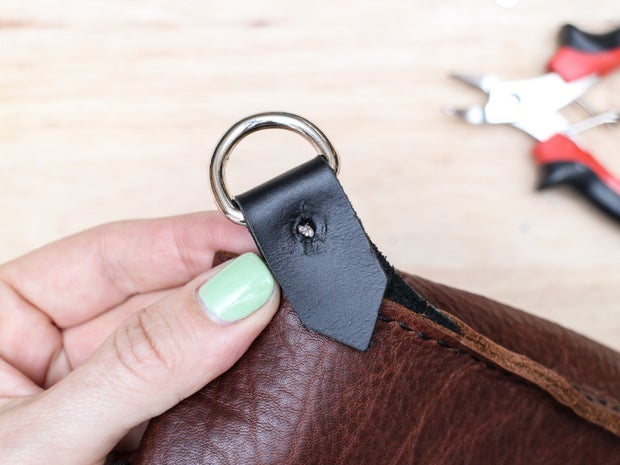
In my opinion, these are the best kind of rivets because, as the name implies, they are quick and easy to set. Rapid rivets have two parts, an end with a stem that looks like a tiny mushroom, and an end with just a cap and no stem. They are also often called double cap rivets because of the cap on both sides (though some variations have one end that is hollow or decorative in some way).
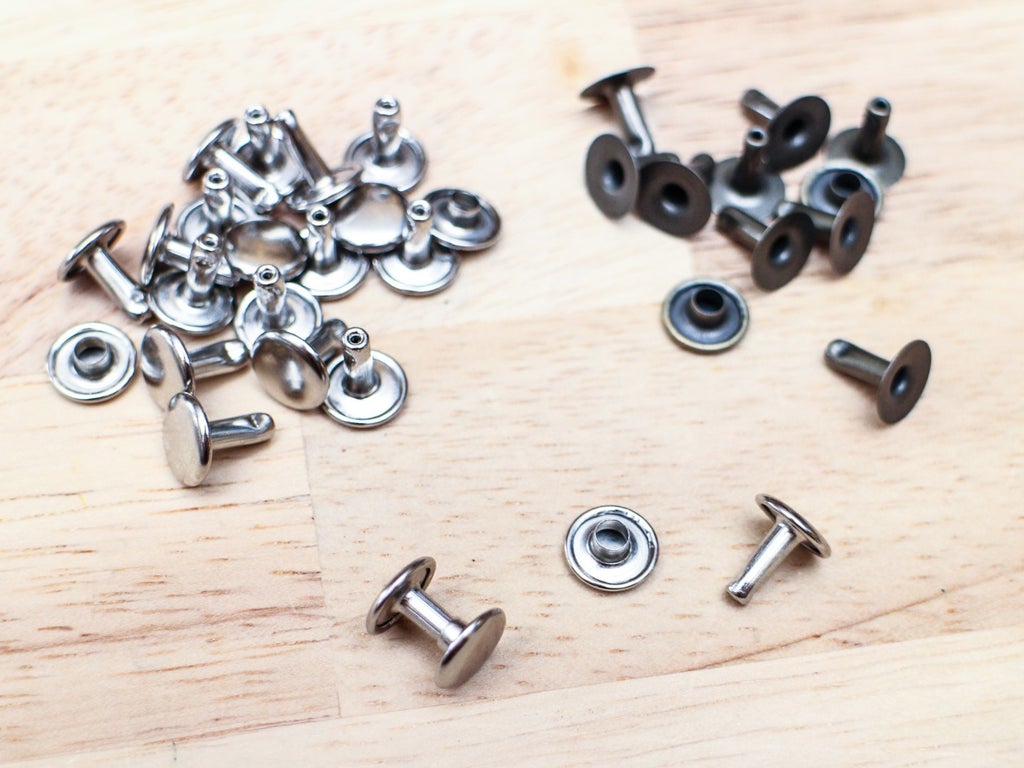
To attach these rivets, punch a hole the size of the rivet stem, or slightly larger, insert the stem into the hole from one side, and then snap the cap onto the end of the stem from the other side.
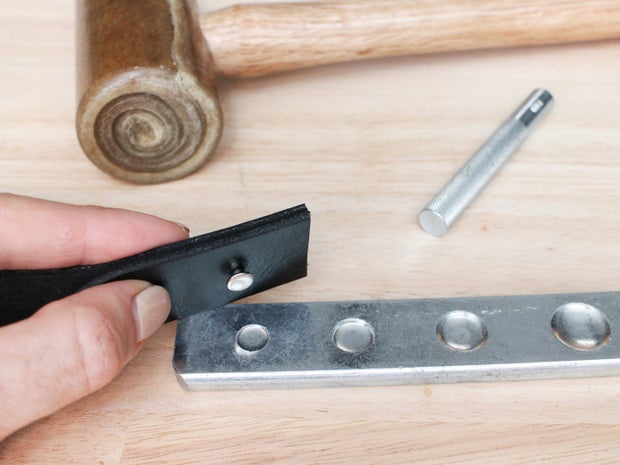
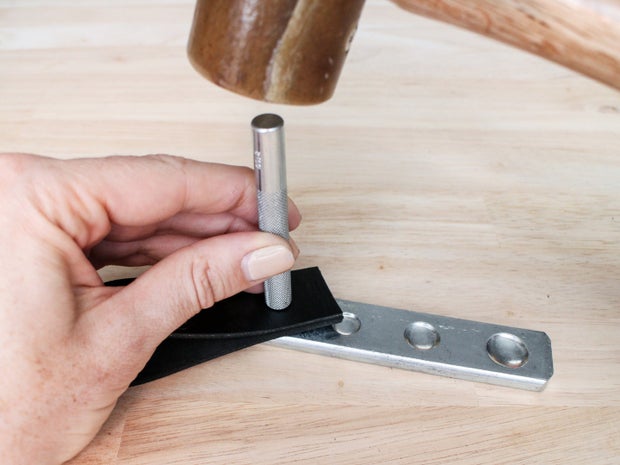
The correct way to set the rivets is by nesting the bottom cap in the correct sized divot in the rivet setting base, and then using a mallet to pound down on the top cap with a rivet setting shaft that has a concave end. This will keep the caps of the rivets slightly rounded rather than hammering them flat.
If you don't have the rivet setter, however, or you would rather have flat-topped rivets, you can just set them on a hard, flat surface with a hammer. The back of the rivet setting base, or your quartz slab works well for this. Using a hammer does make it a bit easier to accidentally crush or mark-up the top of a rivet, but if you try to hit straight-on it will usually work fine.
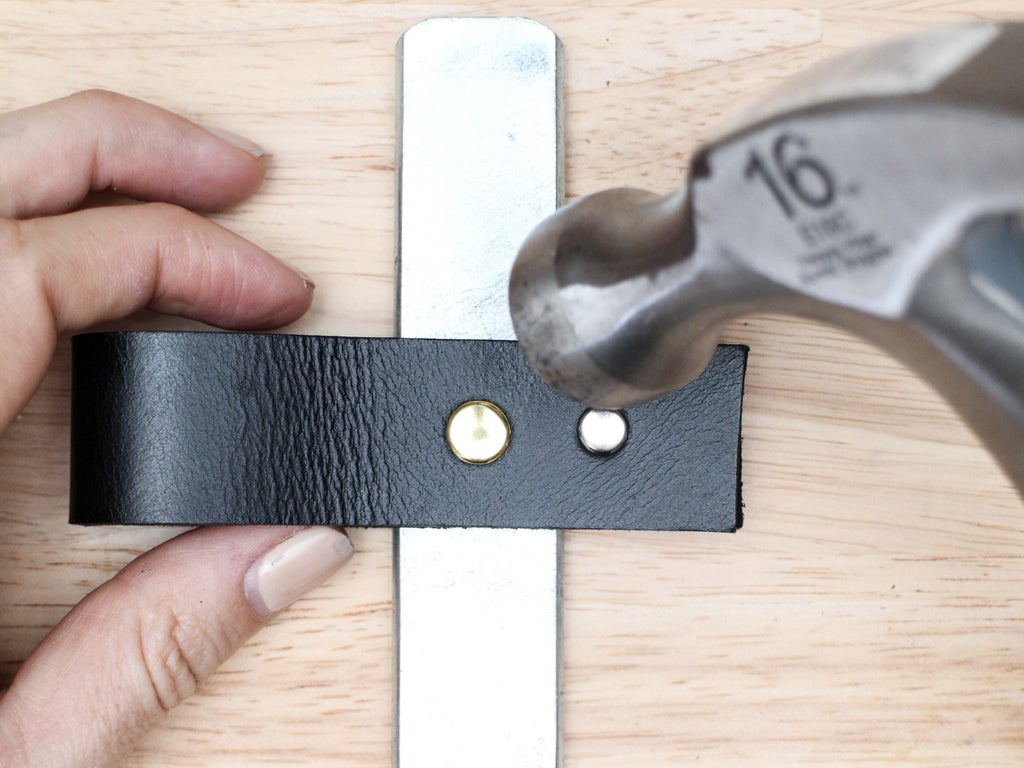
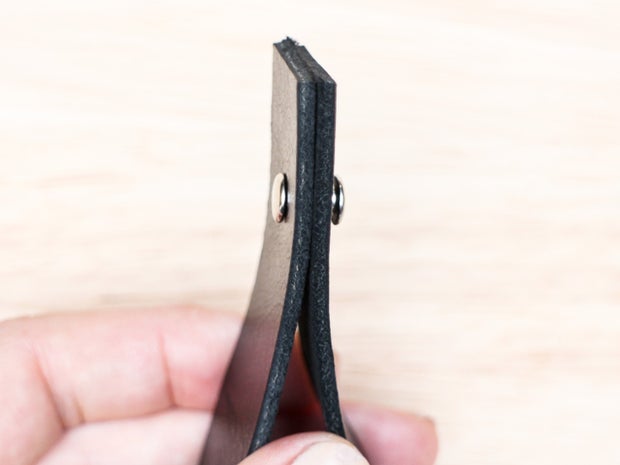
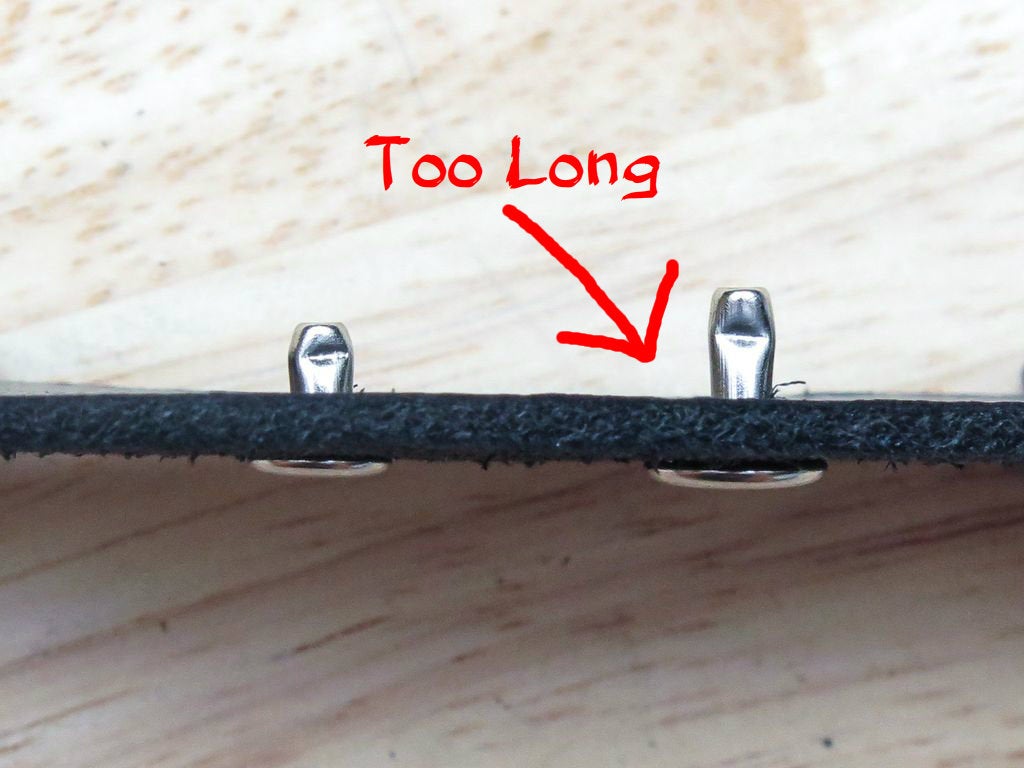
As you can see, these rivets come with different sized caps, but they also have different length stems. The size of the cap is mostly aesthetic, though it is good to use larger caps for more heavy duty projects. The length of the stem, however, is important!
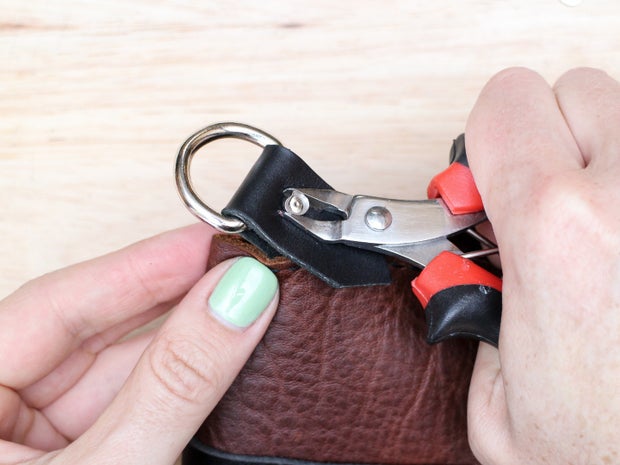
If the stem is too long, the rivet won't set right, and if the stem is too short, you won't be able set it at all. You don't want the stem to extend more than 1/8" beyond the leather. If it does stick out farther than this and you don't have another rivet option, you can use a pair of nippers to cut off the very end of the stem. The rivet should still set correctly, but you should test one on a scrap of leather first.
Step 3: Removing Rivets

It is inevitable that, at some point, you will set a rivet and then slap yourself on the forehead as you realize that you put it in the wrong place or forgot to add the ring to the loop you're closing, or some other apparent catastrophe!
If this happens, don't panic, there are ways to remove rivets or snaps.
I like to use a pair of small wire nippers to cut off a rivet. Start by cutting the stem of the rivet between the layers of leather, this way you will be less likely to damage the visible grain side of the leather. Try not to cut into the leather itself.
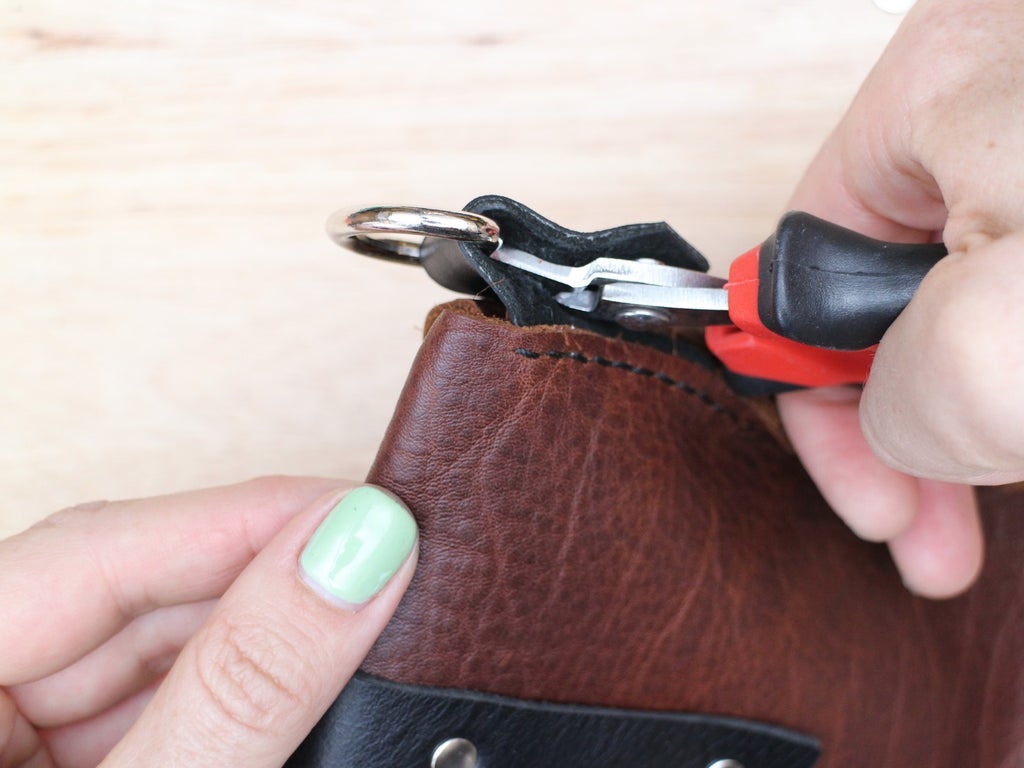
Once you've squeezed the stem a little, the top of the cap will usually pop off, and then you can remove the base of the cap and pull the whole thing out. Your leather may look a bit messy underneath, but that will be covered up by another rivet.
You can basically do the same thing with snaps, but it is a bit trickier since they are made of a harder and thicker metal.
Step 4: Rivets Quiz
{
    "id": "quiz-1",
    "question": "When might you need to use a manual punch as opposed to a rotary punch?",
    "answers": [
        {
            "title": "to punch a hole in the center of a large piece of leather",
            "correct": true
        },
        {
            "title": "to punch a hole through two layers of thin leather",
            "correct": false
        }
    ],
    "correctNotice": "That's right! Rotary punches can't reach more than about 2 inches in from the edge of a piece of leather.",
    "incorrectNotice": "Nope. Guess again."
}
{
    "id": "quiz-2",
    "question": "True or False: If the stem of a rivet is too long, it won't set properly.",
    "answers": [
        {
            "title": "true",
            "correct": true
        },
        {
            "title": "false",
            "correct": false
        }
    ],
    "correctNotice": "You're right! For rivets, size does matter.",
    "incorrectNotice": "No, try again."
}
{
    "id": "quiz-3",
    "question": "If you don't have a rivet setter you can set rivets with:",
    "answers": [
        {
            "title": "a hammer on a hard flat surface",
            "correct": true
        },
        {
            "title": "pliers",
            "correct": false
        },
 	{
            "title": "your bare hands",
            "correct": false
        }
    ],
    "correctNotice": "That's right. While a rivet setter is the best option, pounding in a rivet with a hammer works pretty well too.",
    "incorrectNotice": "No, no, no. Give that another try."
}
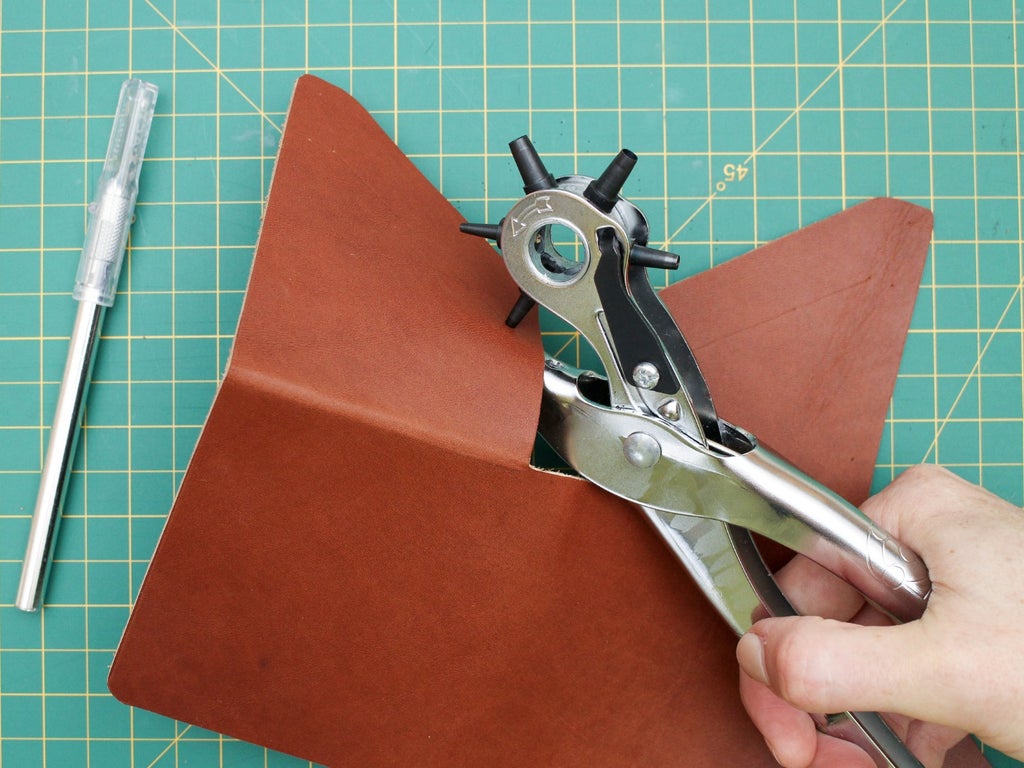
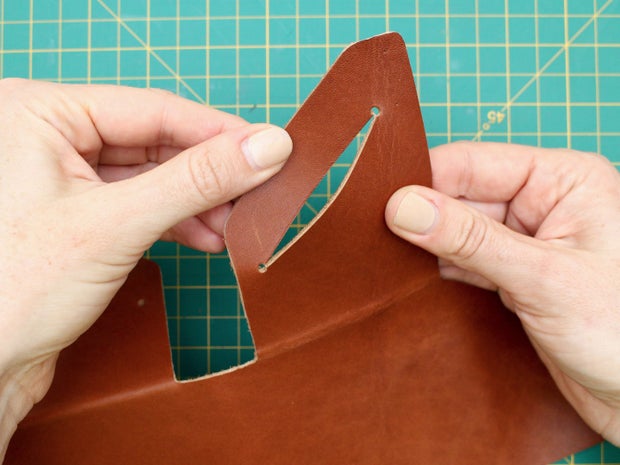
Step 5: Cut Card Slots in the Wallet

Before we use rivets to assemble the wallet, we need to cut the two card slots in the flaps. We didn't do this before because these card slots are going to have a hole punched at each end, and I wanted to teach you about hole punching first. The holes make the cuts in the leather less likely to tear, help cards fit more easily into the slots, and also make the openings easier to cut.
Use a punch to create a small hole at both ends of each slot you marked with the awl.
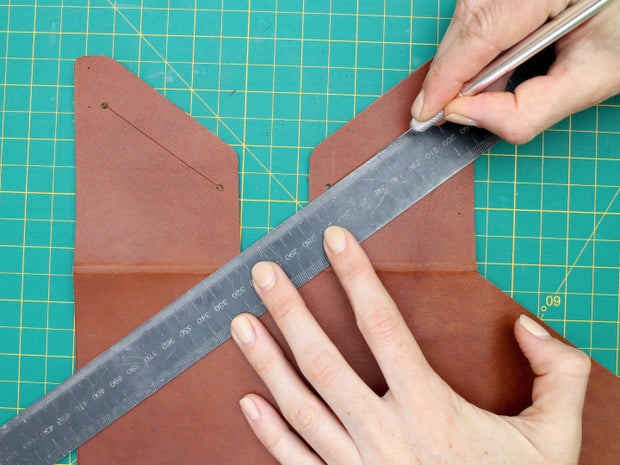
Then use a metal ruler and x-acto to cut between the holes. Be careful not to overcut, holding your knife at closer to a 90 angle when you reach the end of the cut helps prevent this.
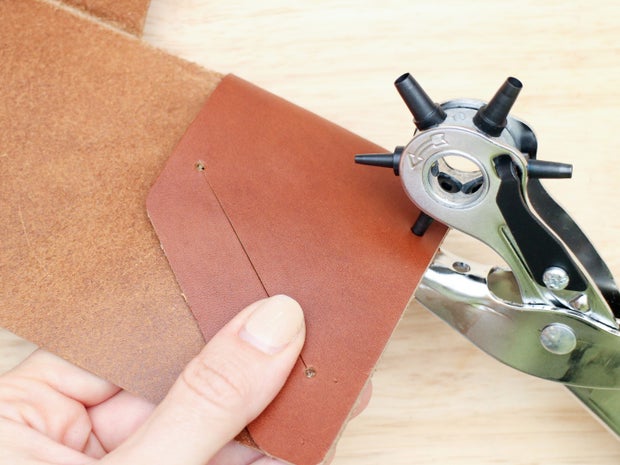
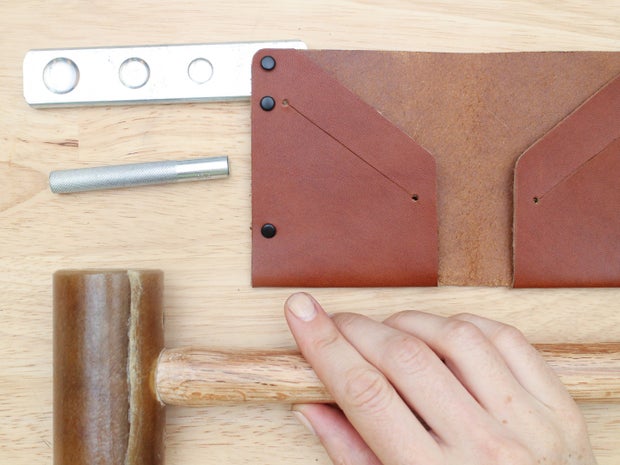
Step 6: Rivet the Wallet

Now we are going to punch holes and rivet together the two folded flaps of the wallet.
First, take one flap and fold it, lining it up so the outside edges of the leather are perfectly even and the fold is laying flat. Holding the two layers in place with the flap facing up, use a rotary hole punch to punch a hole through both layers at one of the rivet positions you marked from the pattern.
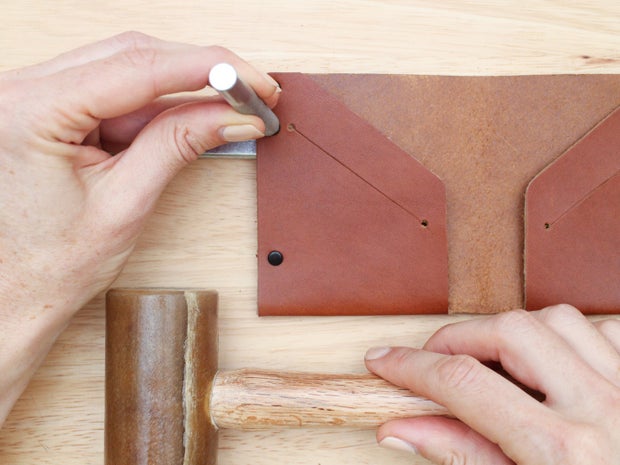
Making holes this way, by punching both layers at once, ensures that your holes will be perfectly aligned. Now stick a rivet stud through this hole to help keep the leather aligned correctly as you punch the two other holes. Repeat on the second flap.

Stick rivet studs through all the holes, then add the rivet caps.
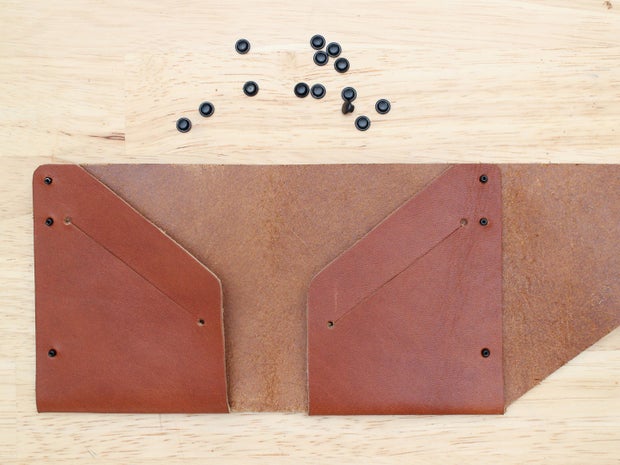
Use your rivet setter and mallet, or hammer, to set the rivets.
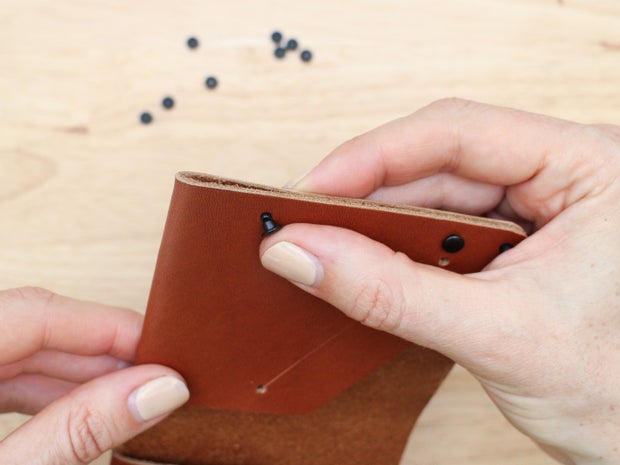
Step 7: You're Almost Done!
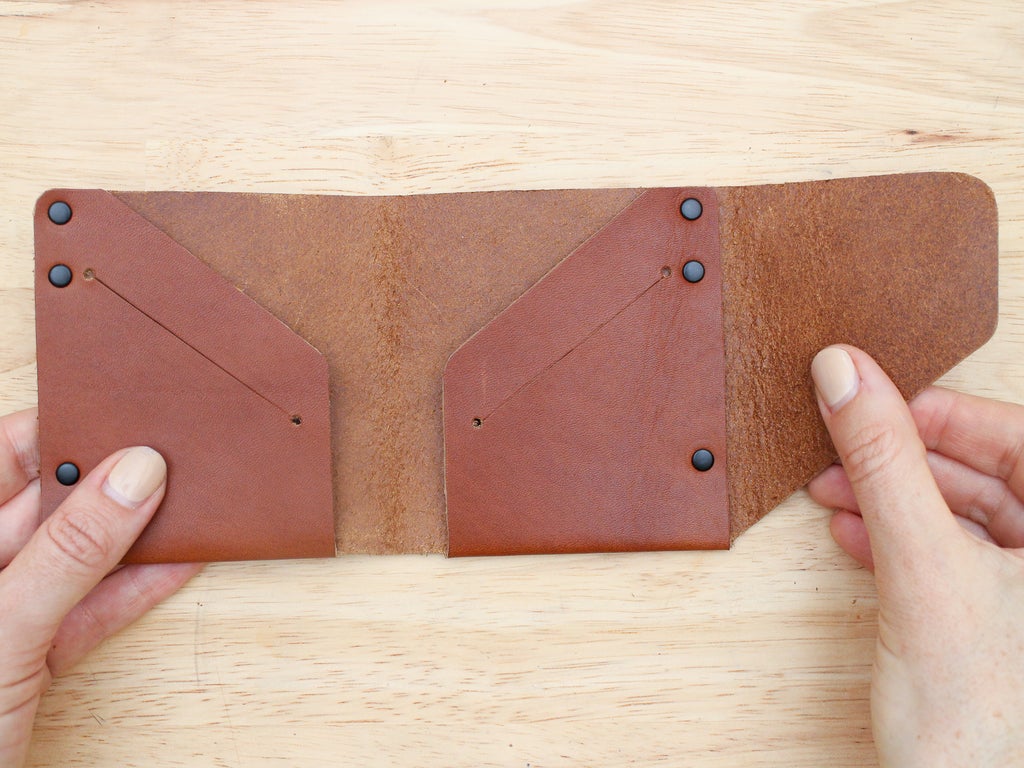
See how easy it is to assemble something with rivets?! Whether you have a rivet setter or just a hammer and a flat surface, rivets are a fast and secure way to make connections between pieces of leather. Rivets aren't always the right way to put something together, but when they are, they're amazingly convenient. Using rivets with different looks can also really add style to a design, and it's not unusual to use them purely for decoration.
In the next lesson we'll move on to another kind of hardware, and finish assembling the wallet by adding a snap closure.


