

Introduction: Leather Hardware: Snaps


Now we're going to learn about one of the simplest types of leather closures: snaps. Snaps are a great way to fasten things because they are relatively small and unobtrusive, and quite secure for their size. They are also pretty easy to set with the right setting tools.
I'll show you how they work and how to set them properly, and then we'll use one to put the finishing touch on our wallet.
In this lesson I'll be using:

Step 1: Setting Snaps

Snaps make great closures on bags or pockets, attachments points on straps, etc. There are a few different sizes and types of snaps that are set in different ways and good for use on different types of projects.
Line 20 and 24 snaps are the most common in leatherwork. They have the same structure and are set in the same way, but line 24 snaps are bigger and more heavy duty than line 20 snaps. I use line 20 snaps for most of my leather projects. I think they are a good size for medium to heavy weight leather.
Line 20 and 24 snaps have 4 parts: The cap and the socket, and the post and the stud. You set the cap and the socket together on one piece of leather and the post and the stud together on another, and then the socket and the stud snap and unsnap to each other create the closure.


To set line 20 or 24 snaps, first punch two corresponding holes in your top and bottom leather pieces. The holes should be the size of the snap post. Sometimes, to be sure I get the snaps aligned correctly, I will set one side and then use it to get the exact placement for the other side before I punch a second hole (you'll see what I mean when we assemble the wallet).
To set the cap side in your top leather piece, slip the cap into the hole from the grain side. Then slip the socket down over the stem of the cap from the flesh side.


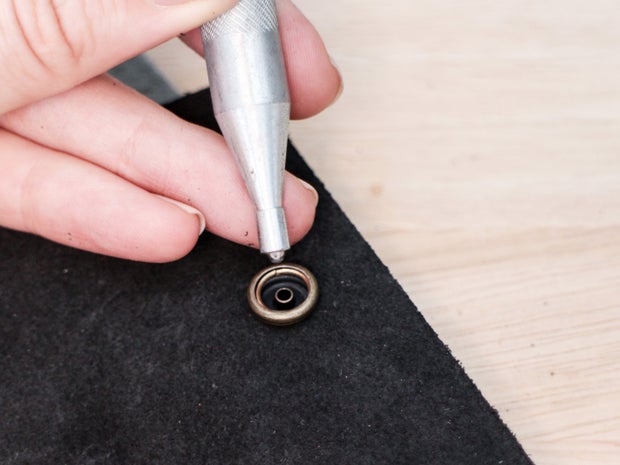
Take your setting base and place it under your leather so the cap sits in the appropriately sized divot. Use your line 20 snap setting tool to set the snap by hammering it together with a mallet. Tap lightly with the mallet at first so the snap aligns properly, then pound harder to secure it. When your snap is set right it shouldn't spin around in its hole.


To set the post side, stick the post through your bottom piece of leather from the flesh side, and slip the stud down over the post from the grain side.


You don't need to use the divots on the snap setting base here because the post is flat on the back. Just place your leather over any very hard flat surface. The other side of the snap setting base works well. Again, use the snap setting tool and mallet to set the stud onto the post. Now you have a complete snap pair.

Snap the two sides of your snap together to test if they connect and hold well.


Though line 20 snaps are all the same diameter (about 7/16"), they come with posts of different lengths that are good for different weights of leather. If your snap post sticks out more than 1/8" beyond the leather, the snap won't set properly, so choose a post length that is right for your leather: 3/16" for 5-7 oz leather, and 5/16" for 8-10 oz leather.


Step 2: Troubleshooting Snaps
When the posts of your of your snaps are a bit too long and they won't attach right when you try to set them. A good trick is to make a leather "washer" by cutting a small circle of leather and punching a hole it it. You can slip this over the post of the snap before you set it, and it will make your leather the right thickness for the snap!


Step 3: Make a Center Fold in the Wallet

Before we put a snap on the wallet, we need to define a center crease where the whole thing folds over on itself. This crease will develop naturally over time from the pressure of the wallet being folded and used, but we want to establish it in the right place so we know exactly where to put the snap.
For this fold, we aren't going to use the V gouge because we don't want to weaken the leather at this point of repeated motion, or make an unsightly mark. Instead, fold the wallet closed so it's lined up just right. Press down on the center fold with your fingers to define where the crease goes.


Now take your sponge and dampen the leather along this line, inside and out. Fold the wallet again, cover the fold with cardboard, and pound to create a crease with your mallet.


Step 4: Add a Snap to the Wallet

Finally, to finish our wallet we are going to add a snap closure on the front flap.
Punch a hole near the end of the flap, 5/8" in from the edge, and 1" down from the top.

Stick a snap cap in from the outside, then nest it in a divot on the snap setting base, add the snap socket, and set the snap with your setting tool and mallet.


Fold the flap over onto the wallet, lining it up exactly where it should sit and press down hard on the snap with your fingers. When you open the flap, you should be able to see the faint impression of a circle on the leather beneath, this is where the bottom half of your snap should go.


Now punch a hole in the center of that circle, and set the post and stud half of the snap in this hole, using the flat side of your snap setting base. You will need to slip the base inside the flap of the wallet so you are pounding directly on the metal of the base not the leather of the flap. Otherwise you would damage the leather.

Step 5: You're Done!

And there's your finished wallet! Cards should fit easily in the slots and the space behind the flaps will hold a full length stack of paper bills.

Now that you've seen how to assemble this basic design, I'm sure you can imagine a lot of variations you could create fairly easily, and how you could apply the skills you've learned to create different kinds of projects. If you've made a wallet or something else using the skills we've covered in this class, please feel free to share a photo your project here!
The best way to internalize any skill is to keep practicing it, so I highly recommend finding another project to work on soon. An easy way to do this is to move on to my Intermediate Leatherworking Class where you'll learn how to create patterns for basic leather accessories and then practice punching, gluing, sewing attaching buckles, clasps, and more as you complete your own custom leather designs!
Instructables also full of great leatherworking projects that will give you even more inspiration, so I've assembled a collection of projects that I think your newly acquired skills will make you well prepared for. They are arranged at the bottom of this page page in order from extremely easy to quite challenging.
I really hope you've enjoyed this class! feel free to ask questions in the discussion section. Please share photos of your projects here, and if you keep creating with leather or any material, I encourage you to publish your projects as Instructables and enter them in Instructables contests! I can't wait to see what you create!


