

Introduction: Lesson 3: Drawing in 2D


When developing a design through sketching, it helps to look at the object in separate “orthographic” views, also known as multi-view drawing. Seeing the projected sides of an object helps us understand proportions, scale, and relationships that are difficult to see in 3D.
To understand something complex, you have to look at it in pieces. This is as true in math and history as it is in music and design. The way to break down a design and study it is to use orthographic projection. Simply put, this means drawing an object straight-on from each of its sides. The top, front, back, left side, right side, and bottom are separate sketches. This kind of drawing is not done using perspective.
To create an orthographic drawing, imagine that the object you want to draw is inside a glass box. If you look straight-on at any side of the box, what you see of the object inside is its orthographic projection. By drawing the object from different points of view in this way, we are able to make decisions and solve problems in a localized way. Trying to design exclusively in 3D (whether by sketching or using 3D software) can often result in objects that aren't well thought-out, as you need to see how each side relates to the other. This is why it’s important to start with 2D drawing before moving onto 3D.
- This video has no sound -
Step 1: A Man-Made Object

To practice multi-view drawing, we will start with a simple manmade object that you probably have at home. A remote control is a good example, maybe a phone, or a bluetooth speaker. Avoid things that are too complex like a can opener at first, and void things with a lot of curves, like a computer mouse.
I'll be demonstrating the process with a 9V battery.
Step 2: Construction Lines
- This video has no sound -
Construction lines are a great tool to control your drawings. They help to tell you where hard lines (lines made in pen) should go, and help you make sure things have the right proportions, help you make circles and other complex shapes, and keep different views consistent. You can never have too many construction lines, especially if they're drawn lightly in pencil.
Think of construction lines as a kind of cage that your drawings a built from.

Start by drawing a few construction lines to create boundaries for the different views of the object. Try to get the proportions as close to the real object as possible by using your fingers or your pencil to get a rough idea. Remember to draw parallel lines first, then draw the crossing lines do get proper right angles. It's often helpful to use tick marks as targets.

Before going any further with construction lines, draw the primary shape of the object from one viewing angle. In the case of the battery, that's the rectangular profile of the front.

To draw a rectangle with rounded corners (also called fillets in designer speak), it's important to draw the parts individually. Draw straight lines, then rounded corners or vice versa. If you try to draw a rounded rectangle in one continuous stroke, you're going to end up with a potato.

Next, add whatever other features can be seen from that point of view. For the battery, that would be the terminals on top. A couple of center lines will help keep the location of the terminals correct (these represent the centers of the terminals, not the rectangle).
Step 3: Side View
- This video has no sound -

From the front view, the terminals just look like rectangles, one of them having an angled base.
With one view done, it's time to move on to the next view. The construction lines are projected from the first drawing, so the proportions and dimensions will be consistent.
This is the whole point of a multi-view drawing. When the views have dimensional consistency, it's much easier to understand an object, and it's crucial in using sketching as a design tool.
A centerline is used to ensure the terminal seen from the side is in the correct location.

From the side, the terminal looks roughly the same as from the front.
Step 4: Top and Bottom Views

Drawing a top view will use construction lines as well. The vertical lines from the side view are extended to make the long sides , then reference the front view to determine the length of the sides and draw connecting lines to complete the rectangle shape of the top view. This view is easy because the rough width dimension can come straight from the front and side view.

Another rounded rectangle will make the perimeter of the top view, and a centerline will help control the location of the terminals in the top view.

Finally, the details are added to the top. The negative terminal is a circle in the top view, and the positive one is hexagonal. The battery also has a small bezel around the top that's made from the way the cells are enclosed with the foil wrapping.
The construction lines for the bottom view are projected from the side view as well. Note that this view could be projected with construction lines from any of the views.

With the lines done in pencil, it's time to move on to line weight using pens.
{
    "id": "quiz-1",
    "question": "How should rounded rectangles be drawn?",
    "answers": [
        {
            "title": "With one continuous stroke.",
            "correct": false
        },
        {
            "title": "With discreet segments.",
            "correct": true
        },

    ],
    "correctNotice": "You got it!",
    "incorrectNotice": "Nope! If you try to draw this kind of shape in one stroke, there's no way you'll get the shape you want."
}
Step 5: Line Weight
- This video has no sound -
Line weight is an important aspect of any drawing to communicate shape and depth. You can do any drawing with a single line weight and get the point across, but applying different line weights makes a drawing more lifelike and can make it much easier to understand, especially if the geometry is complex.
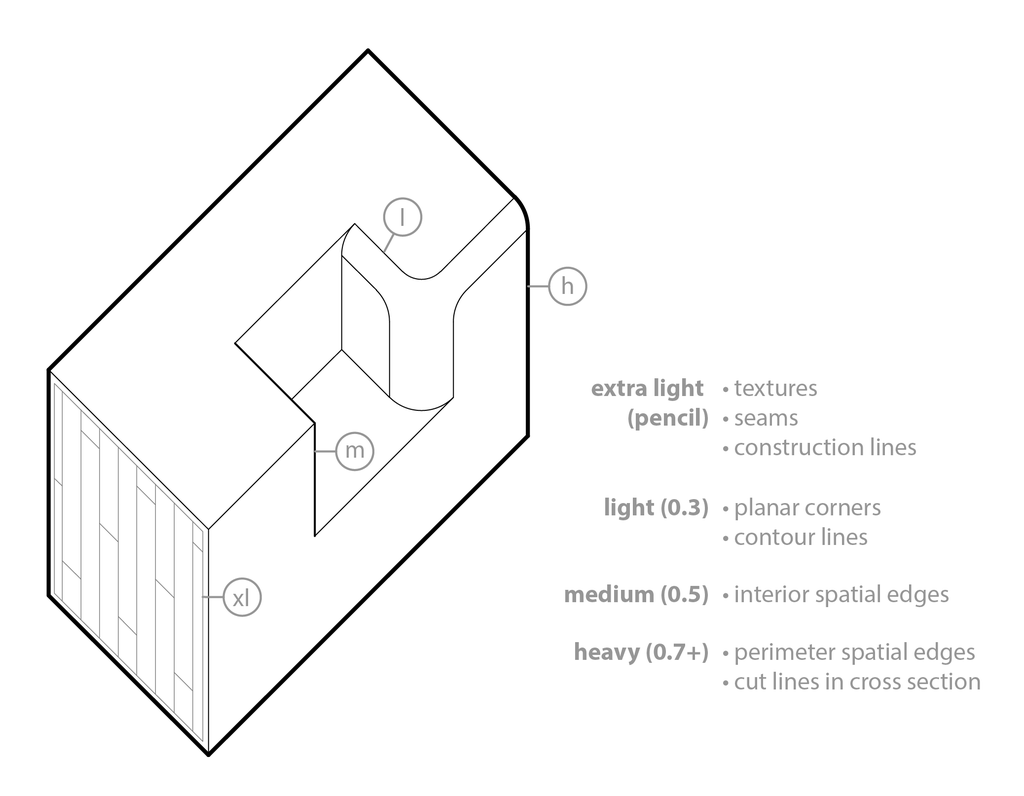
- Extra Light (pencil or light weight pen): This weight is used for aspects that should either be secondary to the overall form of the object or almost disappear entirely. It's good for construction lines, surface features like textures or patterns, and seams between parts that don't have much depth (like the edge where a fender touches a hood on a car, for example).
- Light (+/- 0.3mm): This weight is most often used for contour lines (lines that follow a surface to express its 3D shape) and planar corners (edges between two planes in which you can see both planes in the view).
- Medium (+/- 0.5mm): This weight is generally used for spatial edges (the edges of surfaces where only one surface is seen in the view).
- Heavy (0.7mm+): Heavy lines are reserved for the perimeter edges of an object and for the cut edges of a cross-section drawing.
In general, you can think of line weight as a scale from light to heavy based on the depth of the edge you're drawing in relation to what's behind it. In the example above, you'll see that the extra light lines (the pattern on the side) are for an edge that has essentially zero depth to the surface behind it. The light lines have a greater difference between the depth between the edge and the surface behind it because the surfaces are angled away from or towards each other. The medium lines have a greater depth between the edges and the surface behind them because the only surface behind that we can see in the view are the ones on the indentation. The heavy lines are reserved for the edges with the most depth (there's nothing behind them).

In the case of the battery, the bezel edge gets a light line, the features on the battery terminal surfaces get medium lines, and the outlines get heavy lines. This makes the drawing pop, so to speak. It gives it presence on the page and makes it easier to read.
Step 6: Practice!
Your homework for this lesson is (you guessed it) draw stuff! Find a manmade object, break it down into construction lines, then hard line it and fill in the details. Remember, it's not important that it's pretty, it's important that it's a decent representation of the thing.
In the next lesson, we'll take sketching to the next level and learn how to do it in 3D.


