

Introduction: MLAB | LION KING NALA MASK


In celebration of Disney’s latest live-action adaptation of the Lion King, we wanted to create a project inspired by our favorite character, Nala, Simba’s best friend and a fierce warrior. As fans of Julia Taymor’s ground-breaking costume design work in the Lion King Musical, we decided to make a Mask inspired by Nala in order to explore the true Queen of Simba’s pride. In this Instructable, we will make two versions of Nala’s Mask in order to explore two unique digital fabrication methods; desktop cutting machines and laser cutters. Follow these simple steps to create your own Nala Mask inspired by the Lion King.
Supplies
Cricut Maker - Desktop Cutting Machine and Cricut Design Software Installed on iOS Device or Computer*
Paper Nala Mask:
Cricut Knife Blade and Drive Housing (included in Cricut Maker and Cricut Explore Air)
Cricut Classic Pens - Black, Dark Brown, or Navy Blue
Cricut Weeder [Alternative: Ordinary Tweezers]
(1) 12” x 12” Cardstock Paper Sheet, Golden Yellow
Fine Tip Markers - Orange and/or Red
Felt Nala Mask:
Cricut Bonded Fabric Blade and Drive Housing (included in Cricut Maker but separate accessory in Cricut Explore Air)
Cricut Classic Markers - Black, Dark Brown, or Navy Blue
Cricut Weeder [Alternative: Ordinary Tweezers]
(1) 12” x 12” Felt Sheet, Golden Yellow and/or Dark Brown
*[Alternatives; Cricut Explore Air (a Desktop Cutting Machine), Glowforge (a Desktop Laser Cutter), etc. w/ respective software design tools]
Step 1: Introduction to CAD

In this Step-by-Step, we will show you how to make a sketch and then transform it into a 3D model of Nala's face mask.
Check out mLab Episode X: 'Lion King Nala Mask' above to see how we brought the following steps to life.
In order to create our 3D model, we will use Autodesk Fusion 360 in order to create a Sketch of the original character Nala’s Mask designed by Julia Taymor from the Lion King Musical. If you feel more comfortable using an alternative, feel free to complete the next step in Adobe Illustrator, Rhino, Inkscape, Sketchbook, or any other design software. Fusion 360 is a 3D design or CAD software that allows for you to trace over an image or a canvas in order to create a sketch you can use as a drawing or transform into a CAD Model. As an added bonus, Fusion 360 is free to use for students, educators, entrepreneurs, and hobbyists (which means essentially everyone).
Now, if the term "CAD" sounds unfamiliar to you, don’t fear. CAD stands for Computer-Aided Design and is a type of software that allows for us to build 3D objects using our computer.
For example, once finish our Fusion 360 Sketch, we can transform our sketch into a CAD model and send it off to a 3D Printer, a machine that uses materials such as plastic in order to print physical objects. If you don't have access to a 3D Printer, you can also order a 3D print from online 3D Printing resources or explore your local resources to 3D Print your CAD Model (For Example; your local school or library or makerspace).
In this Instructabe, we are going to use our Fusion 360 Sketch as a drawing and send it off to a desktop cutting machine such as a Cricut Maker in order to bring our Nala Mask to life. Regardless of what you decide to do with your Sketch, the most important step is to get started.
So...Let's #BuildMakeLearn!
Step 2: Tracing Your Nala Mask

Instead of using Sketchbook to create a Sketch of Nala’s Mask, we are going to use Autodesk’s Fusion 360.
PRO TIP: If you prefer an alternative, you can complete the next step in Adobe Illustrator, Rhino, Inkscape, or any other design software.
Given we aren't graphic designers, we've imported an image of Nala's Mask from the Lion King Musical to use as a base or a canvas by using Fusion 360's 'Canvas Tool' in the upper Toolbar under the 'Insert' Tab.
Once we have our Canvas, using Fusion 360’s Sketch feature, we are going to create a 2D trace of Nala’s Mask using a few simple sketching tools including; Line, Arc, and Ellipse.
Let’s start off with the straight parts of Nala’s Mask.
In order to trace the straight lines on Nala's Mask using the 'Line' Tool;
- Go to the 'Sketch' Tab in the left-hand corner of the upper Toolbar and select 'Line'
- On your Canvas;
- Use your mouse to click the starting point of a straight line you would like to trace.
- Drag your mouse until you reach the end of the straight line and click that point with your mouse.
- Press the ESC key on your keyboard in order to escape the 'Line' tool.
- Repeat until all straight lines on Nala's Mask are traced.
ADVANCED PRO TIP: If you want to save time down the line, use the 'Line' tool in order to create a 'Construction' Line down the middle of your Nala Mask.
- Go to the 'Sketch' Tab in the left-hand corner of the Upper Toolbar and select 'Line'
- Go to your 'Sketch Palette' Toolbar on the right-hand side and select the 'Construction' Tab
- On your Canvas;
- Use your mouse to click the midpoint on Nala's Mask.
- Drag your mouse down the middle of Nala's Mask until you reach the bottom and click that point with your mouse.
- Press the ESC key on your keyboard in order to escape the 'Line' tool.
- Go to your 'Sketch Palette' Toolbar on the right-hand side and de-select the 'Construction' Tab
- Complete the following steps for only half of Nala's Mask.
Next, we tackle those pesky rounded edges and half arcs, especially around her ears and mouths, using the 'Arc' tool.
In order to trace the rounded edges of Nala's Mask using the 'Arc' Tool;
- Go to the 'Sketch' Tab in the left-hand corner of the upper Toolbar and select 'Arc'
- On your Canvas;
- Use your mouse to click the starting point of a rounded edge or arc you would like to trace.
- Drag your mouse until you reach the end of the arc and click that point with your mouse.
- Use your mouse to adjust the newly formed arc until it is a perfect trace of the rounded edge.
- Press the ESC key on your keyboard in order to escape the 'Arc' tool.
- Repeat until all rounded edges or arcs on Nala's Mask are traced.
Finally, we will use the Ellipse tool in order to create Nala’s eyes and decorations around her Ear.
- Go to the 'Sketch' Tab in the left-hand corner of the upper Toolbar and select 'Ellipse'
- On your Canvas;
- Use your mouse to click the center point of a circle or ellipse you would like to trace.
- Drag your mouse until you reach the end of the circle or ellipse click that point with your mouse.
- Use your mouse to adjust the newly formed ellipse until it is a perfect trace of the circle or ellipse.
- Press the ESC key on your keyboard in order to escape the 'Ellipse' tool.
- Repeat until all circles or ellipses on Nala's Mask are traced.
PRO TIP: In order to save blood, sweat, and tears, make sure your line connect with each other. When a complete shape is made in 'Sketch' Mode, the shape will illuminate orange such as below;
------------------------------------------------------------------------------------------------------------------------
ADVANCED PRO TIP:
If you created a 'Construction Line', simply;
- Go to the 'Sketch' Tab and Select 'Mirror'
- Drag your Mouse over ALL sketched lines (except the 'Construction' line down Nala's Mask)
- On your 'Mirror' Toolbar;
- Select 'Line'
- Drag mouse to the 'Construction' line down Nala's Mask
- Select 'Ok' on 'Mirror' Toolbar
You've just completed your Nala Mask in half the time!
------------------------------------------------------------------------------------------------------------------------
For our Nala Mask, we are going to stop here and export our Sketch as a DXF file or a 2D drawing in order to bring her to life using the latest addition to mLab...the Cricut Maker (point to Cricut Maker).
In order to do so;
- Select 'Stop Sketch' on the right-hand 'Sketch Palette' toolbar
- Once you exit Sketch;
- Use your Mouse to Right-Click your Sketch on your left-hand toolbar
- Select 'Save as DXF'
- Name your DXF File
- Select 'Save'
Now, we have a DXF (Drawing eXchange Format) file, a 2D drawing format for other computer design programs to read and understand, of our Nala's Mask Sketch we can bring to life using a wide variety of digital fabrication tools including a 3D Printer or Laser Cutter.
However, we are going to use the latest addition to mLab...the Cricut Maker.
Step 3: Export Sketch of Nala's Mask to Cricut


The Cricut Maker and Express Air 2? From our end, we can say that they are nice machines.
They are economical cutting machines that allow us to cut out and even sketch our drawings into physical objects made out of paper, vinyl, felt, and even cardboard.
We are using a Cricut Maker, however, feel free to use a Cricut Express Air 2 or other desktop cutting machine. If you are curious about the Cricut Maker, you can purchase online via Amazon and offline at many Arts and Crafts stores, such as Michaels and Jo-Ann Fabrics.
Now we have the DXF file of our Sketch, we can simply import our Sketch File into the Cricut Design Software, known as Cricut Design Space, in order to make sure we are ready to cut and/or print.
In Cricut Design Space;
- Select the 'New Project' Tab
- Select the 'Upload' Tab on the left-hand Toolbar
- Select the DXF file of your Nala Sketch
- Select Upload Image
- Edit Image Size as desired
- For Example; Our Nala Mask is 6" by 6" in order to fit a typical child's face.
Once your DXF file is loaded into Cricut Design Space, ensure you select the 'Linetype' for each of the lines on Nala's Mask you would like to be a 'Cut', 'Draw', or 'Score' line.
Afterward, prepare the Cricut Cutting Mat with desired material and place it in the Cricut Maker.
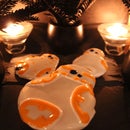
In this case, we've already prepared a Cutting Mat with Light Cardstock in mustard yellow in honor of Simba.
In Cricut Design Space, select 'Make It' from the upper toolbar.
PRO TIP:Sometimes Cricut Design Space has issues with DXF Files when you select 'Make It', if you see a bunch of random lines, go back. Once back to your Cricut Design Space 'Canvas', drag your mouse over the entire image and select the 'Weld' option on the lower right-hand toolbar.
Follow the on-screen instructions until prompted to load the Cricut Cutting Mat, place Cricut Fine Point Pen or Marker, Cricut Blade, etc based on material and features selected.
For example; for our Mask, we used Light Cardstock and a Fine Point Cricut Pen.
If you want to jump straight to cutting a Test Trial of a Nala Mask, we've created a publicly available project on Cricut's Design Space for your making pleasure here;
And there you have it; Nala's Mask.
Want something a little more advanced to show off your true inner Nala? We have something for you as well.
Step 4: Export Nala Mask to Laser Cutter


If you have access to a Laser Cutter (or any other type of Cutting Machine);
Congratulations! You can make your Nala Mask DXF File into reality.
What is a Laser Cutter? A Laser Cutter is a digital fabrication machine that creates objects using lasers from a wide variety of materials including plywood, cardstock, and even acrylic.
LASERS! PHEW! PHEW!
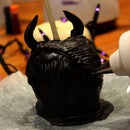
For our more advanced Nala Mask, we used a Epilog Mini Laser Cutter in order to laser-cut the Mask out of 1/8" Birch Plywood. Once completed, we gave her a few coats of acrylic paint.
In order to laser cut your Nala Mask, first;
- Upload your DXF File of Nala's Mask to a Laser Cutter or Cutting Machine Software which corresponds to your specific Machines, such as a Glowforge or an Epilog Mini Laser Cutter.
- TIP: Your software may require you to translate your DXF File into an .SVG File or a PDF File.
If .SVG sounds a like an alien format, don't panic just yet. SVG (Scaled Vector Graphics) files are a very popular file format for 2D or CAD Models and its similar to exporting a Document as a Microsoft Word (.doc) or PDF format (.pdf).
- Once you upload the .SVG File to your specific software, the software will transform your DXF File into a language that machines, in particular 2D Cutting Machines, can understand.
- Select Preferences
- LASER CUT!
So, in order to recap:
.SVG = Language for 2D Cutting Machine SoftwareIn our case, we used Inkscape, which allows for you to upload .SVG files and convert the file format that corresponds to your specific Cutting Machine.
Now, you are ready to truly be the fiercest of Simba's pride.
Step 5: #HakunaMatata


Congratulations, you made your very own Nala Mask.!
As Mufasa once said, in the circle of life, there is a beginning as well as an end. However, the end is never really the end but a new beginning.
When it comes to your Nala Mask, it's very important to customize it in order to make it your very own.
As you have seen so far, Fusion360 allows you to make Sketches and CAD Models that easily bring your ideas to life.
In this Instructable, we customized our Nala Mask using golden yellow and dark brown cardstock, felt, vinyl, acrylic paints, etc. However, you can take this a step further in terms of customizing your Nala Mask.
For example, try exporting your Nala Mask as a .STL file for 3D printing in order to create a 3D Printed stamp of Nala's Mask to decorate an outfit or even make jewelry inspired by Lion King.
Whatever you decide to do, simply #BuildMakeLearn.
Plus, don't forget to share snapshots of your creations with us on Social Media (Instagram, Twitter, and Facebook: @Mbadika) using the Hashtags - #HakunaMatata #mLabBuilds.

Participated in the
DIY Summer Camp Contest


