

Introduction: Maker Olympics Medals


The 2014 Makerlympics is a contest being held by Instructables for authors to showcase their finely-tuned skills by making great projects in different categories. The "events" are: Food, Living, Workshop, Tech, Play, and Outside; the contest runs from February 3 to February 24. To go along with these prizes, we wanted to award a medal for the winners to wear, much like in the quadrennial international sporting competition taking place in Sochi.
There are 6 gold Makerlympic medals for the most outstanding Instructables in each of our 6 categories, and 12 silver medals for the 2 runner-ups in each category.
After you see how they are made, you should head on over to the Makerlympics and enter your project!
Step 1: CAD Design

Since Olympic Medals are designed by the host, I wanted to make medals that reflected who we are at Instructables. Using the International Olympic Committee production standards as a starting point, I started to lay out my design in CAD software.
I wanted to keep some of the traditional medal elements like the round shape and the gold and silver values, but also wanted to incorporate things that evoke our maker community. I chose to incorporate a gear design, to reflect our collective gears turning, the Instructables Robot, and the have it cut by lasers.
I started by creating a base model of a 120mm diameter circle and created a 10mm internal offset. I made the gears my making an external circle offset and then putting an array of radials, trimming the sections to form a rough gear shape. I elected to have the gears only on a portion of the medal.
This was the basic shape I would use for the medals. I saved the drawing as a DWG file and would import it into Corel Draw to laser cut along with the text and Robot.
 You can download my DWG file for reference below.
Attachments

Step 2: Laser Cutter Layout

I use Corel Draw to layout my files before laser cutting. Importing the vector DWG file of the medal outline, I also imported the vector of the Robot outline, then moved each to new layers.
On another new layer I made the text "Instructables Makerlympics 2014" and snapped it to the inner circle of the DWG drawing to create curved text. I spent some time making copies of elements on layers, then shuffled them around to make my laser cuts.
I would be using two types of wood for the medals (a dark and a light wood), and two types of acrylic (mirrored silver and a yellow transparent); both were 1/4" thick. Since there was going to be raster engraving and vector cuts on some pieces, multiple passes were made to ensure clean etches and cuts.
I've included the Corel Draw file of the final layout of my medals below.
Attachments
Step 3: Activate the Laser


Having everything set up in layers in Corel made the cutting easier to manage. For these medals I used two types of 1/4" plywood (a light and a dark wood), and two types of acrylic (yellow transparent and mirrored silver). You'll need to mask the mirrored acrylic so the laser doesn't bounce off the reflective surface and shoot you in the eyeballs.
Below is the process in order of etching and cutting. I used an Epilog 75W laser cutter.
-
first pass - raster etch for medals (speed:50 / Power:50):
-
1/4" birch plywood:
- "Instructables Makerlympics 2014"
- Instructables Robot image
-
1/4" birch plywood:
-DO NOT MOVE WOOD PIECE IN LASER BED
-
second pass - vector cut for medals (Speed:30, Power:40, Frequency: 500):
-
same 1/4" birch plywood:
- Instructables Robot outline
- geared medal outline
-
same 1/4" birch plywood:
-remove cut and etched material from laser bed and set aside
-
third pass - vector cut insets for medals (Speed:30, Power:40, Frequency: 500):
-
1/4" acrylic
- Robot outline
- inner circle
-
1/4" acrylic
-remove cut acrylic from laser bed and set aside
-
fourth pass - vector cut for medals (Speed:30, Power:40, Frequency: 500):
-
1/4" birch plywood:
- geared medal outline
-
1/4" birch plywood:
After the pieces have been etched and cut you can remove any of the protective masking and film from the acrylic.
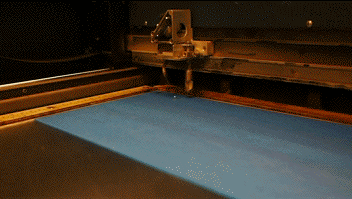
View from inside laser cutter, cutting mirrored acylic
Step 4: Assemble


After the pieces were cut the medals could be assembled. Though the basic design for gold and silver were the same, the materials for each were different. I separated the pieces to their respective piles in order of assembly.
I used super strong 2-part epoxy to hold the pieces together. Since epoxy is sometimes a messy operation, and there was 18 medals to make, I enlisted some help from Renee and Wade. I suggest wearing gloves, too.
Being extra careful not to smear any epoxy on the acrylic, the pieces were assembled and pressed together to ensure a good bond. Any excess epoxy was cleaned with a rag, and the acrylic was cleaned with isopropyl alcohol. Then, the epoxy was left to dry overnight.
Step 5: Ribbon Pin

After the epoxy was completely dry the pin that would hold the ribbon could be secured to the back of the medals.
After drilling shallow pilot holes into the center of the back of each medal I used pliers to bend bent steel brads into a shallow U-shape, these were then inserted into the pilot holes with a little more epoxy and press-fit into place.
The epoxy was then left to set for a few hours.
Step 6: Sew Ribbon


I found 1" wide orange ribbon at the local craft store. I had 18 medals to make, so ended up buying the entire spool (I used all of it!). I eyeballed out a length of ribbon that would mimic the length of the Olympic medals I've seen; I made mine extra dangly.
The ribbon was fed through the metal loop on the back of the medal, then the ribbon ends were folded over to prevent fraying. Using a sewing machine with orange thread the two ends were sewn together to form a ribbon loop.
Step 7: Photo Finish

All that was left was to buff up the medals to a nice shine and hang them for everyone to ogle until they are awarded in the closing ceremony* of the Makerlympics.
Did you win a medal in the 2014 Makerlympics? We want to see it!
*Since we can't be there to personally award you, we want to see a picture with you wearing your medal! Share a picture in the comments below!

Participated in the
Woodworking Contest

Participated in the
Full Spectrum Laser Contest

Participated in the
Makerlympics Contest


