

Introduction: Making of the I-Scream Skull Cone


For Halloween 2021, I wanted to make a unique treat for the family to enjoy. But mostly out of curiosity, I wanted to test how plausible it was to cast ice cream into unique shapes to create an unique activity to do with my nephews when they come to spend the future holiday season over.
A classic design I've always wanted to try to bring to life is the skull ice cream cone.
Supplies
- A digital sculpting program
- 3d printer
- PLA filament
- FDA approved food safe casting mold.
- Rubber Band
- Ice cream
- White melting chocolate
- Food coloring
- Cooking Spray
Step 1: How the Skull Was Made

For my purpose, I used zbrush as my go to 3d software to create the design. Taking the skeleton design starter project that comes with zbrush, I eliminated the extra geometry so only the skull remained. I then used a variety of deformation tools and brushes along with the zmesher tool create a single "scoop" design.
Step 2: Making It a Double Scoop

Once I had a base design for a single scoop, I proceeded further with sculpting and manipulating the design until I had a design resembling a double ice cream scoop.
Step 3: Prepping for 3D Printing

Before exporting the final design, I made a mock ice cream cake cone so I could finalize the design. Generally cake cones range from 2 to 2 5/8" in diameter for the top part of the cone depending on the cake cone manufacturer. I ended up fitting the scoop design to sit upon a 2" cone. With a mock cone, I was able to make final touches to the design with the intention of having the final product capable of free standing without toppling over.
To reduce the plastic usage needed for the print, I hollowed the inside of the design out, and made minor adjustments to reduce as much need as I could for print supports.
Step 4: 3D Printing

The print to be used for casting was printed on my Powerspec Duplicator I3 (Wanhao clone from Microcenter). Though printing a cone wasn't necessary, I wanted to verify that the "ice cream" part would not cause the entire thing to topple over before going out and buying cones and ice cream. Once the print was completed I removed the print supports that were printed with the design (print supports generated in the slicer software. I used simplify3d), and washed the print with soap and water.
FDM settings used:
Layer Height: 0.03
Speed: 60mm/s
Fill: 15%
Fill Pattern: Full Honeycomb
Supports: Yes
Rafts: no
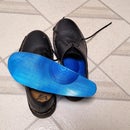
Step 5: Making the Mold

For this project I used Alumilite Amazing Mold Putty that can be found at the craft store near me (Michaels.com). It is a food safe casting mold that I've used previously for casting custom chocolates. It uses a 1:1 putty mixture that can be mixed and rolled out by hand easily.
The mold took approximately 1 and 1/2 boxes to cover the print as I wanted the mold to be thick enough to not tear easily when using, but also last for more than a few uses. The bottom of the mold was left open as the plan was to insert ice cream through the bottom of the mold. Once the mold set, I cut the mold in half and removed the print.
Step 6: Casting in Ice Cream

The mold was held together with a rubber band. With the bottom of the mold open, I filled it with chocolate ice cream and placed afterwards into the freezer overnight.
Step 7: Casted Ice Cream Result


Once the ice cream had time to re-freeze, I gently removed the ice cream from the mold and added it to a vanilla filled cake cone.
Overall, casting in ice cream worked but the method was time consuming as a few hours for the ice cream to freeze was required for the details to set and harden enough so as to not get stuck to the mold when taking it out.
Step 8: Taking It a Step Further

A faster method to produce more skull cones in a shorter amount of time was to create a chocolate cast that could be filled with ice cream instead. Not only was this going to be faster, but the chocolate wouldn't melt as fast at room temp and would hold details of the design better.
To get a two tone look I ended up melting white chocolate on low in two small sauce pans and applying food coloring to the chocolate to get the colors I wanted. While the chocolate melted, I sprayed the mold with a cooking spray to work as the mold release.
When the chocolate was ready, I smeared the chocolate on both side of the mold about 3-5mm thick before closing the mold and rebinding it with a rubber band. I applied a little extra chocolate through the bottom of the mold to cover the inner seam so the two halves would connect. I placed the the cast into the freezer for 20 minutes to re harden the chocolate.
Once the chocolate cast was ready, it easily came out of the mold and through the bottom of the cast I applied the ice cream (this time vanilla).
Step 9: Final Result Chocolate Cast


With chocolate and food coloring, I was able to create a two color chocolate covered ice cream cone in less time than it took to make one completely out of chocolate ice cream.
I hope this Making of the I-Scream Skull Cone has given you ideas into making your own fun dessert ideas projects and what you can design with the use of a 3d printer. Be sure to check out my other Instructables on what you can create with using a 3d printer: Instructables by Twiesner
Design used in this Instructables is available on Myminifactory.com

Participated in the
Halloween Contest


