

Introduction: Meet Your Sewing Machine


The first step in learning how to sew is getting comfortable with your sewing machine and understanding how it works. Even if you don't have the same machine I'm using, the basic parts and principals are the same. In this lesson we're going to explore the parts of our machine, learn how to thread needles, change needles, wind bobbins, adjust thread tension and sew our first few stitches!
Step 1: How a Sewing Machine Works

All sewing machines function on the same basic system. In short, an arm that holds a needle with one thread is positioned over a base plate that holds a bobbin with another thread. When you sew, you insert your fabric between the needle portion and the bobbin portion of the machine. Every time the needle moves up and down through the fabric, the thread from the needle above the fabric is caught by the thread from the bobbin beneath the fabric, creating a lock stitch that secures the layers of fabric together. For a more detailed explanation of how this all works, complete with animated gifs, check out this post.
This deceptively simple mechanism is controlled by a complex series of gears, cams, belts and shafts that are powered by a single motor. Sewing machines may seem like commonplace appliances, but like so many of the devices that surround us, they are actually incredibly sophisticated machines who's invention altered the economic landscape of the world! Take a minute to think about that when you're sewing yourself some curtains :)
Step 2: Anatomy of a Sewing Machine


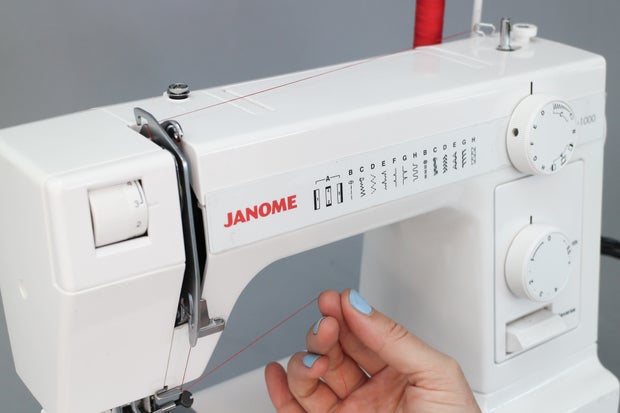
Home sewing machines all have the same basic features. Though your machine may look a bit different than the one I'm showing here, the basic functions will be the same.
I know no one really wants to read an entire sewing machine manual, but it's definitely a good idea to look through the one that came with your machine and read about the more important features, like how to thread your specific machine, wind your bobbin, etc. (If you have an old machine without a manual, you can usually find it online). I have to admit, I learned a few things about my machine that I never knew by looking through the manual while I was writing this class... so read yours! ;)
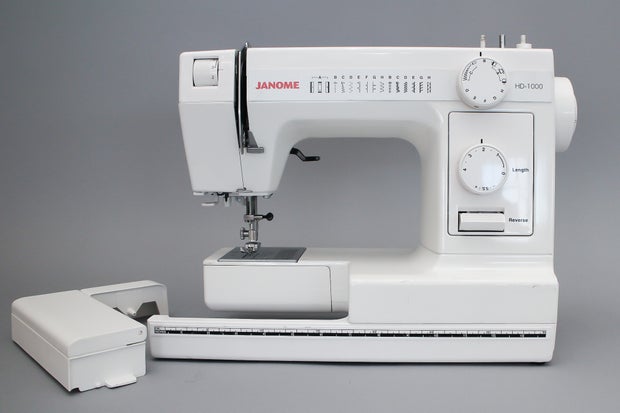
All home machines will have some variation of the basic components I'm pointing to in the diagram above. We'll learn to identify each part now, and talk about a few of them in more depth later:
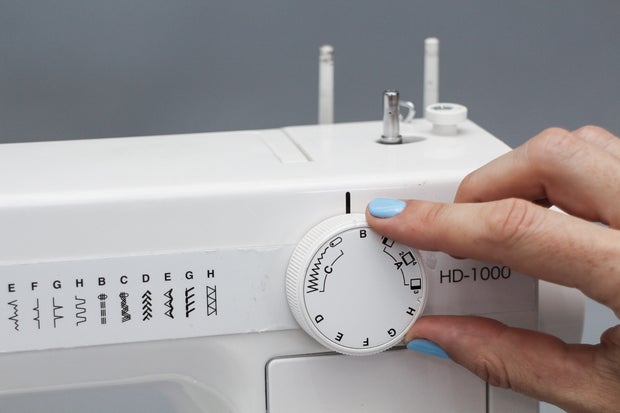
Stitch Selector - this dial lets you pick what kind of stitch you want to use. My machine has 14 stitch options and a setting that lets you create buttonholes. On some, machines like this one, the stitch width selector is also on this dial.
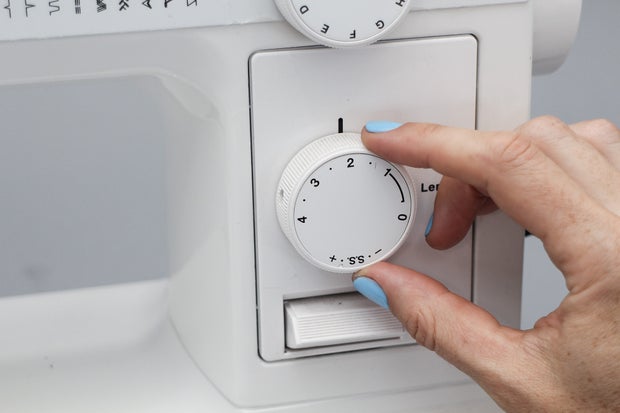
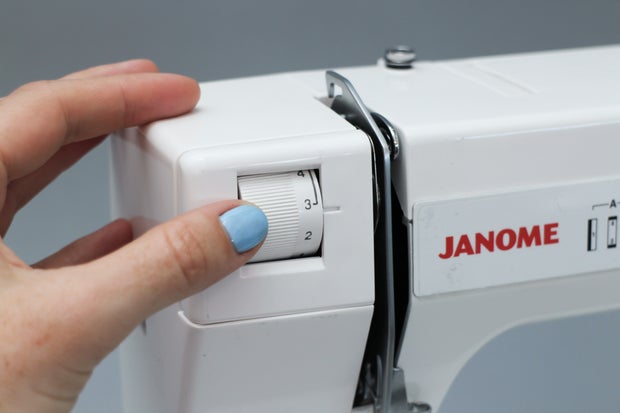
Stitch Length Selector - this dial lets you adjust the length of your stitches for different applications. Different sewing machines will have different maximum stitch lengths.
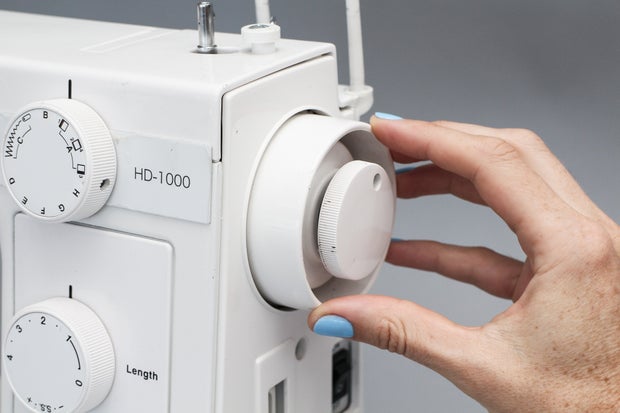
Hand Wheel - the hand wheel lets you manually move the needle up and down.

Backstitch Lever - pressing down on this lever while you sew makes the machine sew backwards.

Thread Spool Pin- this is where the spool for the top thread of the machine sits.

Bobbin Winding Spindle - when you need to wind thread onto a new bobbin, you put the bobbin here to be wound.

Thread Take-up Lever - this is an important part of the stitching mechanism that moves the thread up and down as you sew.
Thread Guides - these define the path your top thread follows from spool to needle, often in slightly different positions on different machine models.
Thread Tension Wheel - lets you adjust how easily the top thread feeds through the machine as you sew.
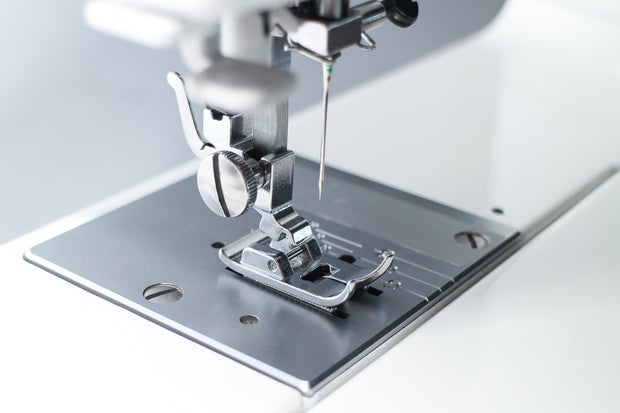
Presser Foot - lowers to hold the fabric in place as you sew, and can be changed for specific sewing situations.

Presser Foot Lifter - a lever at the back of the machine that raises and lowers the presser foot so you can insert and remove fabric and change presser feet.

Needle Plate - a metal plate in the bed of the machine beneath the presser foot with an opening that allows the needle to meet the bobbin below. Also contains the feed dogs which move the fabric forward as you sew.
Extension Table/Storage Box - most machines have a removable section here. keeping the extension table in place gives you a larger sewing surface, while removing it turns the bed of the machine into a free arm that allows you to sew small hard to reach pieces and loops like sleeves. On some machines, like mine, this removable section is also a small storage box where you keep extra bobbins, needles, presser feet etc.

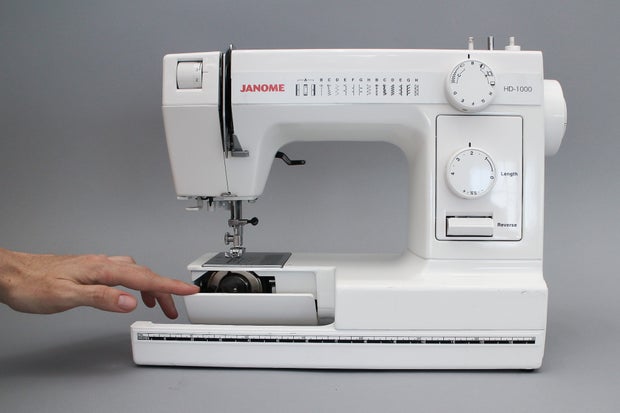
All machines will also have a bobbin assembly in the bed of the machine which is either "top loading" or "bottom loading". The bobbin on this machine is bottom loading and you access it by removing the extension table and flipping down a little panel.

Inside this panel you will find the shuttle which holds the removable bobbin case.

On the right side of the machine (or sometimes the back) you will find the power switch, which also usually turns on a small light above the presser foot. This light is very useful to help you see small details while you're sewing, so make sure it's working.
This side of the machine also has a socket that takes the power cord. The power cord splits to connect to both a wall socket, and a foot pedal which is how you control the machine. When you set up your machine, it's best to put it near the edge of a table or desk, near a convenient wall socket, where the foot pedal can easily reach the floor.

Inside the hand wheel, which is also on this side, many machines have a second wheel called the stop motion knob. This wheel disables the rest of the machine while you wind a bobbin.

Some machines come with a few additional basic features that mine lacks.
For example, a lot of machines also have a dial that adjusts the pressure of the presser foot. This can be useful to help accommodate different thicknesses and types of fabric. Another common feature is the ability to switch the needle position from left to right. This can be useful when sewing fabric edges, or using specialized presser feet.
Step 3: Changing a Needle

If your machine doesn't have a needle in it, you'll need to put one in, and you'll also sometimes need to change needles for different fabrics, or replace one that's broken.
To change the needle in your machine, first make sure the power is off. Sewing machines are powerful little creatures and you don't want to accidentally start sewing while you're messing around with the needle.
Now turn the handwheel towards you until the needle (or empty needle shaft) raises to its highest point, and use the lever in the back to make sure the presser foot is lowered.

Hold the needle while you turn the clamp screw on the right side of the needle shaft towards you to loosen the needle. (On my machine this screw has a flat head that you can turn with your fingers, but on some machines you need a small screwdriver).


If there's an old needle in there, it should come out easily. Insert a new needle and tighten the screw again.
My machine, and most home machines, take standard home machine needles that are flat on one side of the top shaft. This flat side should always face toward the back of the machine when you insert the needle.

Step 4: Changing Presser Feet

The presser foot assembly is made up of three main parts: the presser bar, the foot holder and the presser foot. Most home machines use universal assemblies that are interchangeable, but some have proprietary parts, so check your manual to find out.

The foot holder screws onto the presser bar, and then different types of presser feet can be easily attached and removed from the foot holder. To attach certain kinds of feet you sometimes take off the whole foot holder as well.
To attach the foot holder, raise the needle out of the way, fit the foot holder over the end of the presser bar, insert the thumb screw and tighten it with a small screwdriver.


To remove a foot, just press the small lever on the back of the foot holder.
To attach a foot, raise the presser foot lifter, and position a foot under the foot holder.

Lower the presser foot lifter so the holder snaps onto the foot.

Step 5: Winding a Bobbin

The bobbin is a small spool of thread that goes underneath the needle and loops around the top thread as you sew to create a lock stitch. Before you thread your machine or start sewing, you need to wind a bobbin in the thread color you want to use. Check your manual to see how to wind a bobbin on your machine.
On my machine, you take a spool of thread and put it on the thread spool pin. Then take the loose end of the thread and guide it through the topcover thread guide and the bobbin winder thread guide like this:

Then take an empty bobbin and stick the end of the thread through the hole in the top of the bobbin like this: (You can also wind on top of a spool that has some thread on it already, but you shouldn't do that unless you have to).

Push the bobbin down onto the bobbin winder spindle, and push the whole thing to the right.

Before you actually wind the bobbin you need to disable the functions of the rest of the machine so the presser foot doesn't just pound up and down pointlessly. On my machine, you hold the handwheel with your left hand and turn the stop motion knob in the center of the handwheel towards you with your right hand.

Now hold the end of the thread that is sticking out of the bobbin while you press down on the foot pedal. The bobbin should begin to spin and thread should start winding around it. After it has wound a few times, stop and cut off the end of the thread close to the bobbin, then keep winding until it is full. Some machines have a mechanism that automatically stops the bobbin from spinning when it's full, but you can also just stop it manually.

Cut the thread between the spool and the bobbin, take the bobbin off the spindle and push the spindle back to the left hand position. Also make sure you rotate the stop motion wheel away from you again, or the machine won't sew!
Step 6: Threading the Machine
Every machine has a slightly different threading design, but they are based on the same principal. Look at your machine's manual to see exactly how to thread yours. Most of the time you want to use a top thread the same color as your bobbin thread, but for our purposes here, let's load thread of a contrasting color.
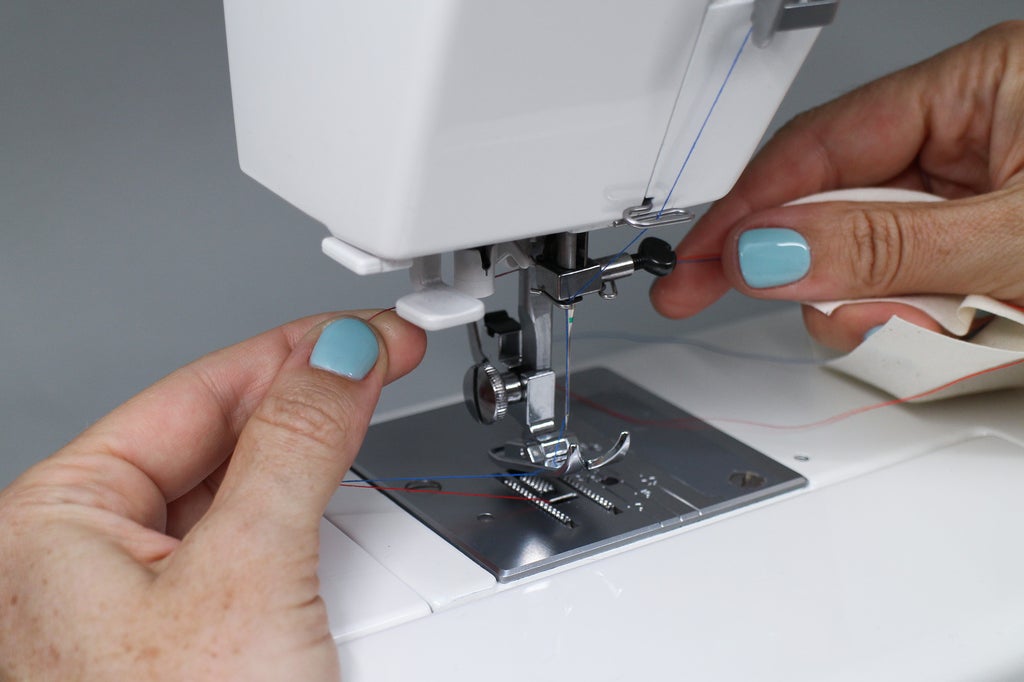
First, turn the handwheel until the thread uptake lever pops out of it's slot. Stop it at its highest point.

Now, put a spool of thread on the thread spool pin, and guide the thread through the top cover thread guide and then the upper thread guide.


Next, loop the thread from the left side down around the bottom of the check spring holder, up the right side and into the eye of the thread uptake lever by pulling it up from left to right.


Thread the two lower thread guides and then the needle bar thread guide.


Last, pass the thread through the eye of the needle from front to back, then pull the thread under and back between the forked prongs of the foot.


Step 7: Loading the Bobbin

First take the bobbin case out of the machine if it's in there. On my machine, which is bottom loading, pull off the table extension and open the panel below the needle plate. Remove the bobbin from the shuttle by grabbing the little metal latch on the front of the bobbin case, and pulling it out.

To insert a new bobbin into the case hold it in one hand with the little protrusion sticking upward. In your other hand, hold your bobbin with the end of the thread coming down off the right side so the bobbin looks like a lowercase "q" not a "p".


Stick the bobbin into the case, then grab the end of the thread and guide it through the the slot in the side of the case until you feel it pop. Leave about 4 inches of thread hanging out.

Now take the case and hold it by the latch lever, the same way you did when you removed it from the shuttle. Stick it back into the shuttle and rotate it a little until you feel it pop into place. When you release the lever it should stay in the shuttle.
Make sure you close the panel over the bobbin shuttle when you're done.

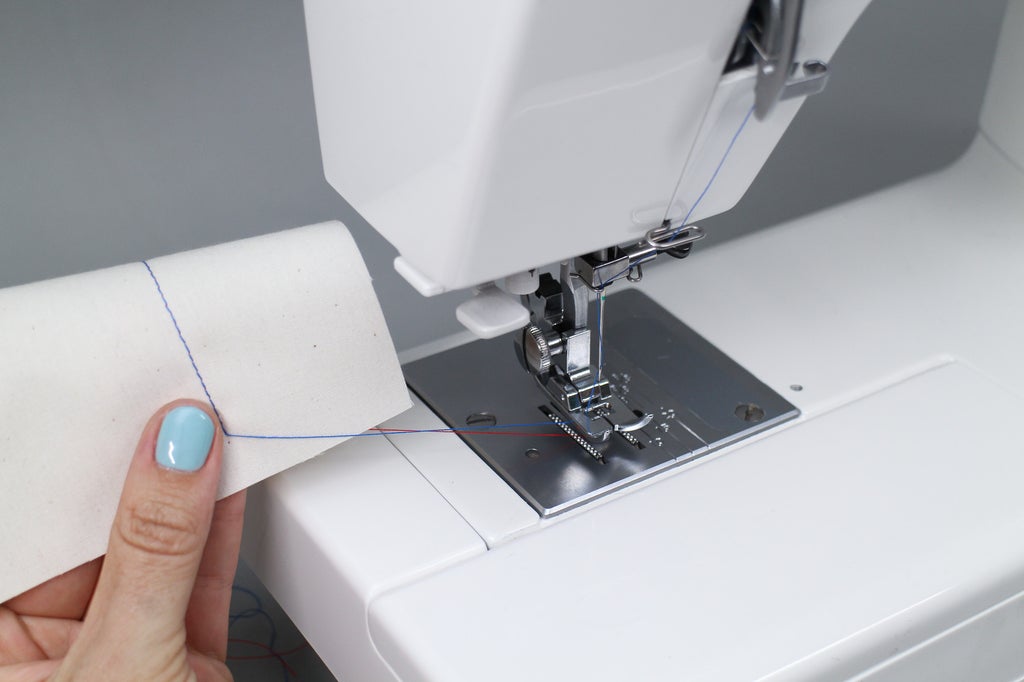
Now you need to draw the bobbin thread up above the needle plate. Raise the presser foot. Grab the end of the top thread with your left hand while you turn the handwheel towards you with your right hand so the needle dips down and then up again. Pull on the thread in your left hand and you should see the bobbin thread appear as a loop below the foot.


Pull on the top thread until you can grab the bobbin thread, sometimes you need to stick something under the presser foot to help you pull the thread out. I seam-ripper works well for this.


Step 8: Sew!

Now that you've gotten your machine all set up and threaded, it's time to actually try sewing!
Cut a piece of test fabric, for your first sewing tests, it's a good idea to use a medium weight cotton like a quilting cotton, muslin or lighter canvas.
Set the the stitch selector to the straight stitch setting, on my machine you do this by turning the dial to 'B'.
To start out with, set the stitch length dial between 2 and 3 and the thread tension wheel to the suggested average tension (on my machine this is between 3 and 5 and is indicated by a bracket in the dial).
Sit down on a chair in front of your machine, make sure the machine is at a comfortable height for you to reach. Raise the presser foot and the needle and make sure at least 3 inches of thread ends are coming out under and behind the foot.
Now put your scrap piece of fabric under the foot and lower it.
Place a hand gently on each side of the fabric, and press down lightly with your foot on the foot pedal until the machine starts to sew.
The fabric will naturally feed under the foot as the machine sews, so all you need to do is guide it lightly in the right direction with your hands on each side of the fabric. As you can tell, pressing down harder on the foot makes the machine sew faster, so practice regulating the speed until you get comfortable.
Be aware of where your hands are in relation to the needle. Sewing on a home machine is fairly safe, but if you get your hand caught under the needle while it's moving, there's a good chance it will puncture your finger. Accidents do happen, so be aware, be careful, sew consciously and intentionally.
To stop sewing, stop pressing down on the foot pedal, and make sure the needle is lifted out of the fabric (if it isn't, turn the handwheel toward you to raise it). Raise the presser foot and pull the fabric out. The thread should pull out easily from the machine, if it seems stuck at all, wiggle the handwheel as you pull the fabric away.
Cut the threads with a thread snipper, or by using the built in thread cutter behind the presser foot. Make sure there are at least 3 inches of loose thread coming out of the machine before you start sewing again.
Practice sewing a few lines of stitches. Pay attention to the sound your machine makes as you sew. Just like with a car, knowing what a sewing machine sounds like when it is running properly will help you know when something isn't right. My machine is on the loud side, especially in these videos, so don't assume your machine will sound the same. If your machine ever gets especially loud or sounds like it is stuck or straining, it might need some attention.
Step 9: Adjusting Tension

When you have practiced a bit, take out your fabric and take a close look at your stitches.
Sometimes the tension on the top thread and bobbin thread needs to be adjusted so your stitches are interlocking correctly. On a properly tensioned stitch, the place where the two threads loop around each other will be hidden inside the fabric, and the stitches will look like this:

If your tension is off, the threads from one side will be pulled up onto the other side and will appear as little dots between the longer stitches like this:

Stitches that look like this aren't as strong as stitches with proper tension because the tighter thread is just running in a straight line and can be pulled out too easily.
We can see this clearly here because we are using a different color of thread on the bobbin and the spool (which is not what you will usually do). If the top thread tension is too loose, we will see blue dots on the bottom of the fabric between the red stitches. In this case, turn the thread tension dial to a slightly higher number and try sewing again until the stitches look right.
If the top thread tension is too tight, we will see red dots on the top of the fabric between the blue stitches. In this case, turn the thread tension dial to a slightly lower number and try sewing again until the stitches look right.

If turning the tension dial a little in either direction doesn't solve the problem, you may have to adjust the tension on the bobbin thread. To do this, take the bobbin case out of the shuttle. If you look at it closely, you will see a tiny screw on one side, turning this screw adjusts the tension of the bobbin thread. Turning the screw clockwise tightens the tension, turning it counterclockwise loosens it. You usually only need to turn it a little.

If you are seeing the top thread coming through as little dots on the bottom of the fabric between the stitches, that means the bobbin thread it too tight, so turn the screw counterclockwise.
If you are seeing the bobbin thread coming through to the top of the fabric as little dots between the stitches, that means the bobbin thread it too loose, so turn the screw clockwise.
Put the bobbin back in and try sewing again.
Step 10: Adjusting Stitch Length

Once your tension is right, try adjusting the stitch length by turning the stitch length dial, and sewing to see what different length stitches look like. Different stitch length can be good for different purposes. Longer stitches are often better for top-stitching that is going to be visible, but shorter stitches are stronger. Seams are usually sewn at a setting of about 2.5, and topstitching looks good around 3.

Step 11: Things to Practice

Play around with sewing simple lines, the more you practice, the better you'll be.
Try sewing a line parallel to the edge of the fabric: use the edge of the foot, or one of the seam guides as a reference. As you sew, keep your eye on the right hand edge of the fabric, not the needle, this will help you sew straighter lines.
Try backstitching: at the beginning and end of most lines of stitching, you need to lock your stitches by sewing backward and forward. Practice this by stopping at the end of a seam, then pressing the backstitch lever and the foot pedal at the same time to sew backwards a few stitches. Try to sew back exactly in the stitches you just made so your sewing looks neat.
Try changing stitch direction: when you need to make a sharp corner with your sewing line, stop sewing, turn the handwheel so the needle drops down into the fabric (if it isn't already), then raise the presser foot and rotate the fabric around the needle to a new position. Drop the presser foot and keep sewing.

Try sewing curved lines: draw a curved pattern on your fabric and try following it with your stitches. When you start to get off track you can stop, lower your needle, raise your presser foot and turn the fabric a little so you are going in the right direction again as I'm doing in this video. Don't worry if yours looks a bit messy, this is hard stuff, and we'll go over it more later.
In the next lesson we'll put these new sewing skills to use by learning how to topstitch, and sew seams!
Step 12: Quiz
{
    "id": "quiz-1",
    "question": "The basic stitch sewn by most sewing machines is called:",
    "answers": [
        {
            "title": "basting stitch",
            "correct": false
        },
        {
            "title": "lock stitch",
            "correct": true
        },
{
            "title": "overlock stitch",
            "correct": false
        }
    ],
    "correctNotice": "Well Done!",
    "incorrectNotice": "Try Again"
}
{
    "id": "quiz-2",
    "question": "If the bobbin thread is showing on the top of your fabric when you sew, you should try:",
    "answers": [
        {
            "title": "decreasing the top thread tension",
            "correct": true
        },
        {
            "title": "increasing the top thread tension",
            "correct": false
        },
{
            "title": "increasing the presser foot pressure",
            "correct": false
        }
    ],
    "correctNotice": "Well Done!",
    "incorrectNotice": "Try Again"
}
{
    "id": "quiz-3",
    "question": "When you load a bobbin into the bobbin case, orient it so it looks like a:",
    "answers": [
        {
            "title": "lower case p",
            "correct": false
        },
        {
            "title": "lower case q",
            "correct": true
        },
{
            "title": "lower case b",
            "correct": false
        }
    ],
    "correctNotice": "Well Done!",
    "incorrectNotice": "Try Again"
}


