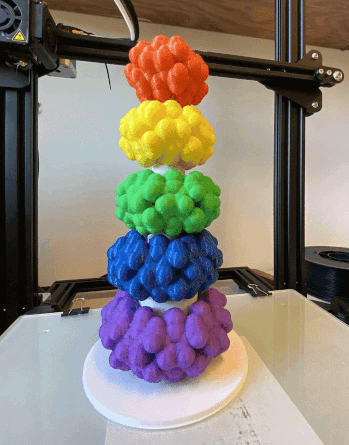
Introduction: Molecular Stacking Rings
I recently got my own 3D printer, and decided to make something fun with a chemistry theme, based on a series of cyclic molecules called cucubiturils ("pumpkins") that remind me of those Fisher-Price stacking toys. I decided to 3D print them and make a cone for them to stack on, as a useful teaching aid in the classroom, or alternatively as a toy for an infant with a predilection for the supramolecular.
Step 1: Cucu-whats?
Cucubiturils are macrocycles consisting of 5, 6, 7, 8 or 10 glycoluril monomers linked together. The name arises because they resemble pumpkins (family Cucurbitaceae). Those with 6 repeat units or more are interesting because the hole in the middle is big enough to accommodate other molecules and ions, i.e. they act as a host to a guest, and can discriminate on the basis of size.
Step 2: Find 3D Files
All of the single crystal X-ray structures of small molecules published are freely available at the Cambridge Crystallographic Data Center. Just plug in the name of the compound you want, choose from the list of available files, and download. They will ask for your contact details. The file will be in .cif format, and in order to read that and convert it into a 3D printable .stl file, you will need to download the free program Mercury. I used the search term "cucubit[?]uril", where "?" was 5, 6, 7, 8 and 10. I found multiple files for each and picked the simplest looking one.
Step 3: Edit in Mercury
Open the .cif file in Mercury. Rotate by holding the left mouse button, zoom in and out using the right mouse button. Set the style to "Spacefill" and select the atoms that are not part of the molecule you want to print. Go to "Display > Show/Hide > Atoms... > Hide. They will disappear from view.
Go to File > Print in 3D. It is kind of slow, probably because the .stl files it generates are large, but let it churn away in the background. By default, Mercury prints at one angstrom = 10 mm, i.e. it scales up the molecule by a factor of 100 million.
Step 4: 3D Print
I used Cura and a Creality CR-10 printer to slice and print out the 5 files in 5 different colors of PLA (orange, yellow, green, blue, purple) at 50% scale. That means the prints are scaled up 50 million times that of molecular level, and generates prints that take about 8-12 hours to print at 0.2 mm resolution. I print directly on to the glass and use supports, but have the settings dialed in such that getting the print off the build plate and removal of support can all be done one-handed with no tools:

Step 5: Stand
I took dimensions directly off the prints and quickly drafted a stand in Fusion360 based on the print heights (47 mm) and the hole size (varied enormously. The .stl file is attached. I printed it white and it took 12 hours to print.
Attachments
Step 6: Display
It makes a good set of props to pass around an organic chemistry classroom, and the stand keeps them orderly. I've never actually given them to a baby to play with - not sure how well they'd hold up to the depredations of a teething infant - but doubtless they'd learn some basic sorting and problem-solving, as well as have an early introduction to macrocyclic and host-guest chemistry.

Made one? Post a picture, I'd love to see it.

Runner Up in the
Multi-Discipline Contest


