

Introduction: Overvolting a Mini R/C Truck With Lithium Polymer Batteries


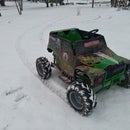

Here's the finished product first. A brand new 1:43 scale Grave Digger, converted from 2 AAA to 1s LiPo batteries. This is a super simple project that you can do it almost any kid's toy that runs on 2x AA/AAA batteries. Each AA is 1.5v, so toys that run on two are usually running at 3v. The 1s LiPo batteries are 3.7v, so you can expect a ~29% increase in speed. Added bonus - 1s batteries are cheap and rechargable, so you'll gain run time and save money on batteries. I've done this to a half dozen of these little trucks so far and it's totally worth it.
Be warned, you are running the risk of frying the electronics or grinding gears when you do mods like these.. but that's half the fun!
Word of caution: LiPo batteries can be dangerous if overcharged and will die permanently if over-discharged. You could install an audible voltage alarm to prevent excess discharge, but I just monitor usage and change batteries as soon as the truck starts to lose speed (about 1/2hr with 500mah cells).
Step 1: Tools and Materials

Here's an overview of my work station and some of the tools you'll need to do a project like this. I didn't end up needing all of these tools for this project, but it's handy to have them available. Bare minimum tools are screw drivers, strippers and soldering iron.
Here's the materials I used for this project:
1:43 Grave Digger Mini R/C Truck (Around $10 each - 27mhz)
1:43 Toro Loco Monster Jam R/C Truck (Around $10 each - 49mhz)
6x 1s 500mah LiPo Batteries and usb charger (About $25)
10 pack of JST Plugs - ($7)
That's really all you need to start modifying kids toys. Once you have a couple batteries and 10 pack of plugs, you can do this project up to 10 times for around $32. This paid for itself in the first month of not buying AAA batteries. My kid was just chewing through batteries having fun with these little trucks. Used to buy a ton of alkaline batteries, now I just swap out the LiPos.
(They also make some 2.4ghz models that come with a backflip ramp. I found them for $19.99 msrp locally, but they're currently super-price gouged on Amazon @$50-90 each. The ramp is pretty cool and 2.4ghz is nice for running multiples. They also run on 3x AAA, so they've got potential for even more overvolting, but I haven't put them to more than 1s LiPo yet. I suspect 2s will fry the electronics instantly.)
Step 2: Remove Body and Roll Cage


The body pops off by squeezing the front inwards and unhooking it from the roll cage. The roll cage is a little trickier to get off. The shock towers (right above each wheel) are little press-in clips. You have to press them out from the underside to get the roll cage off the chassis.
You can see the clips protruding on the underside, on either side of the remove screw sticker. Press on those to get the front of the roll cage separated. I used a mini pick to push them through, but a screwdriver, allen wrench or prety much anything else would work too.
Finally, there's four little black clips that hold the gearbox on, it's easy to remove that, just be careful of the gears popping out when you open it. Then there are two more little green roll cage clips inside there to press out.
Step 3: Solder JST Leads to Circuit Board

Once the roll cage is off, the top of the chassis pops off very easily, just like the gearbox clips. Here you can see where I've soldered my red and black wires of the JST plug to the circuit board. This circuit board was conveniently labeled + (red) and - (black), but if it wasn't, you could look at where the battery contact springs attach to the circuit board and figure out the location and polarity that way.
Cheap chinese solder melts very quickly, so you don't want to hold the iron on the board too long or you'll risk melting things you don't want melted.... which tends to let the magic smoke out and nobody wants that.
Step 4: Drill Chassis and Fish Wires


Now drill a hole in the top of the chassis to let our freshly-soldered JST plug out. Fish the JST plug through the new hole and snap the chassis back together. This is a good time to test the function before you go through with putting the PITA roll cage back on. This one worked great on the first try, but sometimes you have to re-solder if it didn't take.
Step 5: Reassembly


Snap the roll cage back on and tuck the battery inside. Clip the body back on and you're ready to play!
To change the batteries, just press/lift on the hood and you can slide the batteries in/out from under the body. The little 1s LiPos I linked to fit in the roll cage just about perfectly.
Step 6: Play!


Here is a gif and short video of the truck in action. I've modified 6 of these trucks so far and they've been great fun for me and my son. They're cheap enough that it's okay if we break one (and then have a parts truck!), but fast enough to really zip around the house. I recommend only driving them on hard, smooth surfaces. Exterior and carpet is not good for them, the gearboxes will grind if there's too much traction.
Last picture is of the newest additions to the fleet. My son loves that they're making more Monster Jam trucks in this line now. We still have a few more to collect.
If you enjoyed this project, please feel free to follow me here or on instagram/youtube/reddit @ PoppaFixIt
Thanks for reading and best of luck with your projects!


