

Introduction: Pretty Patterned Cutting Board


Use leftover scrap pieces of hardwood in your shop to make a pretty cutting board.
You will need the following tools: table saw, planer, biscuit joiner (optional), router table (optional), circular or palm sander, and clamps.
Supplies
Various hardwood boards or scraps, 3/4" strong by 16 to 18 inches long; 8 by 20 inch plywood or MDF; wood glue; #10 biscuits (optional); mineral oil/butcher block oil
Step 1: Cut the Hardwood Strips

First, cut a number of different colored hardwood boards. My scrap pieces varied between 18 and 42 inches long, so I trimmed all boards to 18 inches. The width of all the boards varied but should add up to between 12 to 18 inches. I had cherry, maple, and walnut boards.
Step 2: Clamping Cauls

Cut a 8 by 20 inch MDF or plywood board into two pieces along the diagonal. The exact dimensions are not very critical, you are just creating the angle for the cutting board pieces.
Step 3: Layout

Lay out the hardwood boards along the edge of the MDF/Plywood cauls as shown. Arrange the different hardwoods in a pleasing pattern. Number or mark the boards for future reference.
Step 4: Mark the Centerline


While lined up draw a line across the centers of the hardwood boards. See pictures.
Step 5: Biscuits (or Dowels) for Alignment


Now use a biscuit joiner to cut #10 biscuit slots in each board, using the center-line from the previous step for alignment. Because of the angle, the slots are slightly offset on each side of the boards. If you don’t have a biscuit joiner, drill 1/4” holes and insert short dowel pieces to keep the boards aligned.
This step is very important to prevent the boards from sliding around during the glue-up. I know this first hand!
Don’t cut a slot on the two outside edges.
Step 6: Glue and Clamp


Put four ‘stopper’ screws into the MDF/Plywood cauls to prevent the assembly from sliding around when you clamp down. Don't skip this step as it really helps! Glue-up the hardwood boards with biscuits for alignment; and the MDF/Plywood cauls to help align your clamps. The pictures should illustrate how to do it. Clean up any glue squeeze-out and leave clamped to dry for at least 4 hours.
Step 7: Trim Edges


After the assembly has dried, lightly plane both sides to get them flat. Don't finish-plane and sand yet since you have more gluing to do. Then cut off the two jagged edges on the table saw.
Step 8: Cut Strips

Next, cut the assembly into six 2.5 inches wide strips. Number the strips for future reference.
Step 9: Arrange Your Cutting Board Layout


Arrange the strips into a pleasing pattern for your cutting board. You may flip each other strip to create a chevron or herringbone pattern. Put narrow strips in between for contrast if desired. A few examples are shown. I decided on the first design using four of the diagonal strips and three spacer strips from 'wormy' maple. The resulting cutting board will be about 16" by 13".
I have two extra diagonal strips which I am going to use for another cutting board.
Step 10: More Gluing


Strongly recommended: Since you are gluing end-grain you should use two to three biscuits on each joint when putting together your cutting board. Makes it a lot stronger and durable.
Step 11: Plane and Sand


Be patient and let the glue dry. Then surface plane and sand the cutting board. I use 100, 150, and 220 grid sand paper in sequence.
Step 12: Trim to Final Size

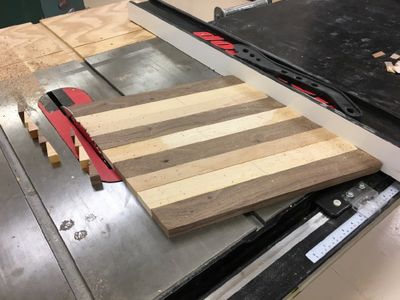
Straighten and square all edges of the board using the table saw.
Step 13: Optional Spline


For strength and looks cut a shallow groove (saw blade kerf) in the center of each edge of the board, and glue a contrasting spline into this groove. Trim the spline flush after glue dries.
Step 14: Finish


Optional: On a router table cut a juice groove one inch from the edges.
Round the corners of the board. I use my corner markers (see my Instructable here) to draw the corner fillets and cut/sand to the line. Afterwards, round over (router table or by hand) all edges and finish sanding your board. Finish with food grade mineral oil or butcher block oil. I like to 'bake' the oiled boards outside in the sunshine to help the oil penetrate the wood.
When using the board re-oil/re-finish it with butcher block/mineral oil as needed to keep it in great shape!


