

Introduction: Rotating Moon Lamp


Have you ever wanted a part of the night sky right next to you? This Rotating Moon Phase Lamp will do just that! It's a moon lamp that has a lithophane moon cover and a stepper motor inside to turn a moon shade to replicate the moon's phases. The lithophane is accurate to the moon's topography based on NASA resources. We're Payasa and Selina, high school seniors in Ms. Berbawy's Principles of Engineering class who are interested in engineering. We got the idea for a moon lamp originally from Tiffany Lo's SIDE project, and Ms. Berbawy came up with the idea of showing the phases of the moon. We followed @poblocki1982's Real Time Moon Phase Lamp Instructable step by step. We started off with very basic CAD and soldering experience and no Arduino experience and learned so much throughout the process.
Supplies
Materials:
- 28-BYJ-48 Stepper motor
- ULN2003 stepper motor driver (included in the same package as Motor via link)
- Arduino Nano
- 12V 1A power supply (2.1mm center positive)
- 12V LED E10 bulb
- E10 bulb holder
- Mini On/Off slide switch
- Mini 3 position switch (1P3T)
- DC socket (2.1mm pin to match your power supply)
- 3 x 2.2k Ohm 0.5W resistors
- 1 x 220 Ohm 0.5W resistor
- 3 x M3 x 10mm screw
- 1m of 15-18 SWG enameled copper wire (about 1mm diameter)
- Solder (preferably lead-free)
- PLA (Black and White)
- Stranded Core Wire (4-5 different colors for organization)
- Sandpaper
Tools:
- 3D printer (we used the Prusa Mini+ and Prusa i3 MK3S+)
- Soldering Iron
Software:
- Fusion360
- PrusaSlicer
- Arduino IDE
Step 1: 3D Designing


Use Fusion360 to begin CAD.
- Create the base shade that is attached to the motor. This rotates to create the phases. The bottom must fit the stepper motor exactly so it rotates smoothly.
- Create base with components and holes for screws. If you ordered the exact same parts as listed above, the dimensions should be exact in the attached STL, but if you have different parts, make sure they are consistent.
- Create base cap. Link the base design onto your base cap so you can sketch the screw holes while ensuring the screw holes match up with the base.
- Make hook for LED light. Ensure the bottom fits into the assigned hole on the base cap.


Step 2: Print All Parts


- For all 3D printing, we used the PrusaSlicer software.
- For the hook, upload it onto PrusaSlicer and cut 0.05mm off the bottom so that it lays flat and can print without support. It does not need to be perfectly cylindrical to hold the LED light. You can print in any color.
Step 3: Create Lithophane


1. First, we found a map of the moon. We downloaded NASA's CGI Moon Kit as a PNG. (attached in the images above). You can use the default option on the LithophaneMaker site later if you want to.
2. Go to the LithophaneMaker site. Before entering any information, go to the bottom and read all the information there and watch the tutorial video.
3. Create an account with the site so you can save your settings.
4. Now that you have created an account on the website, go to “Choose File” and select the PNG of the moon from the NASA website.
5. Because the top hole of the lithophane is what is going to be on the bottom/resting on the base, we need to flip image so that the lithophane prints out the correct way
6. Next fill out the following settings:
- Lithophane resolution: 0.12
- Sphere diameter: 5.293 in
- Maximum thickness: 2mm
- Minimum thickness: 0.5mm
- Y-shift: 0.5 (or whatever you think centers the png on the display box the best)
7. That’s it! Now you can download your moon lithophane. Those are all the settings we used, and feel free to modify those settings to your own build!
Step 4: 3D Print Lithophane


- Upload the downloaded lithophane of the moon into the software.
- Change the print settings to match pictures 1 and 2.
- Go to expert print settings. Go to the Raft section. Change the number of raft layers to 3. Rafts give the first layers of the print more surface area because it is like 2 lines of filament.
- We did a test print of 1/4 of the lithophane before printing out the entire thing to see if the material and print settings worked. Pictures 3 and 4 include our rafts from test print that were successful, thus, applied to the final print.
- Make sure that you print the Moon lithophane in white PLA (or PETG). White material gives the best results for the lamp. Make sure the material is translucent so the light shines through.
Step 5: Test to Fit


- The moon shade should fit through the hole at the bottom of the lithophane. This is to ensure you can take the lithophane off to change LED lights should the battery run out.
- The moon shade should fit snugly on top of the stepper motor.
- The lithophane should be stable on top of the base cap. The wall on top of the base cap is to prevent the lithophane from being knocked off and ensure stability.
- Should any of these tests fail, you will need to alter your 3D designs.
Step 6: Arduino Code
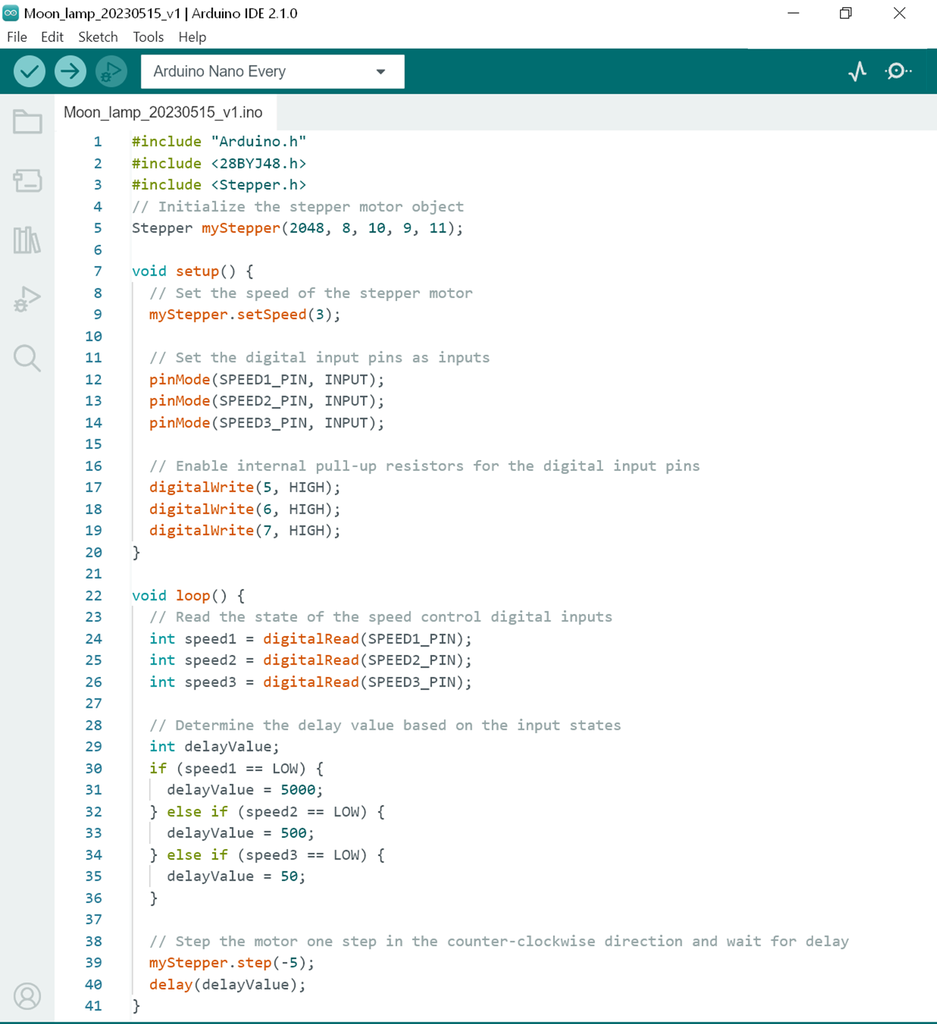
Next, we uploaded code using Arduino IDE to control the stepper motor's rotation for each of the moon phases.
The code created by @poblocki1982 in his Real Time Moon Phase Lamp Instructable didn't work, so the code had to be written from scratch.
- Open Arduino IDE
- Copy the code in the pictures above
- Connect Arduino Nano to PC/Laptop using USB cable
- Choose COM port [Tools -> Port “…” -> COM…]
- Choose Arduino board type [Tools -> Board: “…” -> Arduino Nano]
- Choose Arduino Nano processor type [Tools -> Processor: “…” -> ATmega328P] (you will probably need to change it to ATmega328P (Old Bootloader) depending on Arduino Nano)
- Upload
You do need to have the Arduino connected to the computer for the code to run.

Step 7: Solder the Circuit


In the photos above, you can see the connection diagram for the Moon Phase Lamp. The diagram was made by @poblocki1982 in his Real Time Moon Phase Lamp Instructable. At first, we followed this diagram, but as time went on, Payasa realized that it would just be easier to solder most components onto a empty PCB board so she did that instead (the diagram is the third photo).
We had significant trouble soldering wires onto the 3-position switch since the switch was meant for a breadboard. The wires kept falling off and the solder was not sticking. We used isopropyl alcohol to coat the switch tips and wire ends to get the two parts to solder together.
Use a multimeter to test conductivity and troubleshoot your circuit!!! This is one of the most important checks in this step (and just in circuitry in general), any mistake not caught early on will lead to tedious checking over of all soldered locations.
Step 8: Assemble LED Hook/Base Cover


At first, we tried SLA printing the hook along with the base cap, but it was too large and we were unable to cure it properly. So, we made the two parts of the LED Hook/Base Cover separate and cut the hook on PrusaSlicer so it can be printed on a flat face.
- Hot glue the hook into Hole 2 of the base cap. Hole 1 should fit the stepper motor and be in the center. Make sure to fully let the hot glue cool and stabilize.
- Cut two 1-foot-long strips of enameled copper wire.
- Using sandpaper, file down the 2 ends of the wires to remove the enameled coating for conductivity. Use a multimeter to make sure you have filed enough.
- Wrap the enameled copper wires around the hook/bent arm.
- Once you reach the end of the hook, twist the wires together to form an 'S' shape with the E10 bulb holder at the end.
- Connect the copper wire to the E10 bulb holder by wrapping it around the screw and tightening the screws on each side. Check polarity before soldering, by connecting wires to the bulb holder and switching the lamp on to see if it works.
- Identify hole 3 on the base cap, the one farthest away from the center. Feed the wire through hole 3 to connect to the copper wire above the base.
- Solder the copper wire to the 2 wires which are connected to the 12V E10 bulb in the solder map.
- Screw the lid to the base with the 3 x M3 x 10mm screws.
Step 9: Assemble All Parts


You're now almost done creating your very own Rotating Moon Phase Lamp!
- First, place your finished circuit into the base of the rotating moon lamp, as shown in the first picture.
- Next, place the LED Hook/Base Cover on top of the base unit so that the holes for the screws align. Screw in the base cover with the 3 x M3 x 10mm screws.
- Attach the moon shade to the rotating motor part, and make sure that it aligns with the LED and copper wire hanging from the LED Hook.
- Once everything is set, place the moon lithophane over top.
Sit back and enjoy a celestial body right in front of your eyes!

Runner Up in the
3D Printing Student Design Challenge


