

Introduction: Saw Blade Throwing Hatchet


Last summer I bought an old corded circular saw at a garage sale because my cordless one was dying. This saw had an old, potentially original, blade on it that was rusted so I swapped it out for my blade on my cordless one. I don't like to throw away materials I can use for other projects so I held onto it for a future project. Then in the winter I went axe throwing and it got me thinking. I now wanted to make a throwing hatchet and I had the perfect use for that saw blade.
NOTE: Because this is an unknown material it is not the best option for making a hatchet. I was just looking to make a fun toy out of the material I had so it worked for that purpose. If you use a saw blade for a knife or hatchet just be aware that it might not hold up that great. For a fun toy or fist try at a knife it would work decent enough and it would give you some practice.
Step 1: Making the Design

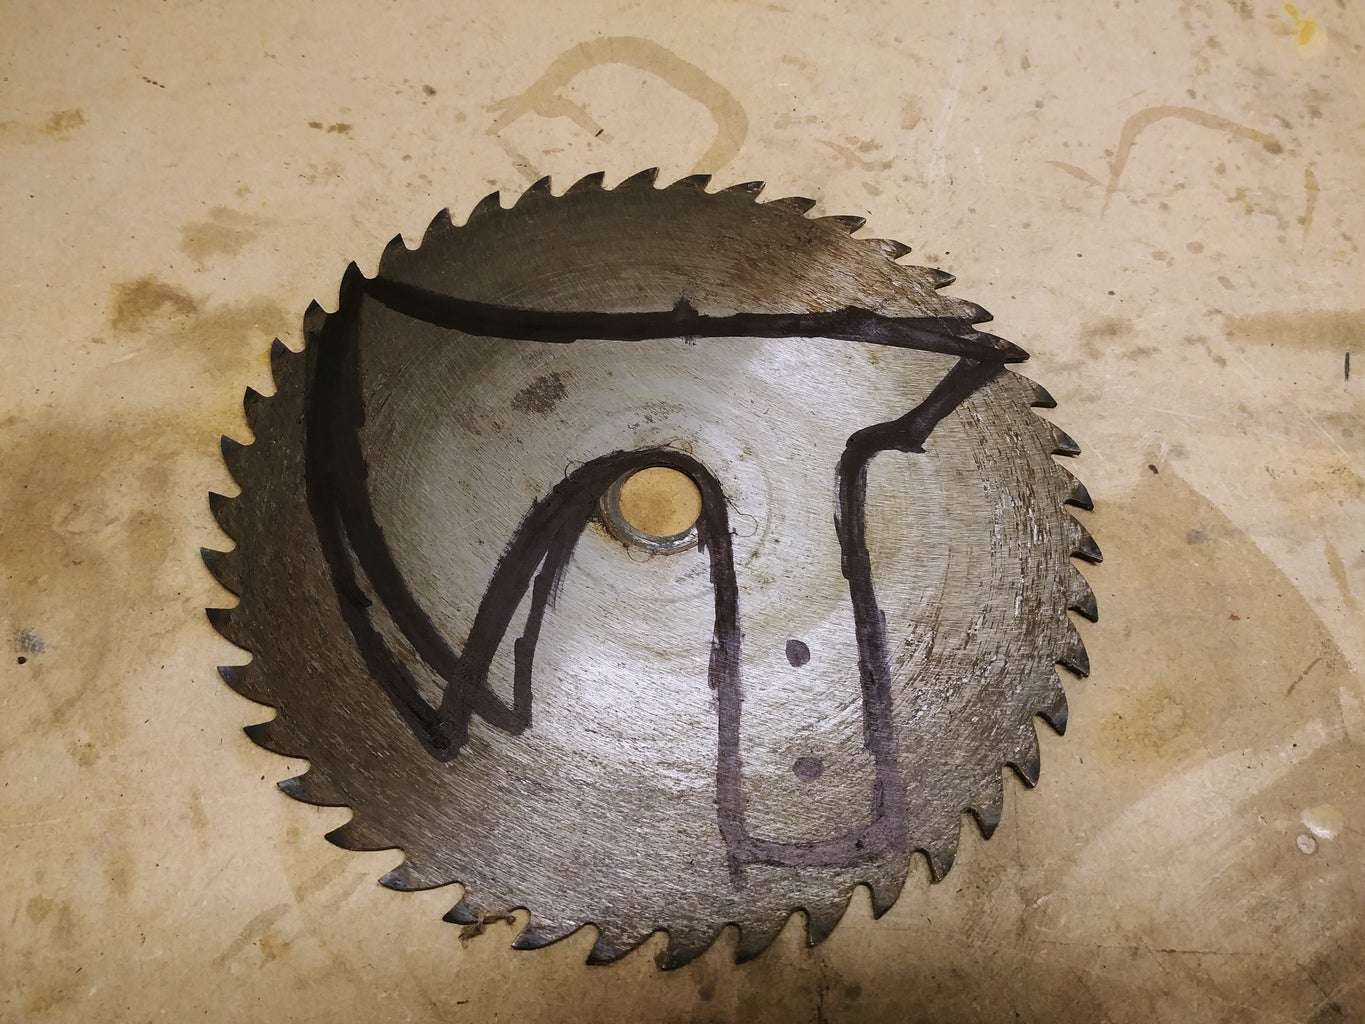

Because this was a 7-1/4 in blade it would have to be a smaller sized hatchet. I did some looking around to get an idea of a good shape for a hatchet head and then I drew my design onto the saw. I knew I wouldn't be able to have a full tang blade but I wanted to make it reach as far down the handle as possible.
NOTE: There have been discussions on using saw blades for knives or bladed objects. There is a difference between saw blades with carbide teeth or ones without. I'm not sure how good the one's with carbide teeth are but one's like this that do not have them are completely made out of the same material and should be at least half decent as a bladed object.
Step 2: Cutting to Shape


Now that you have the pattern marked out it is tome to cut it out. I used a angle grinder for this but a hacksaw with a lot of time would work as well. I've used a hacksaw for cutting out blades before. An angle grinder is a wonderful tool to have.
Step 3: Cleaning Up the Shape


With the rough shape cut, it was now time to refine the shape. I used my belt sander for the outside shape and a Dremel for the inside curves. If you don't have these tools, hand files will always work but will be very difficult as the steel is relatively hard. You could anneal it to help with shaping if you needed.
NOTE: If you don't plan on hardening the steel then you want to make sure that you do not over heat it when grinding.
Step 4: Initial Bevel


With the shape now finalized, it is time to put the initial bevels onto the hatchet head. I wasn't sure if I needed to heat treat this yet as I had to wait until Monday to have access to a hardness tester. Because of this I only ground the initial bevel. If I have to heat treat it then I don't want to finish the bevel until after the heat treat.
Step 5: Drill Holes for Handle


Because I am mounting this to a handle I needed to drill the holes for the pins that will hold the handle on the hatchet head. I wasn't sure if I'd be able to drill the holes without annealing the blade so I figured I'd see how it went and anneal it if it wouldn't drill. But it did drill. Which was a little concerning as this meant the material was not as hard as I would like for it to be able to hold an edge well.
Step 6: Handle Shape


Now that the head portion was fully shaped it was time to move on to the handle. I had a piece of maple that I used on a previous instructible to make a handle for a full size hatchet for a friend so I figured I'd use the scrap from that for this. I first outlined the portion of the head that would engage with the handle and then sketched the rest of the handle. Because of the smaller size of this head I kept the handle on the smaller size as well. I made sure there was enough material to hold on to and then shaped it to give it a nice hatchet handle shape.
Step 7: Cutting Out the Handle


Now that you have a pattern it is time to cut it out. I always cut wide leaving some extra material around my sketch and then I'll sand to shape. I figure it is always easier to remove more material than to add material back.
Step 8: Cutting the Slot for the Blade


Now that you have the rough shape of the handle it is time to cut the slot for the head to fit into. I set the fence on the band saw to cut it down the center and then I cut it down to the mark I made when I sketched out the handle shape. Depending on your blade thickness you may need to do a second cut or sand the slot to make it the same size as the material thickness.
Step 9: Drilling the Holes for Pins


Now to drill the matching holes in the handle. I drilled the first hole and then used the hatchet head as a guide to drill the second hole. I used one of the 1/4 in brass pins that I will use to hold it together to keep the first hole aligned.
Step 10: Start Shaping the Handle


I then inserted the blade in the slot and inserted both pins into place and sanded down the handle so that it was the same width as the hatchet head.
Step 11: Shaping the Handle


It's now time to finalize the shape of the handle. I cleaned up the shape and then rounded out all the edges to make it fit better when holding it. I started with 60 grit on my sander to rough out the shape and then moved to 120 and then sanded it down by hand with 320 grit sandpaper.
Step 12: Testing Material Hardness


Monday finally came and it was time to hardness test the saw blade. I first started with a cut off piece that I sanded smooth to give me a good surface to test. This had a hardness of 45HRC. This wasn't as high as I hoped. I was aiming for around 55HRC. It wouldn't hold an edge very well. Since I didn't have access to the hardness tester this weekend and I was concerned the material wouldn't be hard enough because I could drill though it, I took another cut off piece and heated it to red hot with a torch, quenched it in canola oil, and temped it at 400 degrees F for two hours. I then tested this piece on the hardness tester and got 60HRC. This is what I was looking for. This just tells me that this material can be heat treated and that I will have to heat treat the blade for it to be as hard as I would like.
Step 13: Heat Treating the Blade


Now that I determined that I need to heat treat the blade it is time to do that. I just used a torch to bring the edges up to red hot and then quenched it in canola oil. Because I didn't want it to be quite as high as 60HRC, I tempered it at 475 degrees F for two sets of 2 hours.
Step 14: Final Bevel and Sanding

Now that the blade is hard it is time to clean it up. Because this was a saw blade and I am making this to be a throwing hatchet I am not going to spend a ton of time making sure this has the absolutely best finish. Not to mention that the material is already pretty thin, I don't want to sand it any thinner if I can help it. Especially if it only makes it look better at the cost of performance. I just sanded away the scale with fine emery paper and then took it to my belt sander to finish the bevels and sharpen it 800 grit. This is as high of grit as I have for my belt grinder and because it's a throwing hatchet it doesn't even need to be that sharp.
Step 15: Mounting the Head on the Handle


With the head finished it is time to mount it on the handle. If I were to be making a knife, I would glue the handle along with potentially peening the rivets as well. Because I will be throwing this there is an increased risk that the handle could break, and I don't want to have to deal with removing the glue to attach another handle to it, I will just be peening the rivets without glue. Then all I would need to do is drill out the rivets and make a new handle to attach to it.
If you haven't peened rivets before all you need to do it cut cut the brass rod so that it sticks out 1/8 in from each side and then do lots of little hits with a ball peen hammer until the end widen so that the handle can't separate. The hatchet head was a little loose before peening so I just kept hitting the rivets until it couldn't move and then kept going a little longer. Just be careful as you can widen the rivet too much and it can split the wood. And then you just grind down the rivet so that it is flush with the handle. Keep checking the fit as you grind and if it loosens up then you can hammer it some more.
Step 16: Finish the Handle


Now that it is almost complete it is time to apply the finish to the handle. I used danish oil because it is what already and it seems to work pretty well.
Step 17: Having Some Fun With It

It is now complete. All that is left is to go and have fun with it. Throwing a hatchet takes some practice but is a lot of fun. I used some Styrofoam as a target because I don't currently have a good soft target yet. I was also concerned about the steel being too brittle and breaking but the throws that didn't stick bounced across the concrete and the blade remained fine so that is a good sign. I plan on eventually making a target out of soft pine so that knives or hatchets will stick into it well. Hard woods don't work as well as targets because they can dull your blades faster or make them hard to stick into.

Participated in the
Trash to Treasure


