

Introduction: Sheet Metal Tool Tray
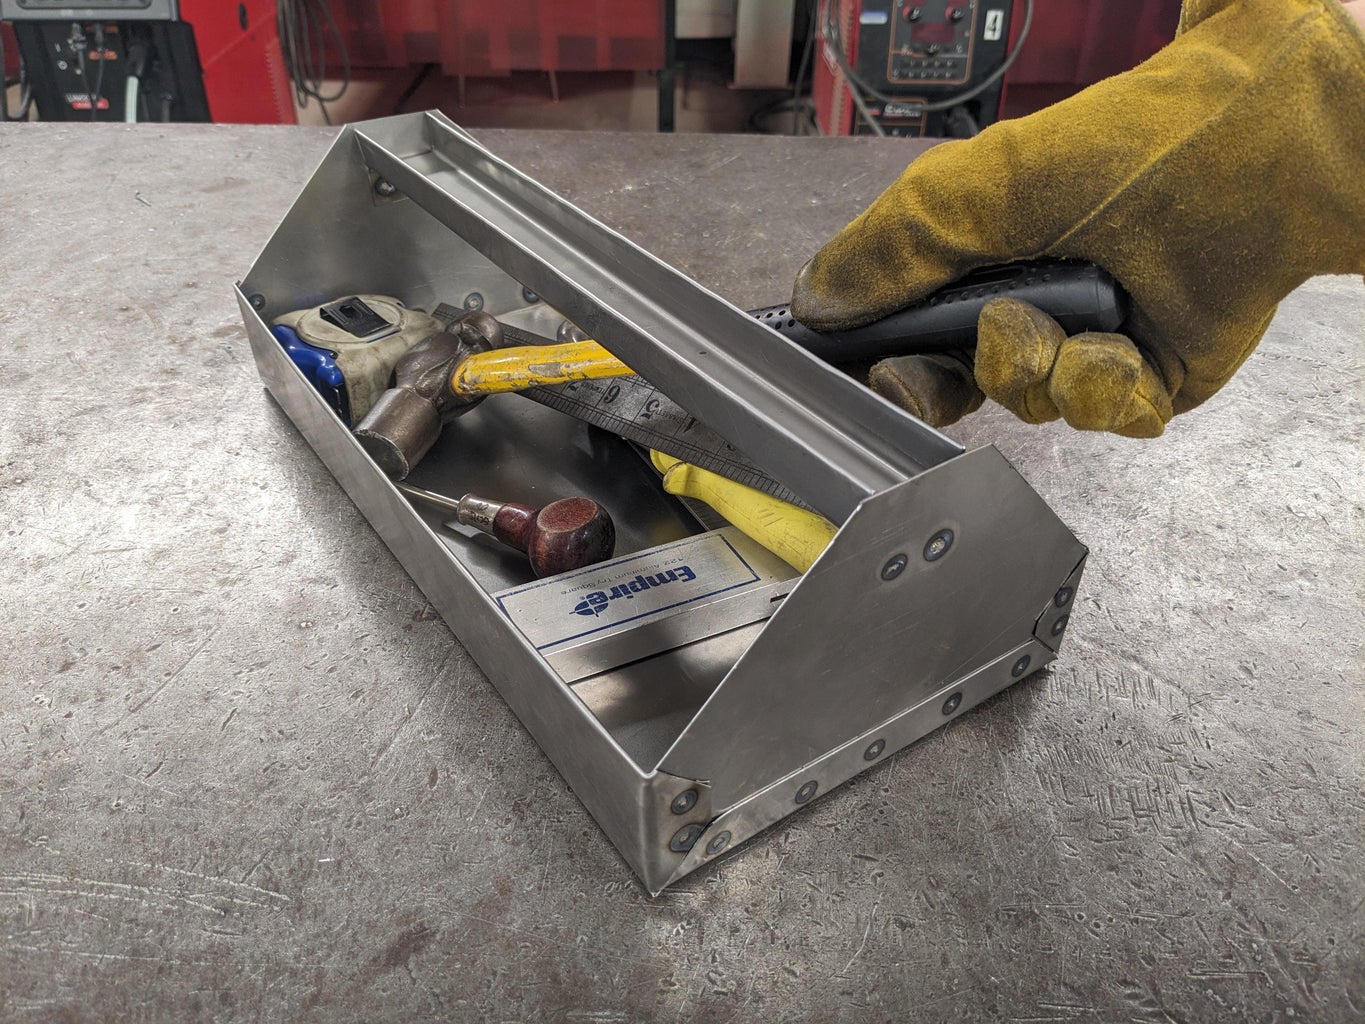


This is the last sheet metal project I assign in my level one manufacturing class. This is the first multiple part project my students work with in class that they will have to assemble together. I like this project because it makes the students read multiple sets of plans, use all their knowledge and skills from previous projects. I only give the students just enough metal to make all the parts of the tool tray, which forces them to plan out their entire process before starting. My students enjoy making this tool tray and it is one of the projects that former students always come back and say they still have theirs from when they were in high school.
If you are new to simple sheet metal work and are looking for some more beginner projects to start with, check out my other sheet metal Instructables where I detail how to make DOG TAGS, VISE JAW COVERS, AND A SIMPLE BOX.
These tool trays are great to have around the house or workshop. I have several of them around my classrooms to hold pencils, rulers, scissors, or calculators. They also work great to hold small bolts and parts when I have to fix one of our machines in the shop. Of course, you can just use it to hold your tools as well but we have a large tool cabinet in our workshop, so I have to find alternative uses for them. If you are really enjoying sheet metal work and want to go a step further after you make a tool tray, try designing a full tool box for this tray to sit in!
In the following steps I'm going to walk you through making this sheet metal tool tray.
Step 1: Tools, Materials, and Parts List

Tool/Equipment List
- Ruler
- Try Square
- Scratch Awl
- Aviation Shears
- Foot Shear (optional)
- Sheet Metal Brake
- Hammer
- Anvil/Solid Surface
- Spot Welder (Alternative: Power Drill and Pop Rivets)
- Tape Measure
Material List
- Sheet Metal ( I used 22 Gauge)
- Layout Fluid (optional)
- Emery Cloth/Sand Paper
- Spray Paint
Parts to Make
- 1 - Tray
- 2 - Ends
- 1 - Handle
Step 2: Video Tutorial
If you like watching to learn more than reading, check out the video tutorial of this project above. It's an updated version all in under 8 minutes!
Step 3: Planning


Before you start constructing any project, you should have some semblance of a plan. That plan can be in your head, a quick sketch on the back of a napkin, or a full fledged neatly dimensioned drawing. Use whatever method you prefer, as with all the projects I use in my class I work with a fully dimensioned drawing. For this tool tray project I do not have my students sketch out their plans. I hand out pre-made drawings for all of their parts without measurements. As a class we then go through and add in the dimensions we will need to know to make each part.
Because all of our sheet metal is donated to our high school by a local company, the size of our metal changes from year to year. Normally our tool trays end up being about 14 inches long, 7 inches wide, and have 2 inch tall sides. Currently the metal that we have will only allow our trays to have 1-1/2 inch tall sides and be 5 inches wide.
The size of the tray may change but the layout will basically be the same. I have included the exact fully dimensioned plans that I used for this tool tray. I also included a blank set of plans for each part if you want to use your own measurements. Feel free to use all of the plans as is or change them to you suit your own specifications.

Step 4: Cut Tray Metal to Size


You will need to build from the ground up for this project, which means we need to start by making the tray first. The first step will be to cut your metal to the overall size needed to construct your tray. For me that size was 15-1/2" x 9". My tray will end up being long and skinny, if you would like a wider tray, cut your metal closer to 15-1/2" x 12".
I use a foot shear for this step, its quicker and will leave my metal with a clean smooth edge, but you could do the same thing with a pair of aviation shears. Whatever tool you use to cut your metal you want to focus on cutting your material square. If your rectangular piece comes out more rhomboid or trapezoid in shape, you're not going to have a fun time marking straight lines and crafting a quality tray.
The order of operations for this step are as follows:
- Measure and mark your overall length measurement from one edge of your metal.
- Scratch a line parallel to the edge you measured from through the marked length measurement
- Measure and mark your overall width measurement from an edge adjacent to the edge you just measured from.
- Scratch a line parallel to the edge you measured from through the marked width measurement
- Cut along both lines
Step 5: Layout Tray


With your material now at the needed size, you need to mark your layout onto your metal. Use a scratch awl and try square to measure and mark the lines for your tray. You will get the most accurate measurements and marked lines if you work from the edge of your metal. When you start marking your angled lines try to get them exactly at 45 degrees. If those angled lines are not at 45 degrees when you bend, your tray your will either have unwanted overlap of metal or big gaps.
The order of operations for this step are as follows:
- Measure and mark your measurements for your hem from each long edge.
- Scratch a line parallel to the edge you measured from through each of your hem measurement marks.
- Measure and mark your measurements for your side from each long edge.
- Scratch a line parallel to the edge you measured from through each of your side measurement marks.
- Measure and mark your measurements for your tabs from each short edge.
- Scratch a line parallel to the edge you measured from through each of your tab measurement marks.
- At the intersections of your hem, side, and tab lines scratch a 45 degree line.
Step 6: Cut Tray to Shape


This portion of the project is quick and simple. Take your aviation shears and cut out the triangular portions of your metal on the tab sides of your piece. Be sure to cut right on your line to get those 90 degree angles that you want. Try to not cut in past your tab line.
Step 7: Bend Into a Tray

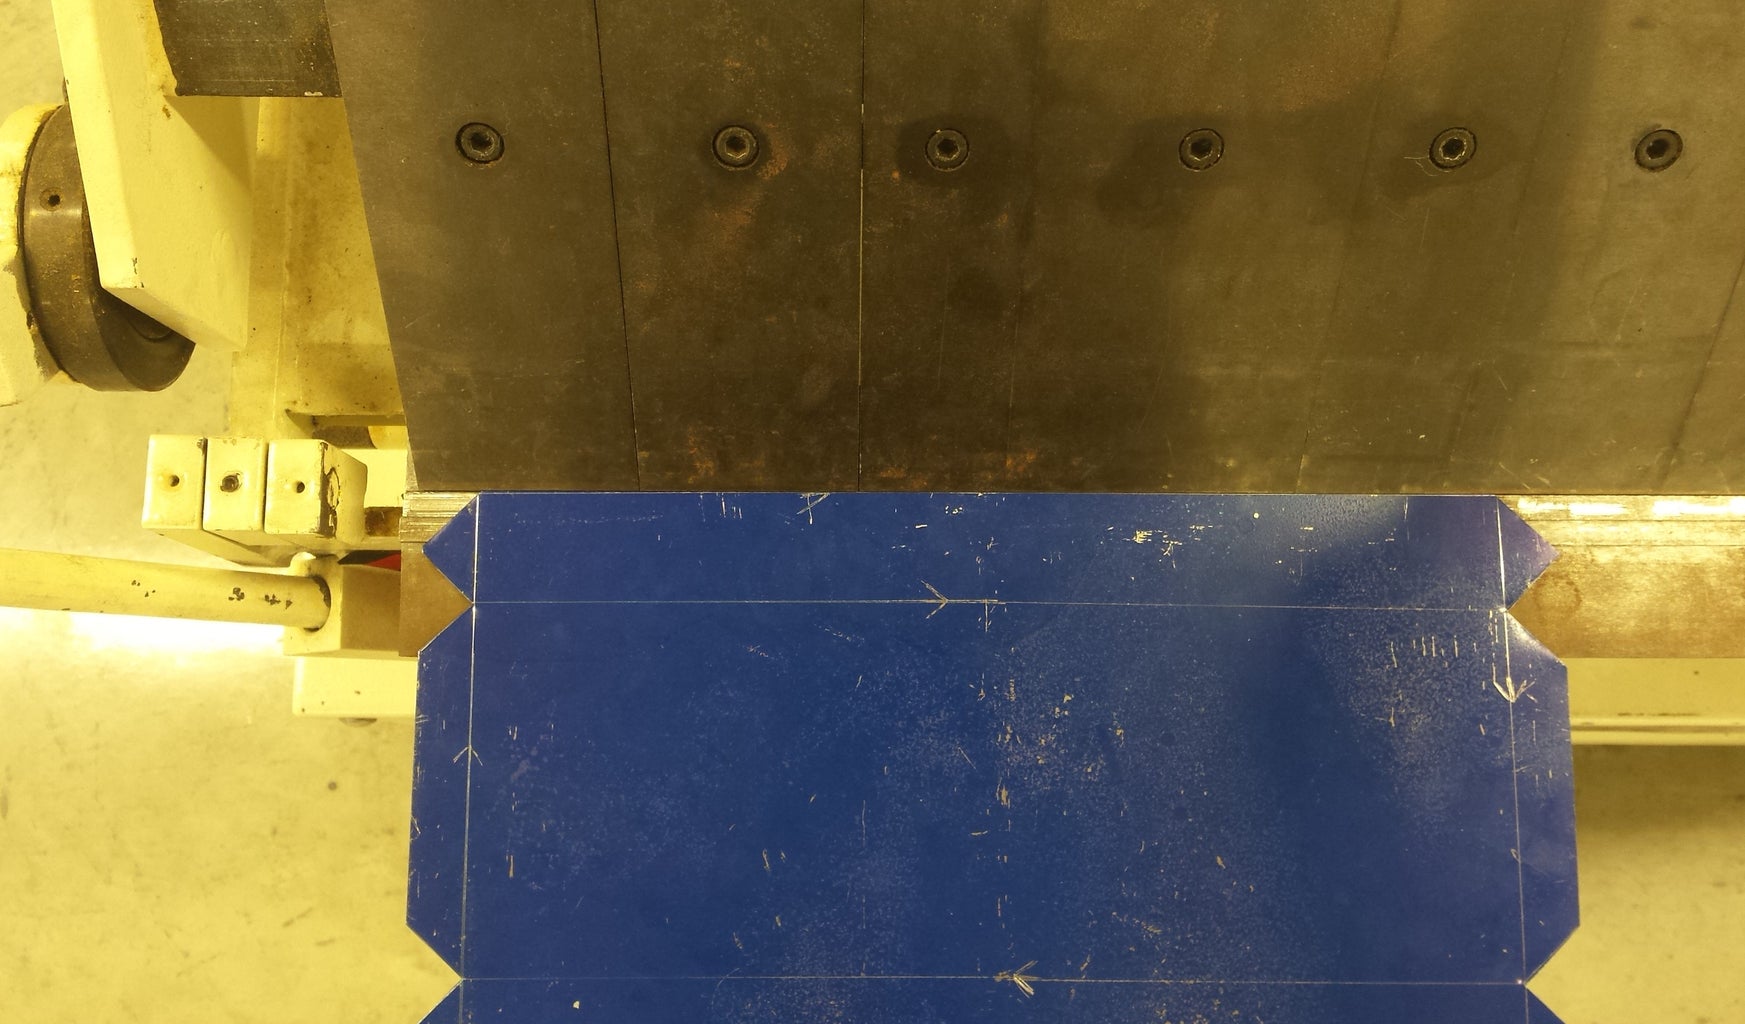


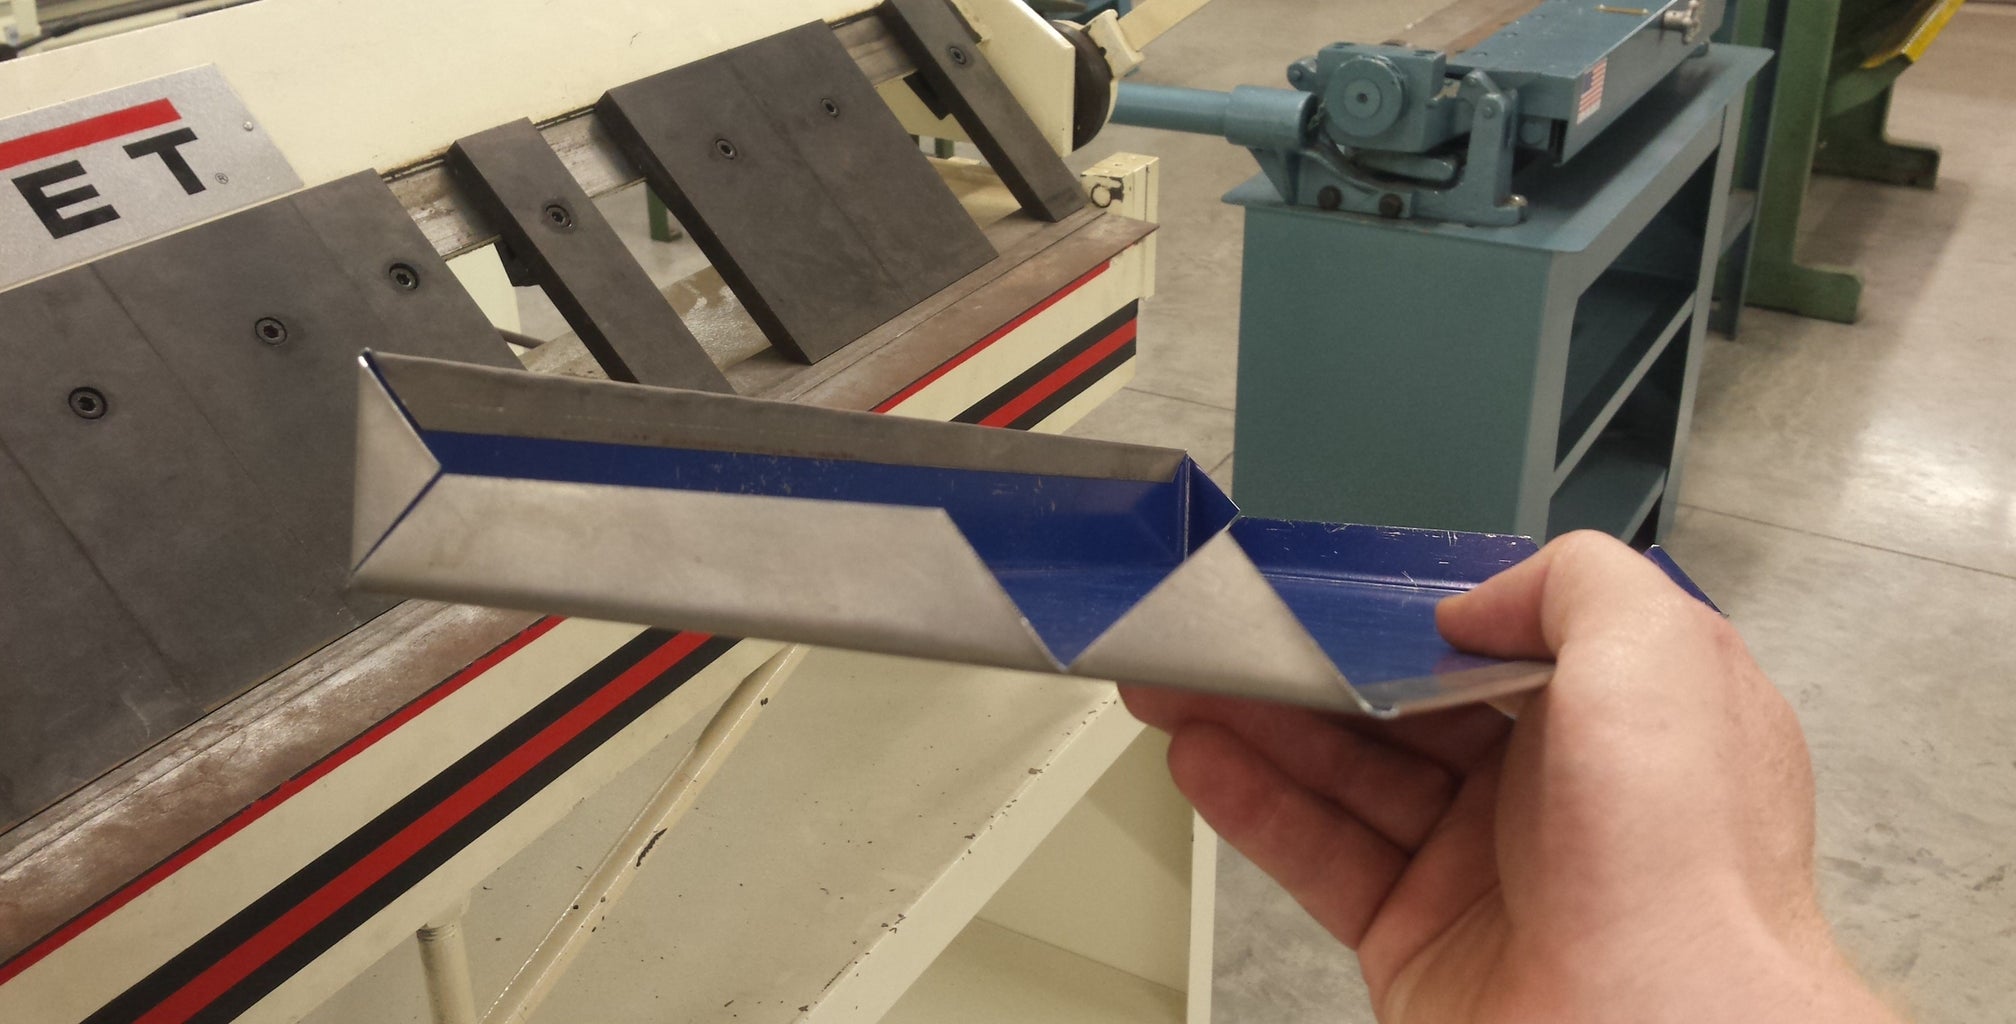


Take your time with this step. Without a well made, quality tray continuing on with making the ends or handle won't make much sense. Make straight bends and work through all the operations in this step in the correct order. My students will tend to get in a hurry and fold the side line before folding the tabs or they fold the sides before folding and flattening the hems. Most of these mistakes are fixable but your tray will have some pretty visible blunders.
I'm using my sheet metal brake to bend my hems in this Instructable. After bending your hems on the brake take your time flattening them out. As you use your hammer to flatten your hems your metal will most likely begin to curl up. Straightening out the curl in your metal again is easy and will have no effect on the rest of the construction of your tray. But, if you are not paying attention as you hammer your hems flat the curling up of your metal will cause you to put dents across your hem. Overall the dents won't effect your tray's usefulness as a container but it will not look as good as it could. As I always remind my students, you should always want to take pride in the quality of your work.
The order of operations for this step are as follows:
- Bend your metal at the hem lines as far as your brake will allow.
- Place your bent hems back under the teeth of your brake to press them down even further.
- Flatten your hems with a hammer on an anvil or solid surface.
- Bend your metal at the tab lines up to 90 degrees.
- Bend your metal at the side lines up to 90 degrees.
Step 8: Make the Ends


One part down, two parts left. In this step you will make two ends for your tool tray. There is no bending in this step you just need to follow your plan and cut your ends to the size and shape that you want. I chose to use just a simple angular shape.
To cut your metal to the correct size for your ends, use a measuring tape to measure the inside of your fully formed tray. Read the measuring tape at the center of the curve in the tape and then use that measurement for the width of your end. When I completed that process the tape measure read just a shade under five inches, so I cut my metal to 4-15/16 inches. Another tip to help make your ends sit flush with the bottom of your tray is to chamfer the bottom corners of your ends.
To get the right height for the start of my angle cut on each side of my hem I put my metal into my tray and just marked my ends at the top of the sides of the tray. I wanted the top of my ends to just be wide enough to fit my handle. I measured in from each side of my metal to leave roughly 1-1/4" section where my handle will be attached.
The order of operations for this step are as follows:
- Measure the inside width of your tray
- Measure and mark your metal to your needed width and height.
- Cut your metal to size.
- Measure and mark your metal for your desired shape.
- Cut your metal to shape.
Step 9: Attach Ends to Tray


You can use several different methods to attach your ends to your tray. I have access to a spot welder and that is the method I detail here. If you don't have access to a spot welder, you can use rivets or some other mechanical fastener of your choice.
To spot weld you will want to clean your metal of any rust, oil, or layout fluid first. If your metal is not cleaned you may not get as strong as weld as you would like. Also, if the metal isn't clean enough you may not have a good enough connection for the spot welder to work.
Be sure your ends are positioned the way you want before you place your first spot weld, as once that first spot is welded you won't be able to move it again. If your end is positioned at an angle when that first weld is placed, your end will be positioned at that angle from that point forward.
Using a spot welder is pretty straight forward. Position your electrodes over the area you want to weld, press down on your foot pedal until your electricity cycles through your electrodes. Once the cycle ends, just release your foot pedal, reposition, and repeat.
Step 10: Make Handle


The handle is the last part of you need to make for your tool tray and the most difficult piece to bend. My students always have trouble getting their hems flattened without dents and often times one of their sides gets bent at an angle. The layout for this step is pretty easy, just take your time and make sure when you cut you only cut away material that is not supposed to be there.
Your hems are rather small so folding them with your brake will require a little more force than your other bends up to this point. Once the hems are bent and pressed down, don't forget to flatten them out to the best of your ability. All of your bends will be made with your brake besides when you bend your tabs. Your tabs will be easier to fold with the use of a vise.
The order of operations for this step are as follows:
- Measure and mark your metal to your needed length and height.
- Cut your metal to size.
- Measure and mark your hem lines from the long edge of your metal.
- Measure and mark your side lines from the long edge of your metal.
- Measure and mark your tab lines from the short edge of your metal.
- Cut your metal to shape.
- Use your brake to bend and press your hems.
- Flatten your hems.
- Use your brake to bend your sides to 90 degrees.
- Use your vise to fold your tabs down to 90 degrees.
Step 11: Fasten Handle to Ends


We are back to the fastening. Again, use whatever method to attach your handle to your ends that you would like. You want your handle to sit flush with the tops of your ends. This will be the same process as attaching your ends to your tray, so just like before, be sure to have your handle properly positioned before spot welding.
Step 12: Paint


To keep your tool tray in fighting shape for years to come, you should finish it in some way. I choose to spay paint mine. I gave my tool tray a light sanding to clean off any rust and oil, then I wiped it clean before painting. I didn't try to clean off the layout fluid for this project as it shouldn't affect the quality of the finish enough to make it worth while. If this was a more decorative project I would have cleaned up the metal, including the layout fluid, before painting to ensure the best quality finish as possible.
I put two coats of paint on my tool tray and checked for runs or missed spots between the first and second coat. As always when you are painting or finishing a project be sure to be in a well ventilated area. We have a finishing room in one of my workshops and that is where I painted my tool tray.
Step 13: Finished!


DONE! After your paint is dry your tool tray is finished and you can use it for whatever purpose you can come up with.
If you need any help or clarification on a step, let me know in the comments. I'll try to help as much as I can.
If you make a tool tray, let me know!
Enjoy creating and learning!


