

Introduction: Ski Free Yeti


 You just spent a rewarding day on the digital slopes playing the PC classic Ski Free. You hit a bunch of sweet rainbow jumps, barely crashed into any trees or rocks, and you and your arrow keys are about to enjoy a well-deserved aprés-ski. Wait...What’s that? It’s coming straight for you, and it looks hunnnngry!
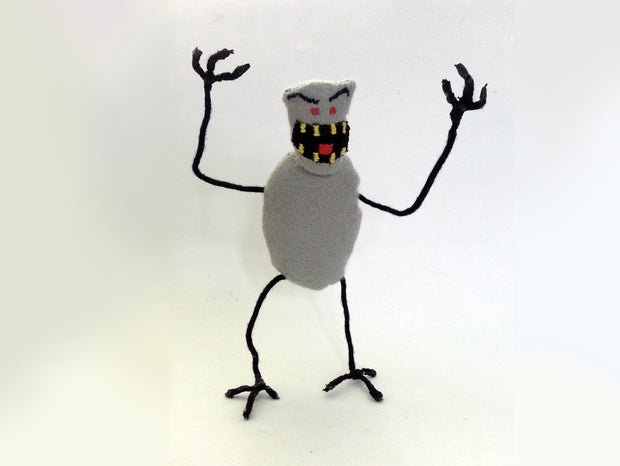
It's the Ski Free Yeti! There's no escape!
If you spent a little too much time playing free Windows games (whether as a youth or employee), you’ll recognize this little guy. Though I call the monster in this game a yeti, the Official Ski Free website calls him the Abominable Snow Monster.
Here's what I used to make mine:
tools:
| materials:
|  |
Step 1: Sketch + Cut, Sew

Using images found online I sketched out the rough shape of the body and head of the monster on grey felt. If your fabric is asymmetrical then sketch on the opposite side of the desired surface. Being a low-res, 2-cell animation some areas were left to interpretation. In one animation cell the top of its head looks to me like there are horns, but in the other animation cell it's maybe just his eyebrows. I liked the idea of small horns, so I added them in my sketch.
I first sketched the size and proportions I wanted, then sketched an offset of about 5mm (1/4"). The shapes were then cut out along the offset. This offset will be where we sew the two halves together.
Once cut, sew along the outline of your sketch. You do not have to be careful with your sewing, lumpy spots add to the character of this low-res monster. Remember to leave a 12mm (1/2") portion open at the end of your sewing, this will be where we turn the monster inside out and hide the stitching. One sewn, turn the monster right-side out and set aside.
Step 2: Make Bendy Frame

make it bendy:
I made this wire frame from solid core copper electrical wire inserted into shoelaces with the aglets removed. The wire I had was too thick to feed inside the shoelaces I bought, the vinyl jacket was stripped off a length of wire equal to my shoelace length and then fed into the laces until all the way through.
attach sections:
For the spine of the monster I cut a small section of solid core wire, about 8cm (3") with each end stripped. After making two bendy sections of my two shoeslaces I folded each in half and made a small opening in the fabric jacket, a portion of the copper was pulled out to be soldered. The spine ends were crimped around each halfway portion of the laced wire, then soldered in place. I used a similar length of wire for the neck, attached to the junction at one of the spine ends. After, I used a small dab of hot glue on the junction locations after cooling to hold the fabric in place.
Step 3: Install Frame

Joining the wire frame with the body is easy. One appendage at a time, feed the wire into the body and gently push the wire though a gap in your stitching (remember when I said in Step 1 to make your stitching sloppy?). I chose to locate my neck slightly forward of the stitching of the two halves, so I poked a small pilot hole in the fabric with a pencil and fed the wire though. This forward placement gave him a more aggressive look.
Step 4: Adding Fingers, Finishing Frame + Stuff That Monster


digits:
Once the frame is installed inside the monster body the fingers and toes can be installed.
Estimate how long you want the arms and legs to be, I made mine about at long as the body is tall. Cut appendages 1cm (1/4") longer then required, then strip the shoelace off the 1cm (1/4") offset. This exposed wire will form the toe/finger and angle/wrist of the monster. Since it's hard to tell from the low-res graphic how long his arms and legs are I decided to make them a little longer. I think it makes him look more menacing this way.
A small section of solid core wire was stripped and cut into 2cm(3/4") sections, these will be the toes/fingers of the monster. The sections were bend using needle nose pliers to have a hook on one end. Hooked wire sections were attached to ankle/wrist, crimped, and then soldered in place.
finish frame:
Once toes and fingers are installed they can be covered up with small sections of shoelace. After covering each digit a small dab of hot glue was used to hold the shoelace in place. The finger ends were curled over to soften the surface. Hot glue was applied and the frayed ends smoothed into the glue. At juncture points black thread was bound around the joint until the glue and solder was covered. I was able to seal the tread end in the hot glue while it was still cooling, leaving minimal loose ended thread.
stuff:
Use pillow or any type of batting to stuff your monster, insert stuffing through same opening the frame was installed in. Make sure both sides of wire frame are covered with batting. Leave body opening unsewn for now..
Step 5: Face

That face...it terrified me as a kid and it has the same affect now. "I DON'T SKI ANYMORE, OKAY?! LEAVE ME ALONE!"
Pro tip: insert a small scrap of cardboard inside the head while embroidering, it prevents you from going through both sides and sewing the head completely together.
Scrap black fabric was cut to the rough shape of a crazied grin bent on the flesh of downhill human. Scrap black fabric was cut roughly the size and shape I wanted, then sew onto head with black thread. The tongue and eyes were embroidered, then yellow for the teeth and black for those terrifying eyebrows. Embroidery might seem like a lot of work, but this head was small and I finished in 30 minutes. This was my first time embroidering, and it was super easy.
When the face is finished remove the cardboard insert.
Step 6: Sew Head + Body

After the face has been embroidered a small hole was poked in the back of the head and the stiff wire neck was inserted. The excess wire was wound into a loose coil and stuffed inside the head. The head opening was sewn shut, then sewn to the body.
You're done! Your Ski Free Yeti is now ready to terrorize any slope bound skiers.
Have a yearning for those halcyon days of Ski Free, but don't know where to find an outlet? I got you covered. You can play a remake of this classic game here. Hit the slopes, you've earned it*!
*hint: I'm comming to get you

Did you make your own Ski Free Yeti? Post a picture of your version of this project in the comments below.
Happy making :)

Participated in the
Instructables Design Competition

Participated in the
Sew Warm Contest


