

Introduction: Space Ship Business Card


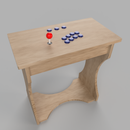
Some time ago I came across 3d printed business cards that you can assemble. I really liked this idea but I didn't like that there wasn't enough area to really put any of your info. This got my thinking about a simplified design that would have a large plaque for your info but also be able to have some sort of assembly factor to it. This is what resulted.
The link below is to this Tinkercad model with all the optional ships. Just pick the ship you want, change the text, add any needed connector pieces, and then then you'll be good to go.
Step 1: Making the Credit Card Shaped Base


The following steps are are brief explanation on how I made this. You don't need to do these if you just want to modify my model.
I started by making a border to contain all of the pieces of the assembly. I made this about the size of a credit card and 2mm thick. I'm not going to go into extreme detail here, Tinkercad has tutorials on their website if you need to learn how to use it.
Step 2: Making the Plaque for Your Info


I then made a smaller rectangle to be the plaque where you can put any info you want. I then put a small slot in the top so that the ship stand can be inserted into it. For the text, I put it as a hole but you could have it protrude if you wanted the text to sit proud of the plaque.
Step 3: Making the Ship Stand


I wanted the ship to be at an angle when assembled so I set the placement of the two tabs that would engage the plaque and ship and then filled in the rest to the shape I wanted.
Step 4: Pick or Make a Ship


Now comes time to make the ship you want. I made a good amount of optional ships that you can choose from if you want or you can create your own. If you are basing the ship off of a existing design then I would recommend finding a silhouette of that ship and then convert it to a SVG file, there are websites that will do this for you, and then you can import the SVG file into Tinkercad. You then just need to put in a hole that is the size of the tabs on the ship stand.
Step 5: Connect It All Together


Now that you have all four parts of the business card it is time to fit them all together and then make some small breakaway tabs to connect everything together. Now it is ready to print.
Step 6: Get It Ready for Printing

Now it is time to convert it to g-code to be able to print it. I used slic3r because I have a Prusa MK3 3D printer. If you have a 3D printer than I assume you have your own program to do this. This does not need any supports so it should be pretty straight forward.
Step 7: Print It


Now it's time to send that g-code over to your printer and print it out. Mine took almost exactly an hour to finish this print. Now you just need to had these out to get your name out there.
Step 8: Final Thoughts and Changes

So, I accidentally had some dimensional problems where I made some changes to one part of the model but didn't update the other parts in it so it ended up not fitting together. I had to modify it a bit to make it all fit together. I have since fixed the model so you shouldn't have that problem if you use mine.
As you can also see, you can only fit so much text on here before it starts blending together and makes it difficult to read. The instructables came out really nice but my handle for this site blended together a little, the I and J at the beginning, and makes it a little difficult to read. I would recommend keeping the text to just the necessities so that it is still legible. But there is definitely enough room to put enough basic info on there.

Participated in the
Pocket-Sized Contest

Participated in the
Space Challenge


