

Introduction: Star Wars Droid Build


This is a down and dirty Instructable to really let this community know about a fun project that I discovered some other Star Wars Junkies were building. I have a few SCI FI items in my movie room and once I saw this, I had to make this.
This is the summation of two resources and me doing the work. There is a guy in the UK who details a number of Droids in CAD / STL files and sells the files on Etsy (see link below). And another gentleman designed the arduino circuit that detects motion and plays sounds when motion is detected in front of the droid.
I had to modify the original droid 3D files to fit it up for the arduino circuit.
Where to go for the initial information starts with crediting...
Giving MUCH Deserved Credits:
Droid Division - 3D STL Print Files go to @Spacebobs
On Etsy - https://www.etsy.com/listing/738096855/
"SpaceBobs Pit Droid Movie Styled 3D printable files"
For support on Model & Build, see the community on Facebook at - www.facebook.com/SpacebobsDroids/
Arduino Base Program & Circuit - John Guarnero (www.guarnero.com) Check out his website.. really cool stuff he has built well beyond this droid.
Supplies
• Approx 3- 4 spools of PLA filament
• 3D print files from Droid Division
• (1) Arduino Nano
• (1) HiLetgo HC-SR501 PIR Infrared Sensor
• (1) HiLetgo YX5300 UART Control Serial MP3 Music Player Module
• (1) MicroSd card
• (1) Panel Mount 2.1mm DC barrel jack (Optional)
• (1) 5 VDC Wall Power Adapter (2000mA) – Connector 2.1mm plug
• (1) Audio Amplifier Board, DROK 5W+5W Mini Amplifier Board
• (1) Speaker
• (1) 3.5mm Mini Stereo Audio Cable with Plugs (M/M)
• 4 kinds of Rustoleum Paints - automotive primer, silver paint, Hammered copper, hammered steel
• Kwik seal or similar caulk to make wear points for fatiqued paint look
• Epoxy / Super glue as needed
Step 1: 3D Print Files to Parts

The 3d files have a TON of detail of which is as accurate to the movie as I can imagine. While some may say the price of $30 USD seems high, let me say thatt here are no less than 100 hours (if not 150) invested in drawing this doid up, ensuring the parts fit up correctly and generating the hardware list and assembly instructions that you get when you purchase the plans. Bottom line... a super deal paying for this man who calls himself "Spacebob", for his time investment.
Once purchased, I started printing from the feet up to gain the experience before I got to the parts where most people would notice / attract their attention to first. People rearely will look at the feet but will look at the face.
The prints went extremely well but take a ton of time. Time is dependent on infill percentage and I played around with this from 7 to 20%. I used 7% up in the head to keep the weight down, but used 20% in the legs as they support the droid AND take a lot of tension in the joints to stand erect with no concerns for overtightening and crushing the knees as an example.
I must say in spite of the head being able to fit on my Creality CR-10 (300 x 300 mm bed), I did split it into two halves so I could minimize risk in lost print fails or lifting off bed, etc when 3 days into a print.
Step 2: Finishing and Painting / Detailing


Process the Parts - Once printed, I finished all the parts in the "standard" 3D PLA parts post processing approach. Namely I pulled off all support material, filed off heavy spots, then successive sand paper and spot putty to fill in major gaps.
The best thing about this or any droid is the scale and what it is allows you to really cheat on the finishing. It is made out of machined metal in the star wars universe so having "milling machine" marks is acceptable. Look closely at the photos and I chose to leave a lot of print layers as found to exaggerate the look.
I then created battle or service scars on the droid, namely at the wear points like the edge of his head, fingers, and knees, etc. I did this by heating up an old screw driver with a propane torch and then melting dents into the parts. I made other scars with a heated knife (see head top).
Painting - I then painted all the parts with Rustoleum auto primer to get the paint to really stick and fill in the most minor print lines. Then followed with aluminum metal paint (Rustoleum). Note that the metallic paints are VERY hard to get a paint to stick on top of it to begin with... hence when spraying the Copper or Steel hammered paint on top of the aluminum, much of the paint already wanted to peel off with the masking (painter's tape).
Fatigue It - After the aluminum paint is dry, I applied some Kwik seal caulking on the high spots of the droid's components. I especially focused on the wear points like his arms, shoes, and knees. Note the side of his body has an extreme amount of paint removed on his right side to his body. This was NOT intentional, but peeled off with the painter's tape illustrating how easy it is for the paint to peel off the aluminum. Once I saw that, I said, ok... normal wear and tear so I left it as it was. Let the caulk dry.
Final Paint - Then I mask off where I wanted to keep steel versus the copper look and painted those layers on the parts. Once those layers are dry, I then went back and scraped off the Kwik Seal and low an behold the silver underneath pops through looking like authentic scrapes! It turned out great!
Not Quite Right (?) - This still did not look authentic at this point. If you look at anything similar in OUR real life, there are lots of labels and warning stickers, etc. on tools and machinery we use, so I started down a path to get some Star Wars authentic decals going. I used a custom decal sheet where I first created a MSWord document with symbols and fonts for the droid. Catch phrases like "remove all pressure before servicing," and "Property of the Galactic Empire" were created from online searches for fonts and symbols. I even added his unit number "1608" on his head and his "qualifications" for what he can service. See the photos where these are shown.
The decals are put on with a solution of "Microsol" from a hobby store that makes them stick better and not eventually dry up and flake off.
Step 3: Arduino System

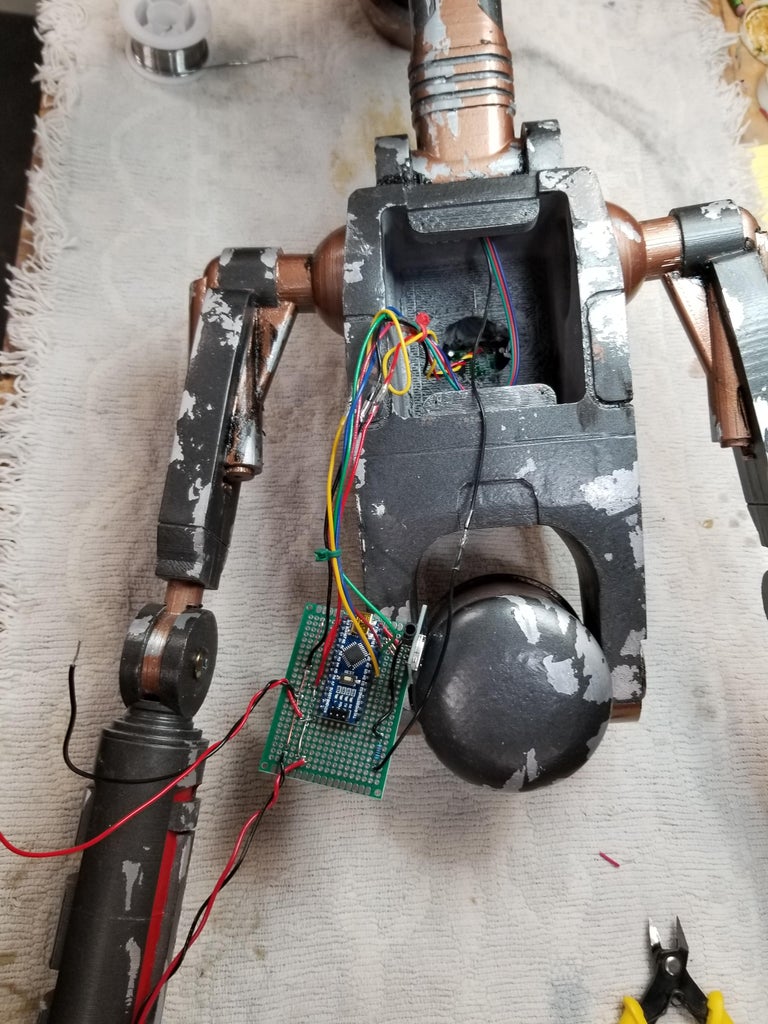


To install the Arduino driven IR sensor to detect motion and for him to make Star Wars Droid sounds, I go the attached Arduino program from the Facebook Group for these builds. I did modify it for the LEDs to light up (see circuit) when a audio file is played.
NOTE: The IR sensor was a real pain to find good documentation on how it really worked - well to get it to work in a manner that makes sense! The sensitivity and range pots settings, etc. but most of all the real pain was discovering that the sensor requires a full 30 minutes to first warm up and has a built in reset delay that you cannot adjust. ALSO, it needs to have a jumper relocated to trigger and hold a reaction so multiple triggers do not goof up the audio files stack from playing (normal mode). So after it detects motion, it needs to "hold this signal" and then tell the arduino motion is detected, then reset for a bit. This can throw you off while trouble shooting it. Bottom line set the range as low as possible and the sensitivity as low as possible, pop the fresnel lens cover off it and you can see how to wire it up.
I highly recommend you build the circuit on a breadboard and then ensure you have it working then install it in the droid.
Read the details on the instructions for the arduino and how the SD card works in accessing the audio files. I added the audio files here for your use as these had to be edited by me in Audacity but are now ready to go for you here.
I modded the droid body to accept the sensor, speaker and power cord adaptor jack. I also had to run the LED wiring up through the neck (see photos for drilling this out) as no droid would have a cable external to such a pivot point.
Attachments


Step 4: Assembly & Modification of Model


The Droid files come with a set of assembly instructions and hardware list. I will say the hardware (furniture bolts) is perfect for the design, but somewhat hard to find in the USA. They can be had online and I could only get the ones I needed by buying an assorted kit which was a bit pricey however I think by the time you go to a hardware store and convert the assembly to Imperial Socket heads it will not look as good and be just as costly. I spent about $25USD to get the hardware correct but now I have enough for another droid. (Didi I just say that?)
You can see in the photos the remaining detailing in the decals I added and the speaker and power cord mods to the rear panel. I had a ton of fun building this and make it your own! There is very limited information on this particular droid as it is really only shown on the Phantom Menace for the pod racing scene and of late, is now on the Mandalorian. I chose mine to be a mechanic for Galactic Empire tie fighters as shown by his qualification decals on the rear of his helmet.
Hope you enjoyed reading about a project that was an easy build but had a lot of creative design detailing to made a fine addition to the movie room!


