

Introduction: Swimming Pool Canoe


I turned an old swimming pool that was destined for landfill, into the most amazing electric powered Tesla boat. Why would I build such a thing…. well.
As an Australian living in Norway I never felt like I fitted in here. I mean I think skiing sucks. Brown cheese is terrible, I don't own a cabin worth more than the GDP of the Democratic Republic of Congo and I don't own a boat.
I was sick of just being known as the Australian guy that makes stuff. So I decided to be known as that guy with a boat! If you choose to build this crazy project with me then you too could be one of the cool kids with their own Tesla Boat. Yeah we can all become Norwegian sea boat captains “ baby”.
Supplies


Supplies! Right the first thing you're going to need is it old above ground swimming pool preferably with a metal frame. In addition you're going need a whole bunch of PVC pipe, some old plywood, two drills and two angle grinders, 1000s of cable ties, and a bunch of other stuff. Which I have inconveniently not mentioned.
Ok.....I give in. Here is a list of materials
Materials
- 1x Old above ground pool (preferably without a hole in it, so small you won't realize the boat is sinking till its too late. Leaving you embarrassed in front of your friends)
- 1x 15mm plywood sheet
- >20m ø16mm PVC pipe
- >10m ø20mm PVC pipe
- 300+ cable ties
- silicon sealant (eg Tec7)
- 2x cordless drills
- 2x cheap angle grinders
- 1.5m gutter down pipe
- 1x Stolen bike.... I mean legally acquired
- 2m M8 threaded rod
- Bunch of different sized nuts and bolts
Tools
- Your brain (most important)
- Compound miter saw
- Drill
- Router with copy bit
- Sewing machine ( with needle and thread that can handle thick plastic)
- Heat gun
- Hot glue gun
- Iron
- General workshop tools
Step 1: The Keel


Before we go much further I need to tell you that I never take any measurements for any of my projects I usually do things by eye. This boat is no different. I eyeballed the heck out of this project. I say this only because I believe this is the best way to build prototypes. It allows you to pivot and adapt on the fly. Right! Enough of my life philosophies
The Keel
The first thing you want to do it's fine the parts of the swimming pool frame that could make a good structural keel. with one angle used as the bow and the other as the stern. Laying the keel on the bench you'll start to get an idea of how the boat will begin to look. I joined the two opposing pipes with a spacer In between. Which in hind sight should have been 20cm longer. With my welder empty of gas and being poor. I was forced to join these parts with pop rivets and bolts. This, however, gave me the idea that the boat could be disassembled and packed away so that it doesn't take much more space than a large suitcase. See what I mean adapt and pivot! ( FYI I’m yet to test this theory as I’m scared to do so as I have little confidence in my workmanship)
At the bow and stern insert the length of pipe you believe will give you the correct height of your boat. Once again using your eyes my friends. (My boats height from keel to bow was approximately 44 centimeters.)
Mark evenly along your keel where your 8 ribs will sit. At each rib position pop rivet a 2 L brackets, opposing each other with a distance of 15 millimeters (the thickness of the plywood.)
Step 2: The Ribs


Now we're going to have to try and calculate how to make the ribs.
The first thing I did was to get one of the PVC pipes and use it as a reference for bending and understanding the shape that the boat will be. I then use this as a reference for creating my ribs. I did not get it right 100% but it was good enough.
Once you have rough cut your ribs you have to then start to work out where all your stringers will be. The stringers are the PVC pipes that will run lengthways. I distanced these evenly to ensure the forces were evenly distributed.
Use a template to cut the notches into each rib for each Stringer. Using a copy bit on your router, you can then reproduce all your ribs with the Stringer notches in the correct position.
Next up. Drill a 5mm hole approximately 10-12mm away from each notch for the cable tie.
Attaching the six middle ribs is quite simple just drill a hole through your L brackets then attach with a bolt.
The bow and stern ribs however need to be modified. Cut a piece of plywood matching the angle of the bow and stern then using the slot joint method cut a slot halfway through where the bow rib will sit. Then on the bow rib cut on the opposite end a slot so that they can fit into each other at right angles. Repeat this process for the stern rib.
Step 3: The Stringers


The stringers were my favorite part of this build I think. As I mentioned in the materials lists I used two sizes of PVC pipe the 20mm and the 16 mm.
The first Stringer will be your gunnels. (The gunnels are the highest part of the side of your boat). I used 20 mm PVC pipe for the gunnels with the 16 mm pipe used as a joiner. To make your gunnels cut your PVC pipe to length and place the join somewhere in between the ribs. Using cable ties begin to fasten it to the ribs. At the bow and stern use a heat gun and some 16 mm PVC pipe to heat and bend the pipe to create a reciprocal for each end of the channel. Once your gunnels are secured. Flip the boat over and begin to cut and lay each 16mm Stringer on one by one. The joins for the stringers will be the opposite to the gunnel stringers. They will be made from 16 millimeter PVC pipe with the 20 millimeter PVC pipe on the outside. (Again, place your joints in between the ribs.) Use cable ties to secure them as you go then enjoy the joy of cutting 100+ cable tie ends.
Step 4: The Skin


How the heck do I explain how I made the skin?
Right! When you look at the pool it generally has these loops which the metal frame goes through and I decided that I would also use these loops so that I can pull the skin tight over the frame. So, that's where we're going to start.
Lay out your pool on the floor and literally cut it through the middle in half. Each half will be one side of your boat. Take your top half where the loops are and drape the plastic over the side. Here you will naturally see how the plastic wants to form over your boat. It's then a case of using your "eyes" again to decide where to cut and join panels so that they form over your frame nicely. There is no recipe for this. And if there was a recipe, it would be like Pickles and ice cream. Not good.
Once you've worked out the shape of your panels cut them out leaving a good inch to two inches of play so that you can make mistakes.
Lets face it you will make mistakes. You will crack the S****. You will get angry and throw something you will regret later. You may even possibly cry. That however is the process of making something for the first time. You will finally fix it and you will be passively aggressively satisfied with your barely satisfactory job.
Talking about barely satisfactory jobs as you'll see I used an iron and a hot glue gun to glue the main panels together. This was a mistake. This is why I pulled out the sewing machine. The hot glue was good at holding shearing forces but the second something caught the edge of the plastic it peeled apart like the plastic film lid on a jello cup.
So in the end, I sewed each panel together with the seam allowance. This proved to be incredibly difficult as my wife's sewing machine didn't quite have the right needles and thread. After many broken needles, some blood, a lot of bad language and a divorce. I managed the job regardless and you will too.
Now its crunch time! Does it fit or have you ballzed up somewhere?
Thread some PVC pipe through the loops that will sit over the gunnels then begin to pull tight with cable ties. You want it firm but not over tight where you can see the seams starting to tear.
The next step is to use some sealant to seal your seams and hopefully stop water from entering your boat. (I used TEC 7 exuberantly ) Just so it didn't look like a bag of hammer. I also used some masking tape to ensure it looked semi professional. (well I'll let you be the judge of that)
Now, I would say I then tested the boat for leaks, but that wasn't quite the case for me. See I began to build this boat at the end of summer and by the time I had ripped my hair out, thrown multiple things around my workshop, cried in a corner and got a divorce. Winter had come. Lets just say testing didn't go according to plan....... please make sure you time your build better than me if you live in a cold climate.
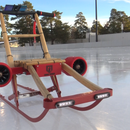
Step 5: The Steering


The concept of the steering came from one of those kids drift trikes from the 90s that use levers to steer the back wheels and potentially give you “mad” skids. I always wanted on as a kid. So, I thought this was a great concept to limit the amount of space needed in the cockpit to steer the thing.
The first thing you need is to steal….I mean “acquire” a bike. Remove the handlebars and cut them in half. This will give your two levers (keep the hand grips and brake levers on as you will need these for the propulsion system. Then drill a hole in the end for the pivot bolt. As you can see from the pictures I made a mounting bracket which was attached to one of the center ribs using a bit of wood and a U bracket.
At the stern of the boat we're going to make our rudder system. I had these caster wheels just floating around so I use these as a bearing system. Then you want to use a bit of plywood you have lying around to make some sort of platform where the propulsion system can be mounted. Which means this platform needs to be wider than the boat so that the propellers do not chop a hole in this precious skin.
The main pivot hinge or pivot pin was a M10 bolt mounted using a angled bracket and attaching to the stern rib. Measure up your distance from your leavers to your rudder and cut the steering rods to length. I used 12mm aluminum rods here. Which I tapped a M6 thread in for the ball joint and eye bolt. You could however, have used pipe or something similar. Attach a ball joint to the lever and eye bolt attached to your rudder assembly.
Step 6: The Propulsion System


Alright nearly there guys.
Now before we start here with the propulsion system I in no way or form, stole this idea from Laura Kumpf. OK that was a lie.
Now the basic concept is we're going to use a drill for the motor and an angle grinder for the gearbox. As I was building this though I thought one propeller was not enough so I decided to go all in and double the power. Saying that drills and angle grinders can be expensive so it's best that you go to your local junkyard and find some cheap alternatives like I did. I found these still in their boxes. It's really amazing what people throw out these days.
Let's start with the mounting of the drills. Using some scrap plywood leftover from your rudder. Build yourself a cradle to hold the drill and glue and screw them into your rudder plate. Using a small piece of aluminum and copper pipe you can then make a simple throttle control system Using the cables from the bike brakes.
The gearbox
Disassemble your angle grinder so that you remove the motor from the gearbox. With this cheap model the motor and the drive shaft are one piece, so I had to cut the motor windings off. Removing the protective plastic that was there I then threaded an M8 thread on to the end of the drive pinion. The drive pinion was then attached to a M8 threaded rod with lock nuts and split pins just to be sure. I also grinded some flat spots on the threaded rod so the drill chuck would not slip.
The outer housing was inconveniently difficult to source let's just say my wife was not impressed when it rained. Using a precise tool such as your feet. Flatten your drainpipe so that it becomes an oval shape. Using blind pop rivets fix the drainpipe to the housing bracket made from some more off cuts of plywood.
To fix the gearbox to the outer housing I made an adaptor plate. This was just a small piece of 6mm steel plate, which I drilled holes for the drive shaft and mounting bolts. Use some small angle iron then to attach the drainpipe to the adaptor plate.
Tighten your drill chuck to your drive shaft and test for alignment to ensure everything will not vibrate its self to bits.
To finish this epic build. Attach the propeller using four screws to the angle grinder flange nut and thread onto the spindle with some Loctite.
Let that Loctite cure. Then the final and most important bit is to sit up in you boat and pretend to be out on the high seas. To get the full experience. Ensure you make boat noises and wave to pretend boats passing by.
Step 7: Testing


Now its all systems go and you should check if the thing sinks or not. Get out there and have fun. Don't let anyone from stopping you from making your crazy ideas reality.
Thanks for reading :)

Runner Up in the
Battery-Powered Contest


