

Introduction: Tactical Ammo Can Portable Propane Fire Pit


When camping in California parks, because of climate change/drought, you are not allowed to have camp fires anymore. But, your allowed to have portable fire pits. I saw a couple of portable ammo can fire pits on line for quite a bit of $ so I decided to make my own. I had a spare ammo can laying around, a bunch of copper fittings, and the tools necessary to put it together. so I figured I would make my own.
Supplies


You can make one of these much simpler than I did, but I like building out the pipes and soldering them together. I mentioned I had a lot of the copper bits laying around and had the ability to solder them together.
To get started I went with a quick disconnect line and a regulator that fits the 1lb Colman propane cans. (You can refill these cans - there are a couple of Instrtuctables on how to do this.) With the quick disconnect I can get another line and regulator and use a full size propane tank and not have to bring a wrench to connect/disconnect the line.
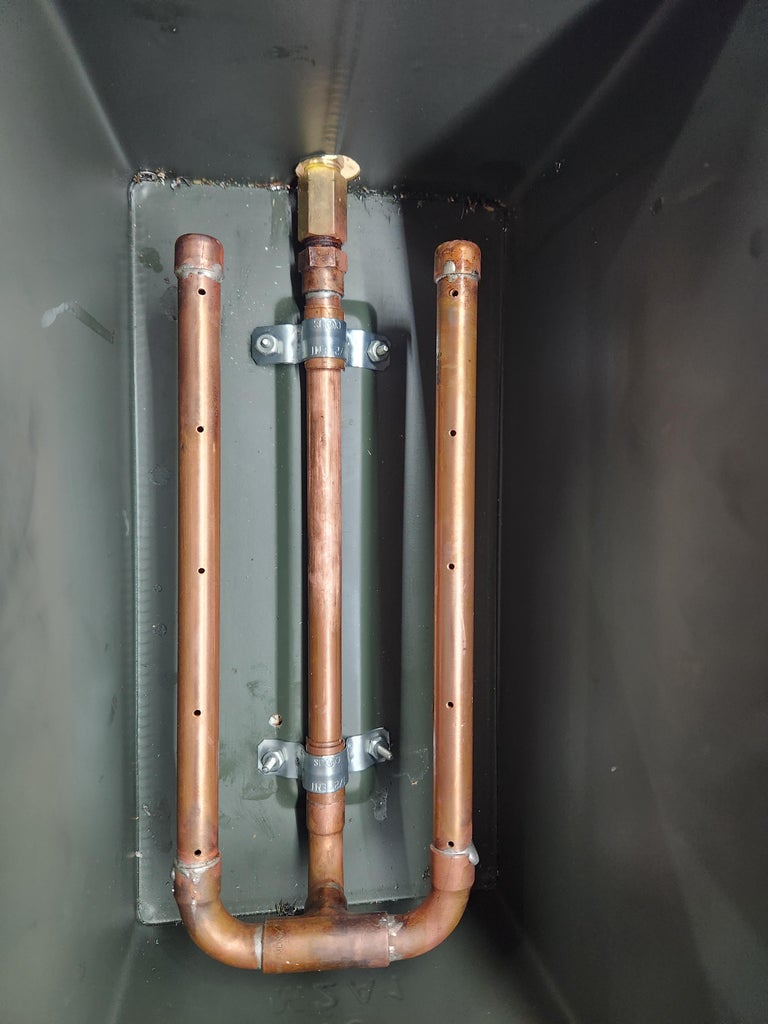
Step 1: Drill the Hole in the Box, Build Out the Burner


From fooling around with the fittings and copper pipe I kind of came up with want I wanted to do. So I used a hole saw and put the hole in the can so the fitting can stick out.
Once that was done I cut and fitted the tubing together. For the nozzle size I went with a 5/32 and I figured if I needed bigger I could always drill it bigger. I soldered up and built out the bottom line and fitted the top lines and taped them in place. I wanted to try it out before I committed to soldering it all up and not liking what I had.
Did a test fire and I liked the flame I was seeing.
Step 2: Mount the Burner, Make the Grate


I mounted the burner with two electrical conduit clamps I had laying around and bolted them to the bottom of the can with some 6-32 screws.
Since I probably will add some lava rocks or something in the can to keep some heat, I cut a piece of expanded metal (metal grate) to fit inside the can. I made a couple of brackets from cutting up a 1" square piece of square tubing and bolted them to the inside of the can.
Step 3: Make the Legs


When look at what other folks have done I saw a couple of designs that had foldable legs attached to the can. I figured that was a good idea - get the can off off the table or where it was setting because it's probably gonna get hot!
I used some 1" wide sheet steel strips to make the legs. Wasted some material getting the 2nd bend right so that the 'C' fit properly in the can.
I used some 1/4-20 nuts, bolts and wing nuts to attach the legs to the can. I had to make sure when the legs were folded up, they didn't overlap (more trial and error testing).
Step 4: Testing!


Took it to the back yard and fired it up. Ran it for an hour to see how it performed. Once I started the test I was a little worried that the heat inside the can would be high enough that the solder would melt. Checked periodically and it was looking good. Also the powder coat on the can didn't blister or fall off - yet.
Started with a new Colman 1lb can and after an hour quite a bit of it was gone. Which is ok, since I refill them. I'm ordering a 2nd hose with a quick disconnect and connector to a regular sized propane can.
Other things.
I added a 2nd hole to the front of the can so I can put the lighter through so I don't have to look over the flames when I light it. Also will need it if the can is filled with lava rocks.

Participated in the
Metal Contest


