

Introduction: Easy 3D Printing Class: Tools + Materials


There's really no limit to the things you can make with a 3D printer, but like every other tool, you need to know how to use it to get the best results. In this class, you'll learn the most important part of the process: how to design your own 3D objects, no previous experience required.
Using Tinkercad, I'll walk you through three simple projects. We'll start with a monogrammed keychain, dig a little deeper with a pair of numbered dice for your favorite game, and finish with a portable amplifier for your smart phone.
You'll also learn how to setup and operate a desktop 3D printer. If you don't have your own 3D printer, you can still take the class and get your models printed at a service bureau, which we'll cover in the Tools and Materials lesson.
To get you acquainted with the basic functions and features, you'll make your own monogrammed keychain. You'll learn how to move, scale, cut, and group objects to prepare them for 3D printing.

Step 1: Tinkercad

In this class, we'll be using Tinkercad for all the 3D design work. It's free and browser based, so you can use it on any computer or tablet. It's an easy, fun, intuitive 3D modeling program that's great for designing objects for 3D printing.
Sign Up

Before you go any further, you should sign up (for free) for a TinkerCAD account. It just takes a minute or two.
Follow this link to the Tinkercad page, then click on Sign Up if you don't already have a TinkerCAD account.
Then all you have to do is enter the country you live in and your date of birth, then move on to the next page to enter an email and password or sign up automatically through Facebook, and that's it! You're ready to start designing.


Look Around
Now that you have an account, take a minute to look around the interface. The Gallery tab is a great place to start- you can browse other users' designs and get a taste for all the awesome things you can create.

Step 2: 3D Printer (Optional)
There are so many desktop 3D printers to choose from, there's no way I could give you a definite answer on which one to choose. The main factors you have to balance are price, reliability, and familiarity with machines. Make Magazine has an outstanding 3D Printer Buyer's Guide that will help you choose the printer that's right for you.
I'm recommending the Dremel Idea Builder because it works for me. Here's why:

Dremel 3D Idea Builder ($800)
- Build Volume: 9” (230mm) (X) x 5.9” (150mm) (Y) x 5.5” (140mm) (Z)
- Materials: PLA
- Pros: Affordable, reliable, easy maintenance, quiet, great customer support, files pulled from internal memory, excellent machine interface.
- Cons: Inferior support structures for substantial overhanging geometry (3rd party software can solve this problem).
The Dremel 3D Idea Builder is a sign of things to come: a long established, profitable hardware company has learned from the startups and entered the market with an affordable, widely available 3D printer.
Here is my experience with the machine: With heavy, regular use for over 9 months, the machine is still working well. Filament jams are rare and easy to fix. Printing failures happen maybe 15% of the time (which in my experience is comparable to the Rep-2).
I recommend this machine because it's ready to use right out of the box using very simple software. It's the right mix of affordability, build volume, and user-friendliness.
Go to the Glossary for more info on the Dremel and other 3D printer options.

Printrbot Play ($400)
- Build Volume: 4" (100mm) (X) x 4.1" (105mm) (Y) x 5" (130mm) (Z)
- Materials: PLA
- Pros: Very affordable, reliable, easy maintenance, great customer support, files pulled from internal memory, seriously well built.
- Cons: Small build volume.
The Printrbot Play is an amazing little machine. $400 for a 3D printer that's this well made, has internal memory, and has really good tech support is pretty amazing. The only issue with this one is that it's got a small build volume. If you're looking to get started with 3D Printing on a budget, this is the printer for you.
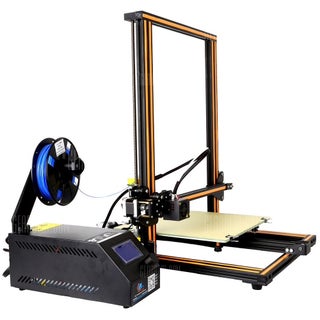
Creality CR-10 ($400)
- Build Volume: 11.8" (300mm) (X) x 11.8" (300mm) (Y) x 15.75" (400mm) (Z)
- Materials: PLA, ABS, HIPS, Nylon, PETG
- Pros: Very affordable, high quality prints, huge build volume, easy to unclog / repair, customizable, heated bed (allows for much wider range of filaments and prevents prints peeling up), on-board computer control, fast nozzle heating.
- Cons: Some assembly required, takes up a lot of space, not a simple, self-contained box (power supply and printer are separate objects connected by cables).
In terms of bang for the buck, this is the best printer I'm aware of. The build volume is huge but it's still less than $400. It's a bit messy on a desktop because the power supply and printer are separate, but that's a small price to pay. The print quality is excellent in my experience, the heated bed opens you up to a whole range of high-performance filaments, and even though it's sold as a "kit", it basically just comes in two parts that screw together and a bunch of cables you have to plug in. If you're a little more savvy with machines and not intimidated by some assembly, this machine can't be beat.
Step 3: Service Bureau (Optional)
You don't have to have your own 3D printer to take this class. If you want to get 3D prints made and mailed to you, you can go with a Service Bureau.
A Service Bureau is a 3D printing service available to consumers. They charge on a per-model basis to print 3D models you upload to their site, and offer a wide variety of materials using almost every 3D printing technology that currently exists.
Although there are lots of options available for owning your own 3D printer, service bureaus can be a great way to get a high-quality print of your model in materials that would otherwise be inaccessible.

3D Hubs
This service connects local 3D printing services worldwide. You upload a model and local services bid on producing the model for you. This can result in bargain pricing, but be careful to pay attention to customer reviews. Sometimes entry level 3D print users offer their services and can't promise the quality that a professional operation can, albeit at a higher cost.

Shapeways
This is a service bureau that offers high quality prints in dozens of materials. Metals, plastics, ceramics, and sandstone are among the options with this site. In my experience, they offer unparalleled quality, are very responsive, and are reasonably priced for their excellent results.
I firmly believe the best way to learn about design for 3D printing is to have your own printer, but if owning your own 3D printer isn't in the budget right now, you can learn one-piece-at-a-time with a Service Bureau.
Step 4: Tools for 3D Printing

3D Printer Filament (varies): Filament is the spooled plastic material that gets extruded into a 3D object. There is a wide array of options for the material, but for this class we'll stick to 1.75mm PLA, which is the best option for the Dremel Idea Builder.
Isopropyl Alcohol / Alcohol Pads ($7): Filament has to stick to the build platform. Oil from your fingers keeps it from sticking. Solution: rubbing alcohol! Add cleaning a 3D printer build platform to its endless list of other uses.
6" Painter's Tape ($30): Save your build platform, your money, and your sanity by buying some 6" painter's tape to cover your build platform. It's a great surface for the filament to stick to and it's cheap, so you can replace it when it gets too rough.
Metric / Imperial Ruler ($6): This will come in handy when it's time to measure your smartphone for the portable amplifier project.
Old Credit Card: This tool will help you spread out the tape to prevent bubbles and wrinkles and will help you unstick clingy filament that won't come off the build platform with your fingernails.
Step 5: Next Up
In the next lesson, you'll get acquainted with Tinkercad by making your first 3D object- a monogrammed keychain.


