

Introduction: Restore Broken String Instruments and Make Them "Self-Playing"!


Hello fellow makers,
Do you want to serenade your guests with some sweet guitar tunes at your next dinner party courtesy of a magical guitar siting in the corner by its lonesome self?
In this Instructable I will be showing you how I brought a broken mandolin back to life and gave it a neat little party trick by making it a "self-playing" courtesy of a Bluetooth exciter speaker install.
This Instructable can be used on any string instrument that is in need of some repairs.
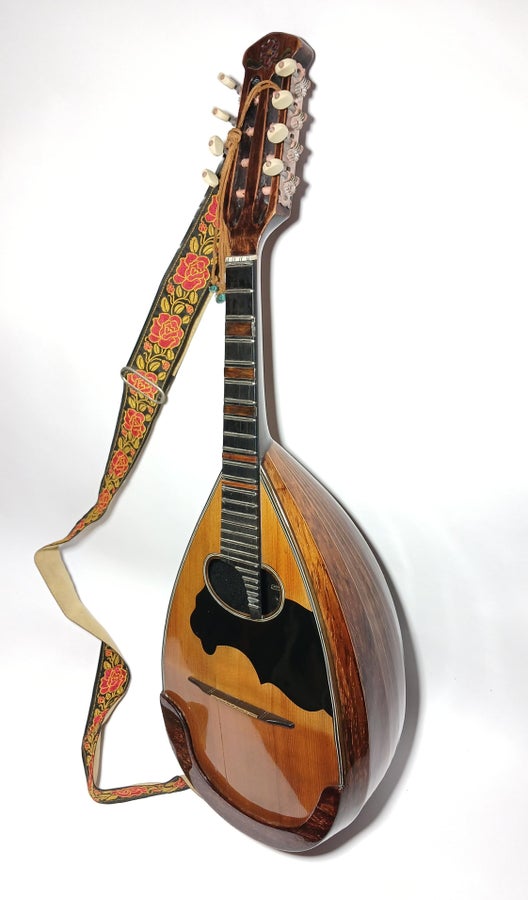
This all started when I got my hands on a late 1800's mandolin that I got for an absolute bargain at around $10 as it had a split open bowl and front a missing piece of plywood that cracked away.
As I am nowhere near being a luthier, in fact this will be my first ever restoration of a musical instrument. I knew that the mandolin will never sound like it use to again so I decided to try adding a exciter driver under the bridge along with a Bluetooth amplifier.
Because the exciter produces sound much in the same way as the mandolin originally does you get a very realistic playback of instrumental tracks, plus you can still play the instrument as usual.
![]()
If you enjoy my Instructables and would like to support my future projects you can Buy Me A Coffee.
Step 1: What You Will Need:
To make your own you will need the following:


- A string instrument in need of some love
Or you could use something really inexpensive like this Ukulele for $19.99.
Amazon - Martin Smith Soprano Ukulele
- Exciter driver
Amazon - Dayton Audio DAEX25CT-4 Exciter
- 3.7v Bluetooth amplifier
Amazon - M38 Wireless Bluetooth Amplifier
- 18650 Li-ion cell
Amazon - Samsung25R 3.7V Rechargeable 18650 Battery
- Charging board with BMS
Amazon - TP4056 Type-c USB 5V 1A 18650 Lithium Battery Charger
- Female USB-C connector
Amazon - USB 3.1 Type C Connector
- On/off switch
Amazon - Black Latching Mini ON/Off Switch

Optional:
- Access to a 3D printer
Amazon - Creality Resin 3D Printer Halot-Mage 8K
- Eco paint stripper
Amazon -
- Clear lacquer
Amazon -
- Epoxy resin
Amazon -
*As an Amazon Associate I receive a small percentage from sales made through provided links at no cost to you, this helps fund future projects.
Step 2: DML Concept:

Distributed Mode Loudspeaker (DML) is a flat panel loudspeaker technology, developed by NXT, in which sound is produced by inducing uniformly distributed vibration modes in the panel through a special electro-acoustic exciter. Distributed mode loudspeakers function differently from most others, which typically produce sound by inducing pistonic motion in the diaphragm.
Exciters for distributed mode loudspeakers include, but are not limited to, moving coil and piezoelectric devices, and are placed to correspond to the natural resonant model of the panel.
Advantages
Broad frequency range (100 – 18000 Hz for 0.6m2 panel).
The air radiation resistance is small and constant with frequency. This means that directivity is not affected by size of speaker.
Bipolar (radiates sound in 2 directions), but may be made forward directed.
Flat, don't require enclosing, may be produced in different shapes, may be decorated etc. Some DML units are designed to be plastered into walls and completely hidden.
Low cost of materials relative to traditional loudspeaker designs.
Disadvantages
Problems radiating low frequencies. Increase in size makes it possible to radiate sound with lower frequencies.
Low directivity and slow fading may lessen stereophonic sound impression. Still, listening from an off-center position gives some imaging of phantom sources as the other speaker can be heard with its full spectrum, but with extra delay due to the listeners local position.
Read more on Wikipedia
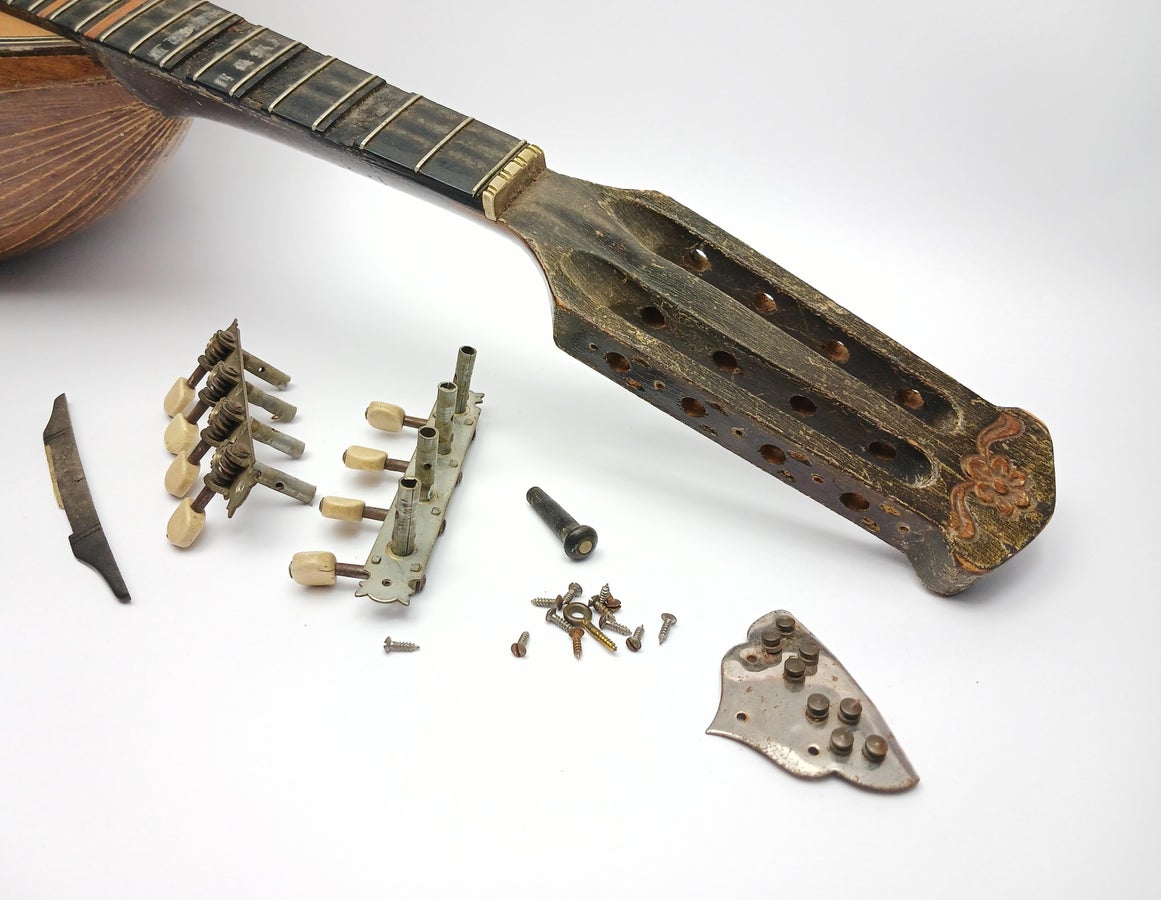
Step 3: Restoring the Instrument: Part 1


Now to get started restoring the broken mandolin.
First we will need to remove everything that can be taken off without damaging the instrument further, for me this was the tailpiece, strings, tuners and bridge.
With the mandolin stripped down we will start by addressing the split bowl, unfortunately because the mandolin was stored with the split bowl for a long time there was some warpage that was a pain to get back into shape.
I started by lifting up the separated slats one by one supporting them with some popsicle sticks and sanding between them with some 220 grit sanding paper to get a smooth clean surface for the glue to bond with.

After sanding all the slats we can start gluing the bowl back to together, this is going to take a lot of tension to get everything back in its original place. The best way I found is to smear a generous amount of glue on all the joints and then starting from the neck position the slats into place and use broad masking tape across the slats (pulling taught) to clamp the joint.

Continue along the bowl until the bowl is back to its original shape wiping away any excess glue oozing out as you go, leave to dry for at least 24 hours before moving on.
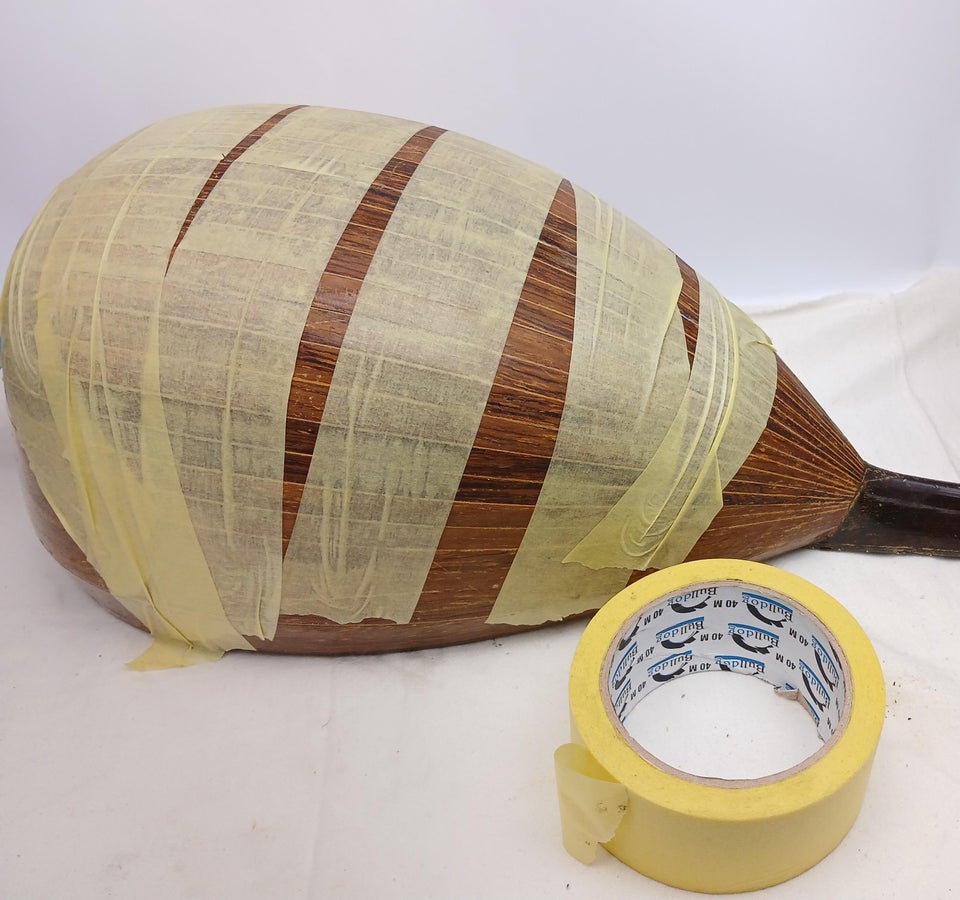
With the glue dry we can remove the tape and get rid of the old varnish.
For delicate projects like these I use an eco paint stripper that is very gentle and doesn't damage any of the decorative pieces or glue.
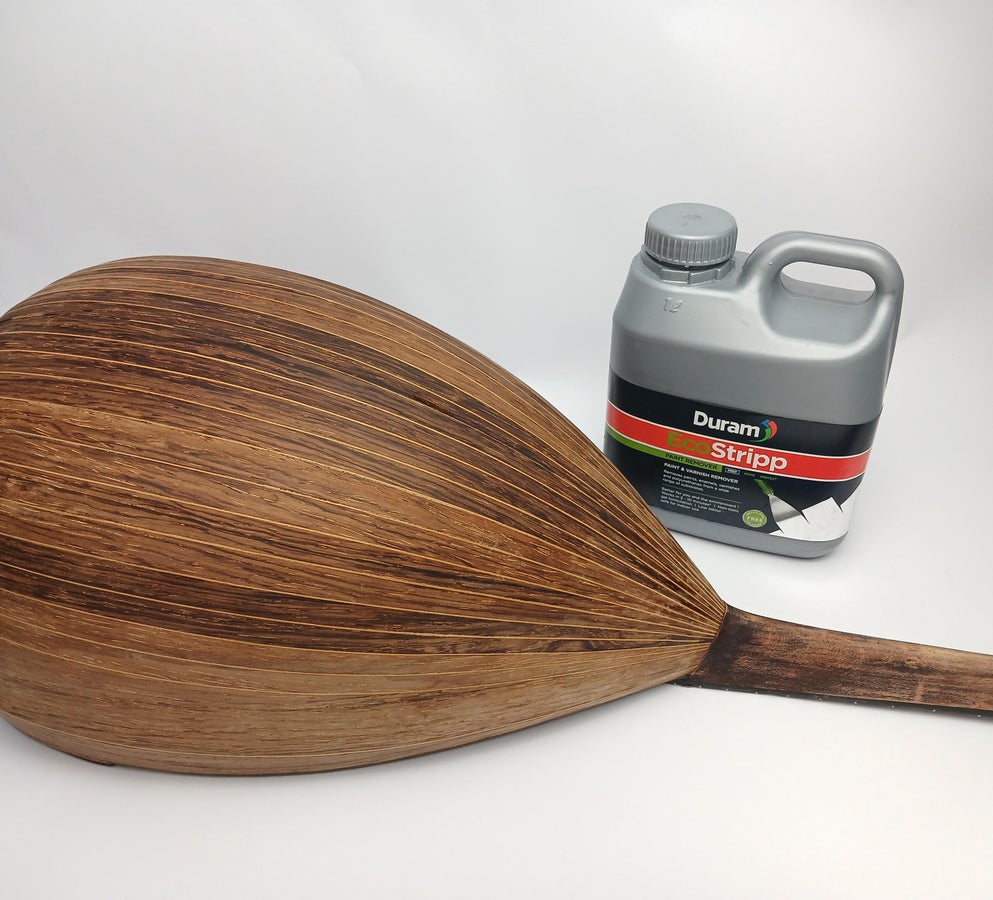
To remove the varnish I smear on a generous layer of stripper and then the mandolin in a layer of cling film for about two hours, afterwards you can scrape away the varnish with a plastic scraper or an old bank card.
Clean off any remaining paint stripper and leave to dry.
We are now left with a raw wood instrument that you can now sand with some 400 grit sanding paper to get rid of any blemishes and have a nice smooth surface for the clear lacquer later.

Step 4: Restoring the Instrument: Part 2

Unfortunately one of the reasons I got this mandolin for so cheap was the large missing piece of plywood on the front.
I decided since it broke in such an interesting shape that I would just go ahead and embrace it and fill the void with black epoxy resin to complement the rest of the black accents the instrument has. I simply mixed up some clear 2 part epoxy resin with black pigment and slightly overfill the void so we can sand it nice and flat after it has cured.

After the epoxy has cured I used 220 grit sanding paper with a sanding block to knock back the excess resin and then smoothed it out with 400-800 grit sanding paper.
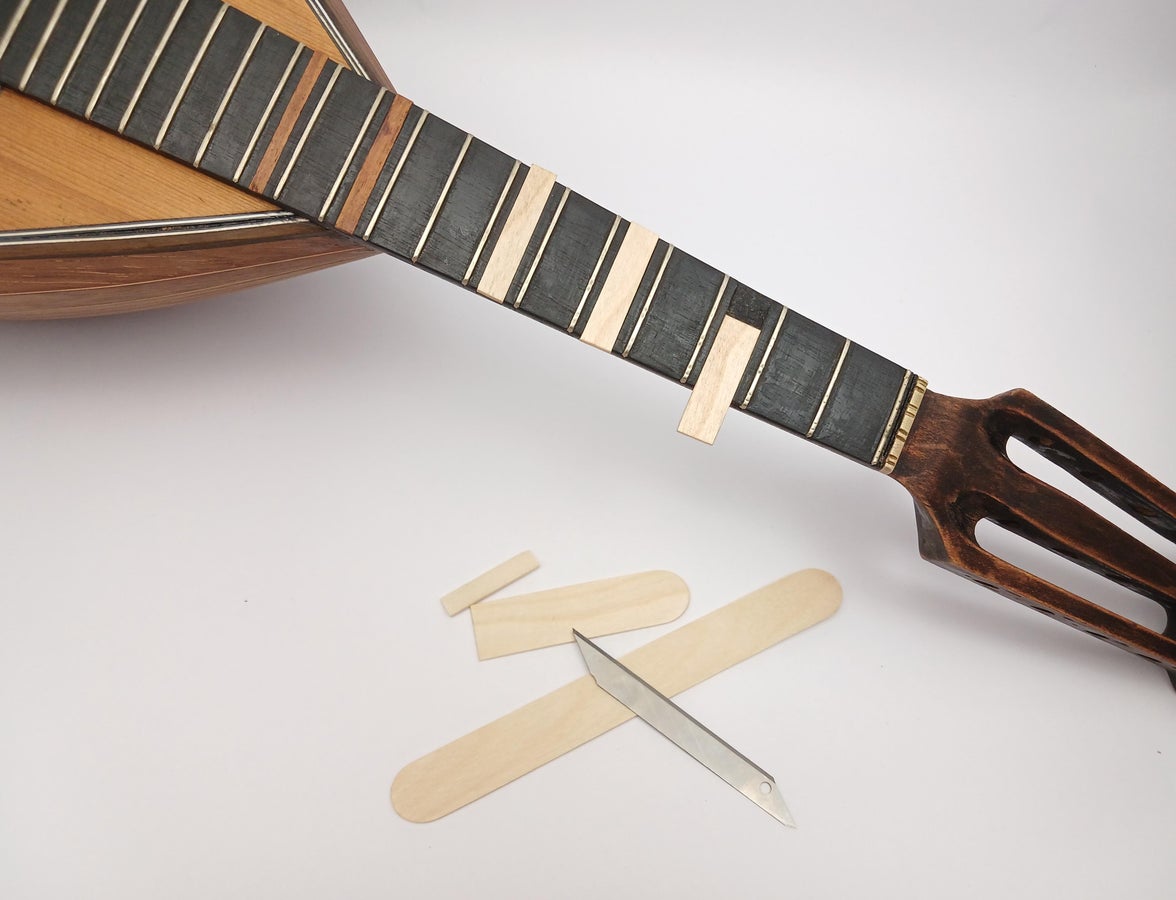
The last repair needed was some missing fret markers, luckily as I was busy I realized by accident the the popsicle sticks were the exact thickness I needed and also had a very similar grain. I cut down three pieces to fit the missing fret spaces and then simply stained them to match the original and I think they turned out pretty well!
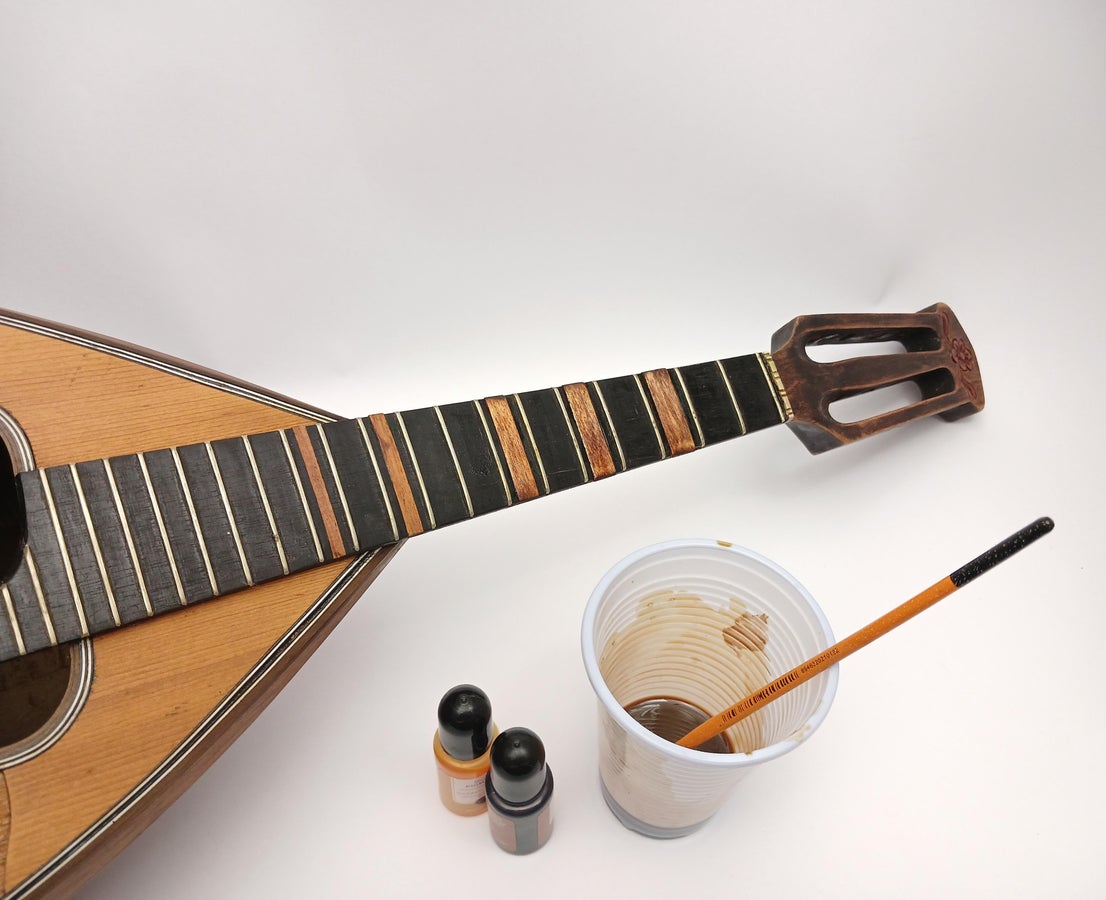
Now that all my repairs are completed I can get the clear lacquer on.
I used some automotive 2K clear lacquer mixed according to the manufacturers specs in my airbrush and gave it three good thick coats leaving the lacquer to dry slightly between coats to prevent runs on the curves.
Leave to dry completely, I suggest not putting it in the sun before it has partially dried as I've found the wood tends to make bubbles in the clear.
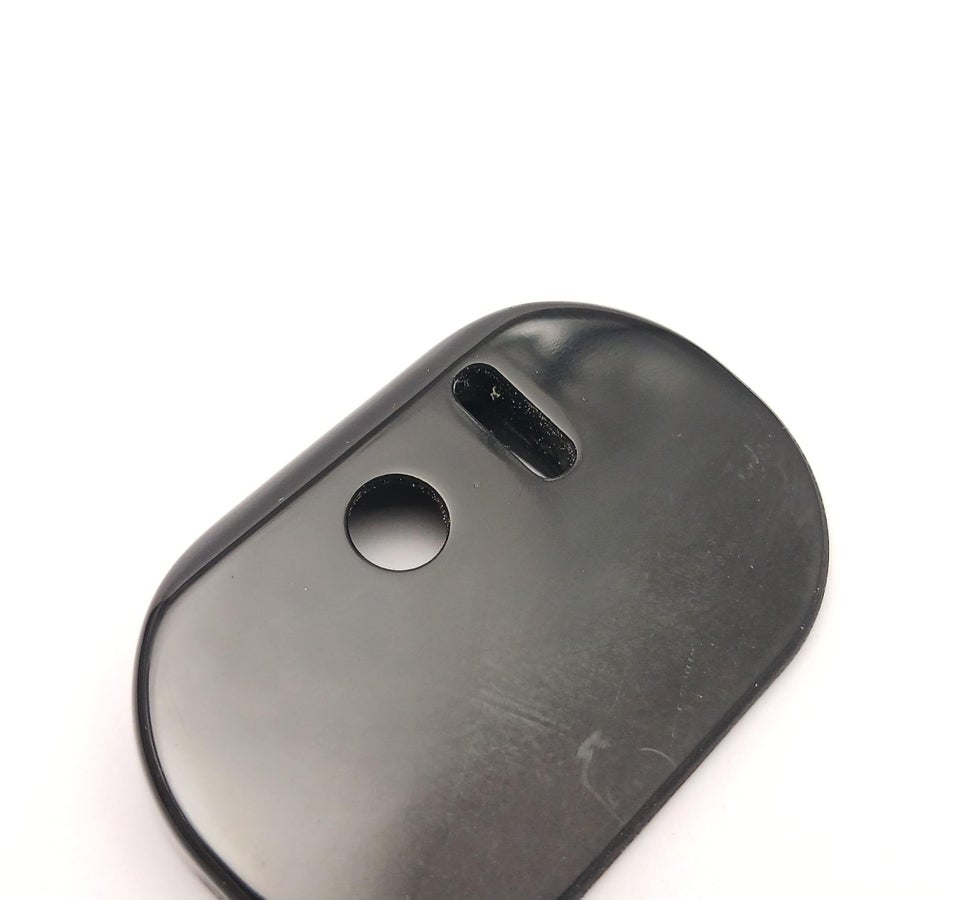
Step 5: 3D Printed Parts:


To house the electronic components I designed a battery/amplifier along with a switch/charging port holder using Fusion 360.
Because of wooden ribs placed underneath the bridge of the mandolin there wasn't enough space for the exciter so I had to also design a standoff for the driver to fit in between the ribs.
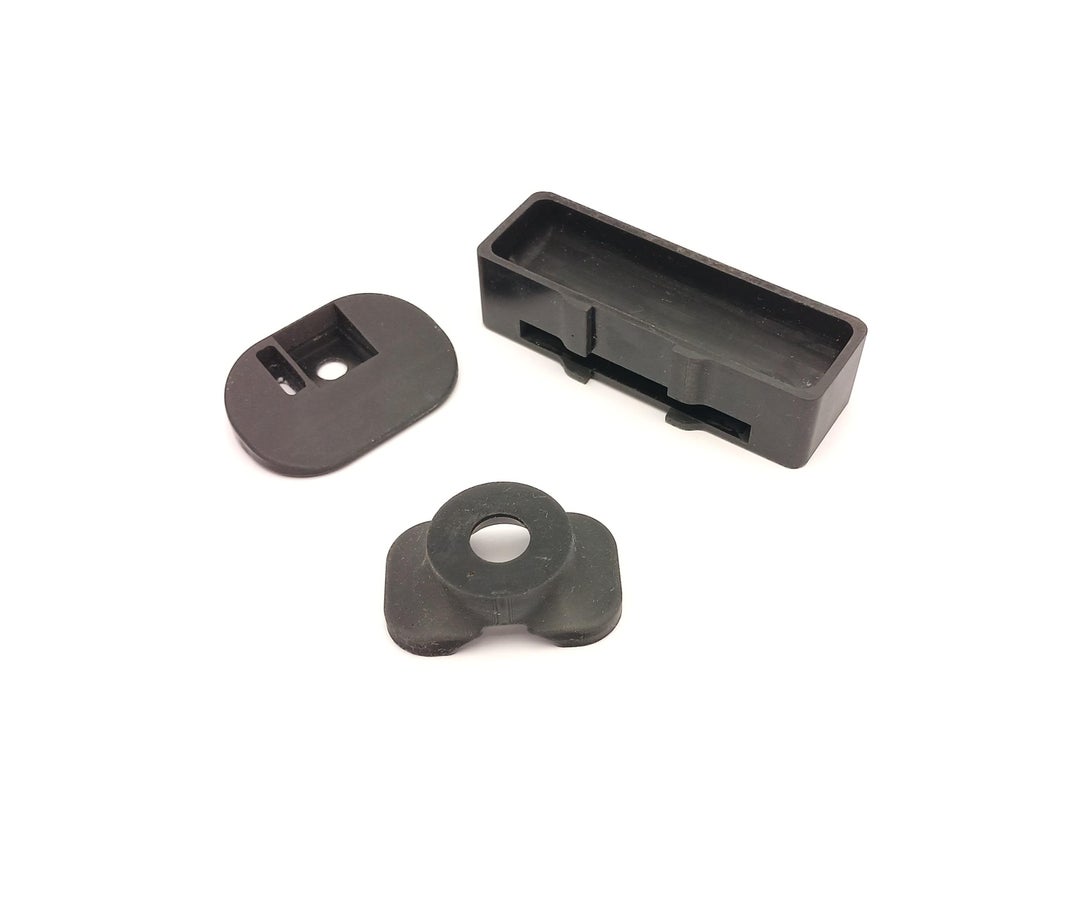
All the parts were printed using my Creality Halot One using black industrial blend resin but can be printed in any resin or with an FDM printer.
As the printed switch/charging port will be exposed I sanded it lightly with some 1500 grit sanding paper and polished it with some plastic polish to get a high gloss black finish that fits in perfectly with the rest of the black accents.
Guitar DML


Step 6: The Electronics:

Now it's time to assemble the electronics.
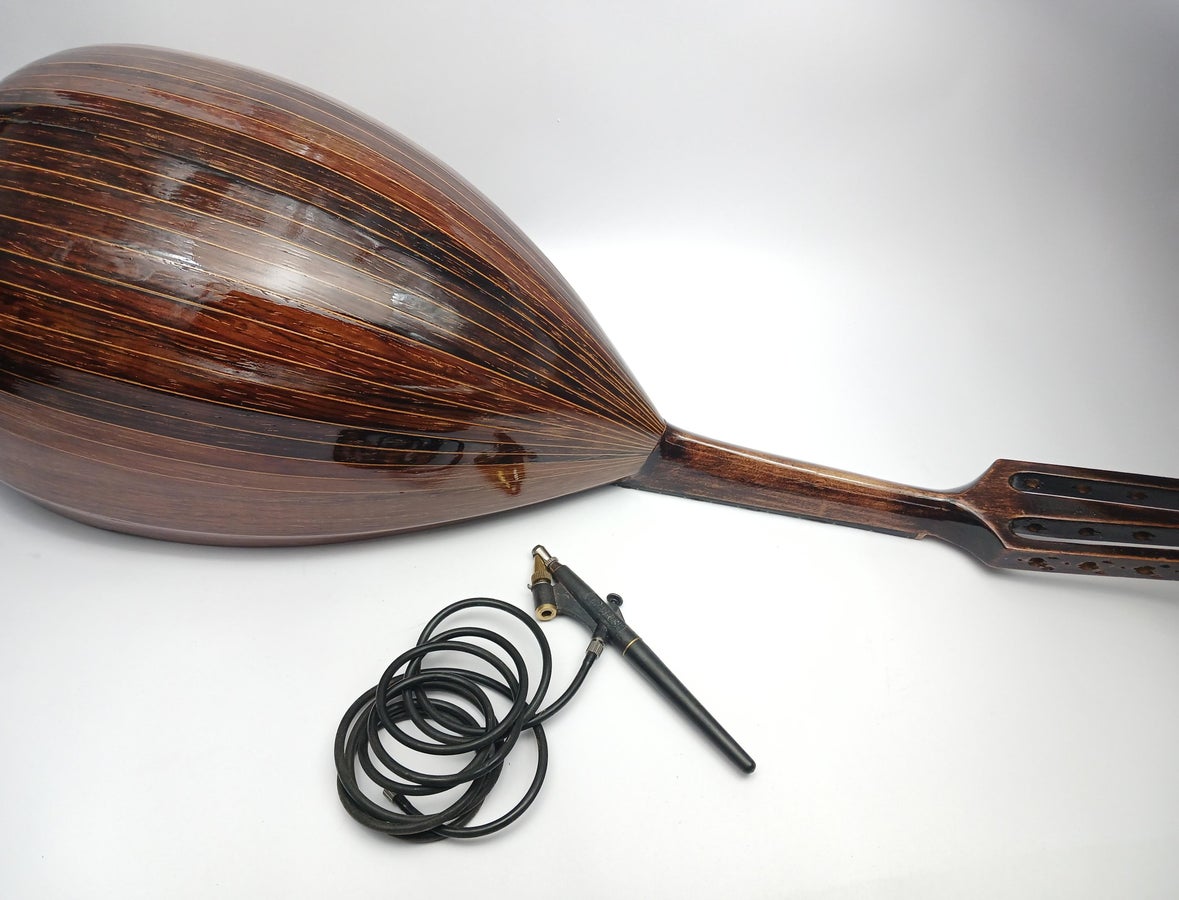
In this project I'm using a MH-M38 Bluetooth v5 amplifier powered by a rechargeable 18650 Li-ion battery, this drives a 38mm 10w exciter.
Wiring for this project is very straightforward, start by soldering on a wire from each pad of your exciter to the speaker positive (+) and negative (-) output on the amplifier then on your battery solder a wire from the top positive tab to the B+ on the charging board and a wire from the bottom negative of the battery to the B- pad on the board.
As I want the electronics as hidden as possible I had to attach a separate charging port to the board. I used a USB-C female power port and soldered the positive and negative wires onto the charging board as pictured. Finally solder a wire from the output + of the charging board to the positive input of the amplifier, the negative output - from the charging board goes to the switch and then to the negative input of the amplifier.
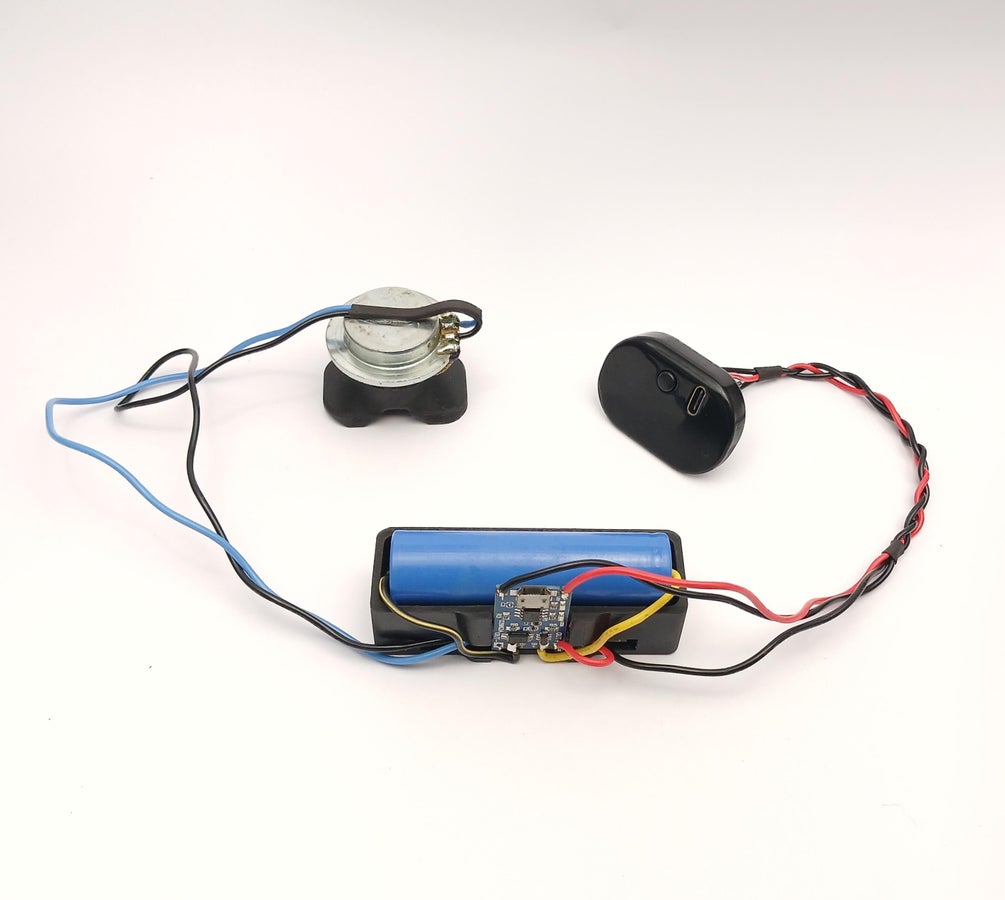
Once wired you can insert the components into the printed parts as pictured and you're ready to start assembling the instrument!
Step 7: Assembling Your Speaker:


Now to reassemble your instrument and get the electronics mounted.
I started with getting the electronics mounted inside of the mandolin, unfortunately because the install space is so confined (literally just enough to fit two fingers at a time!) I'm unable to photograph but the battery holder/amplifier gets mounted with 2 part CA glue in front of the sound hole behind the start of the neck as far back as I could reach, this is to minimize the effect it will have on the sound.
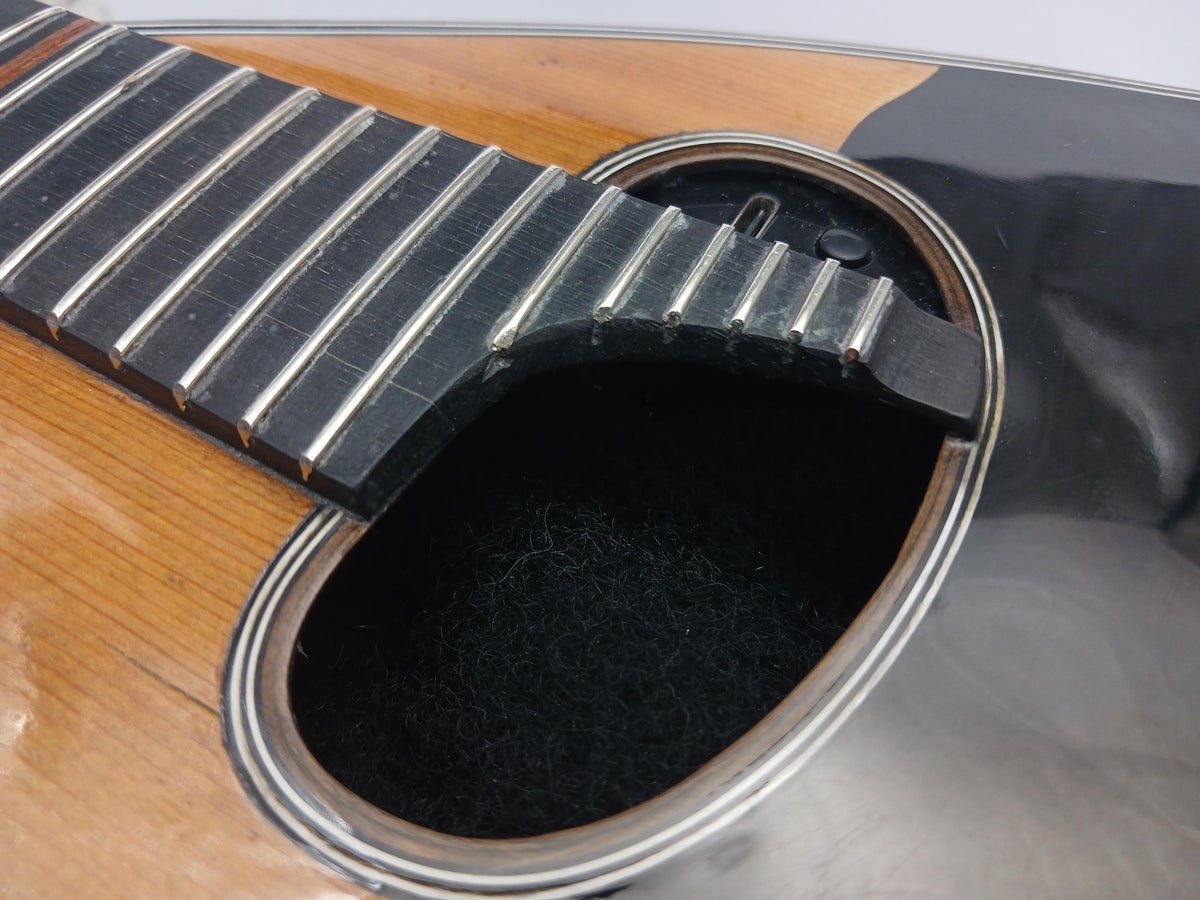
Next the exciter was mounted in the middle bellow the bridge to mimic the vibrations from the strings. And finally I mounted the charging port and switch in the side of the sound hole so that just the port and switch are visible.
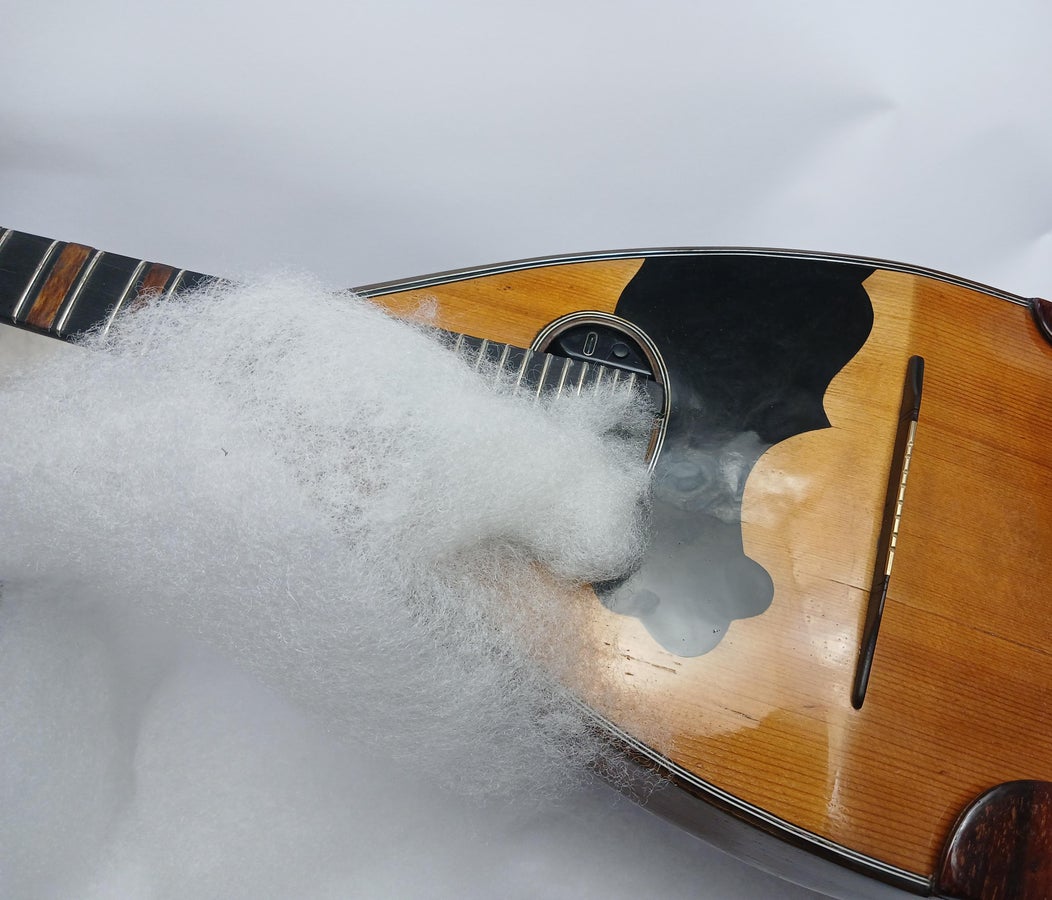
Upon testing on higher volume some of the back slats had some vibration so I decided to stuff some polyfill into the bowl that cured it. The last piece of polyfill was sprayed black to hide the internals.
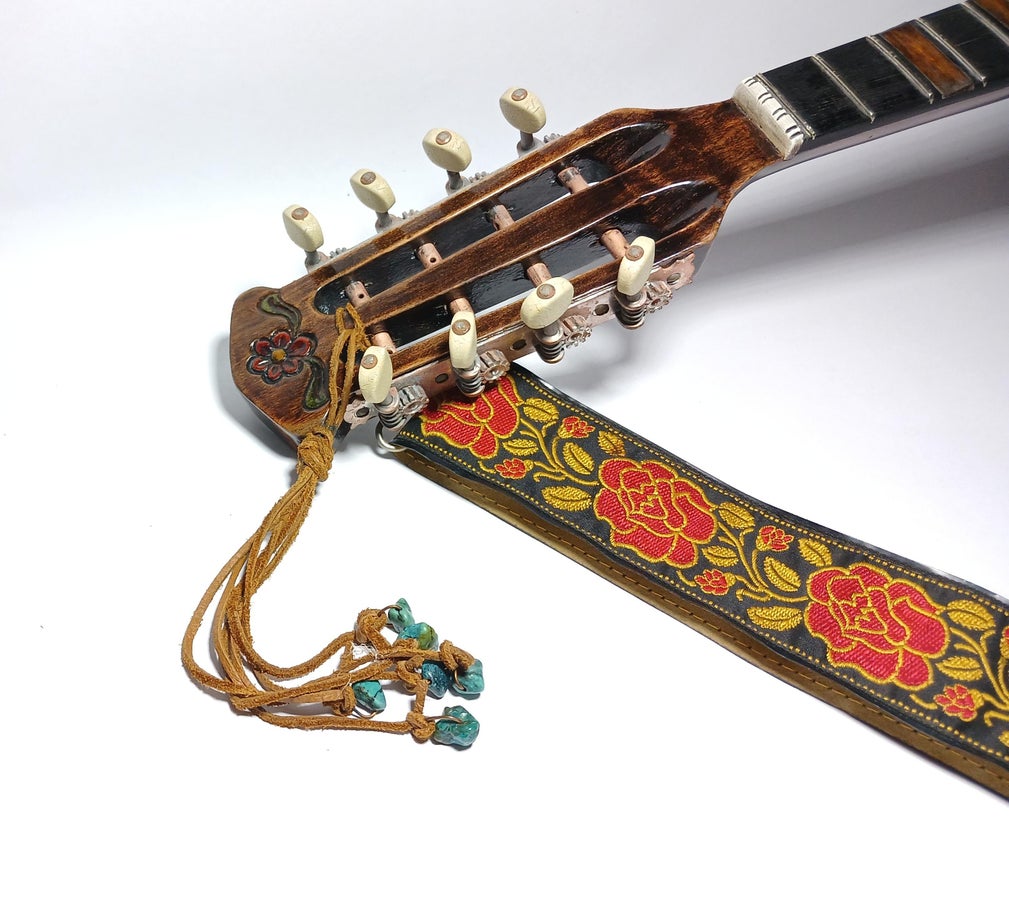
With the electronics installed I can reattach the tailpiece, tuners and bridge. Now we can re-string and tune it before finally adding back the original shoulder strap, I made a leather and turquoise mounting string for the strap onto the head stock.
Step 8: Enjoy!

I hope you guys find this Instructable useful and if you have any questions please feel free to leave me a message or comment bellow.
Thank you for taking the time to read through my project and as always..
Happy making!
- - -

This is an entry in the
For the Home Contest


