

Introduction: DIY Ping Pong Blaster!


Ok, let's be honest. Is there any real need for a ping pong ball machine gun? No. But then again, is there any real need for a water gun? No. Both are definitely great for pranking friends or to spook intruders or pesky wild life! Regardless, in this Instructable, I'll show you how to make a ping pong ball machine gun using the parts from an old RC car.
If you aren't into reading, feel free to watch this video instead (shameless plug for my Youtube channel).
Step 1: The Inspiration

The idea for this project stems from two things:
- A spare remote control car
- An automatic pitching machine.
If you've ever been to a batting cage, you've seen those automatic pitching machines. They're basically two wheels that spin very fast, and when a baseball is passed between them, it propels it forward, pitching it to you. Given that I had an old RC car that I wanted to find another use for, I thought that recreating this type of pitching machine for ping-pong balls would be a great project.
The idea is extremely simple: Take the two motors and wheels from the RC car and position them side by side with just enough space to force a ping-pong ball through it. To make it more functional, we could add a motion sensor to make it automatic, but this isn't supposed to be a difficult project. It's purely intended to be a lesson in re-imagining the technology you have around you. If you stripped down an RC car to it's basic parts, how would you re-imagine those parts? What would you make? What would you do with them? This is just one of the many possibilities. Let's get started!
Step 2: Taking Apart the RC Car

I'm using a cheap RC Car called the Thunder Tumbler. You can find it for less than $10, and it has some great, salvageable electronic parts inside of it! It has regular Phillips head screws and is very easy to disassemble, revealing the control board. Then removing a few more screws, you can separate the back wheels and the back wheel motors. Unless you accidentally disconnected any wires, you should still be able to put the batteries back in and use the remote to activate the wheels.

Verifying that it still works, you can unscrew and remove the control board from the chassis. The motor, wheels, and control board should be all we need for this project. You can desolder any extra wires (such as LED's) to make things less cluttered.
Step 3: Mounting the Motors

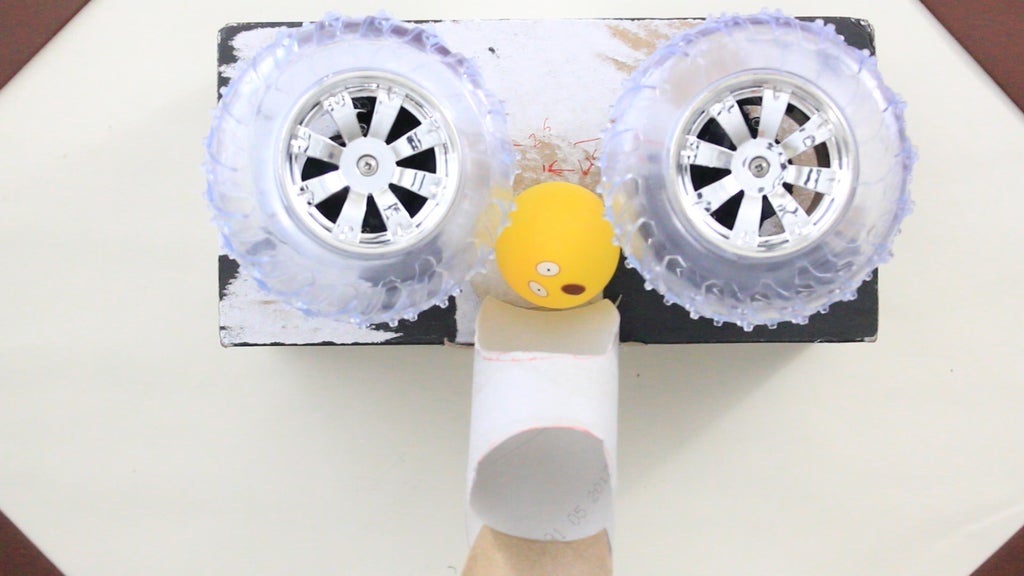
We need a platform to mount the motors side by side. To avoid the hassle of having to take time and fabricate something, I found a rectangular box that was perfect for the job. I measured the motors, gearbox, and wheels as well as the width of a standard ping-pong ball to determine the placement of the wheels. Then I cut holes in the box and mounted the motors in them. Now's a good time to test it and see if the measurements work. Just reconnect the battery pack to the mainboard, get the motors spinning using the remote, and see if you can launch some ping-pong balls! My rig ended up working perfectly! At this point, we need to make a mechanism that can store the ping-pong balls. Paper towel or toilet paper tubes make a great way to funnel and store ping-pong balls. I just cut some to size and positioned them behind the middle of the motors so that they could funnel the ping-pong balls down through the wheels. Once they were positioned perfectly, I hot glued them into place.
Step 4: Adding Motion Detection

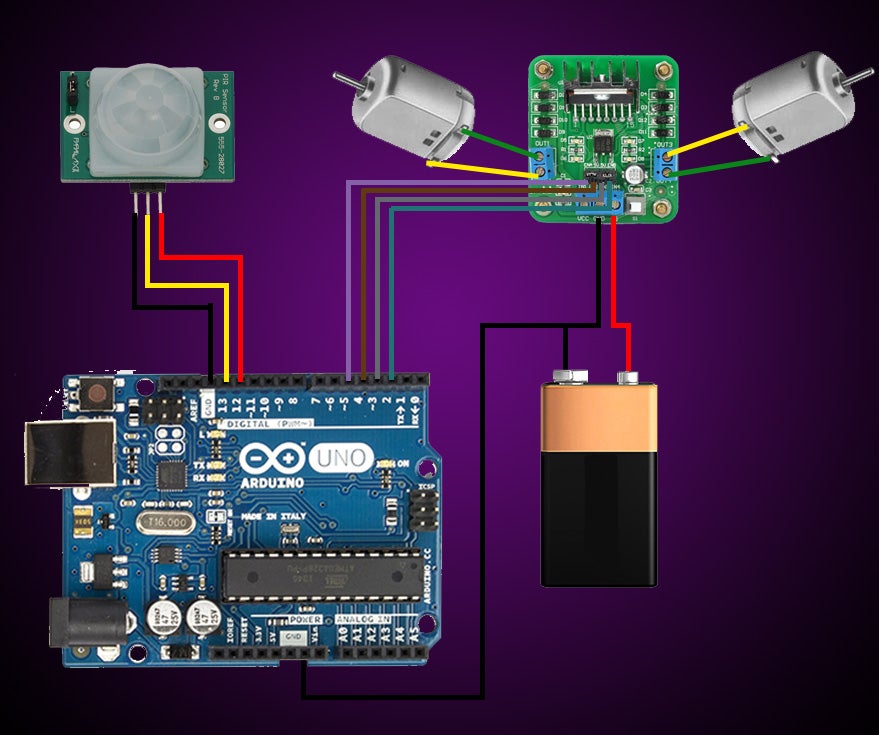
Up until now, you should be able to make this entire project using what you've sourced from the RC car. But to take it to the next level, we can add an Arduino and a motion detector. To have the Arduino control the motors, we'll need to add some type of motor controller. You could use a series of resistors, diodes, and transistors, but I actually had an h-bridge dual motor controller that I'll be using. You can connect it to the motors, to an external power supply for the motors, and to the Arduino (pins 2-5). Take a look at the diagram below for details on how to connect it.
For detecting motion, I'm using a PIR (Passive Infrared) Motion Sensor. It has three pins, ground, a trigger pin, and a VCC (power) pin. I connected them to GND, 13, and 12 on the Arduino respectively. Again, refer to the diagram below for details.
/*
 * PIR sensor tester
 */

int pirPin = 13;
int inputPin = 12;
int pirState = LOW;
int val = 0;

#define FORWARD 8
#define BACKWARD 2
#define STOP 5

int Motor[2][2] = //two dimensional array
{
{2 , 3}, //input pin to control Motor1--> Motor[0][0]=4, Motor[0][1]=5
{4 , 5}, //input pin to control Motor2--> Motor[1][0]=6, Motor[1][1]=7
};

void setup() {
 pinMode(pirPin, OUTPUT);
 pinMode(inputPin, INPUT);
 pinMode(Motor[0][0], OUTPUT);
 pinMode(Motor[0][1], OUTPUT);
 pinMode(Motor[1][0], OUTPUT);
 pinMode(Motor[1][1], OUTPUT);
 digitalWrite(pirPin, HIGH);
}

void loop(){
 val = digitalRead(inputPin); // read input value
 if (val == HIGH) { // check if the input is HIGH
 motor_run(0, FORWARD);
 motor_run(1, FORWARD);

 } else {
 motor_run(0, STOP);
 motor_run(1, STOP);
 }
}

void motor_run(int motor, int movement) {
 switch (movement) {
 case FORWARD:
 digitalWrite(Motor[motor][0], HIGH);
 digitalWrite(Motor[motor][1], LOW);
 break;
 case BACKWARD:
 digitalWrite(Motor[motor][0], LOW);
 digitalWrite(Motor[motor][1], HIGH);
 break;
 case STOP:
 digitalWrite(Motor[motor][0], LOW);
 digitalWrite(Motor[motor][1], LOW);
 break;
 }
}
Step 5: Testing It Out/Finishing Touches

Once the code is uploaded to the Arduino, test out the system to see if it works. If it does, the last thing you need to add is portable power. I used two 9v batteries, one for the motors, and one for the Arduino. I then stuffed all the components into the box, made sure it was all wired correctly, and cut a hole in the front of the box for the sensor. Loading in some ping-pong balls and powering it up, every time the sensor detected motion, it would shoot out ping-pong balls! Totally awesome! Remember to check out the video above to see it in action!

Participated in the
Trash to Treasure Challenge

Participated in the
Summer Fun Contest 2016


