

Introduction: Ultimate Workbench


The ultimate workbench is your go-to place when you need to get a job done. It's got a solid wood work surface, great lighting, a vice to hold down your work, and of course all the important tools at the ready in drawers underneath. Also, it's on casters. Which is really the best part about this workbench, the mobility it provides.
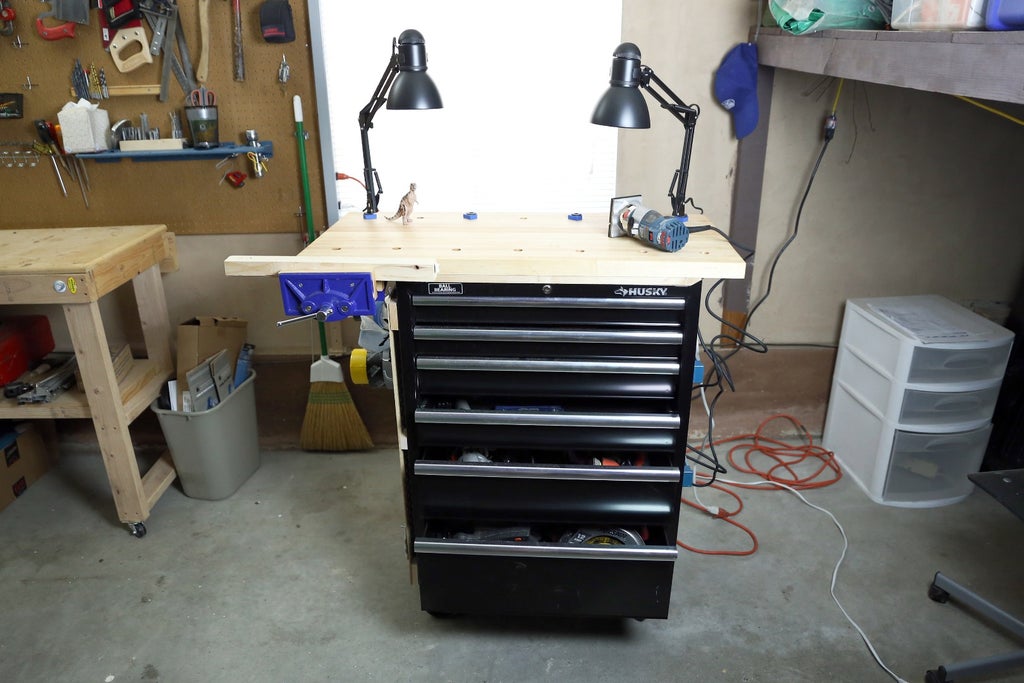
This customizable workbench is small and mobile, so you can roll it around your shop or even into the back of your truck and take it to the job site. When you're done it neatly tucks away, ready to save the day for your next project.
Ready to make your own ultimate workbench? Let's make!
Step 1: Supplies

The ultimate workbench can be customized to suit your needs. For mine, I knew I wanted bench dogs, a power source, lighting, and a magnetic knife rack and peg board to hold all the irregular shaped tools I have.
Aside from a standard tool chest on casters, here's the shopping list:
Sturdy hardwood top:
I used hard Maple, which is a classic woodworking tabletop choice. For my workbench I used two 10' lengths of hard maple planks (roughly 1"x8") and had some wood left over.
Accessories for the worktop:
Accessories for sides:
Step 2: Work Surface


I wanted a sturdy work surface that would withstand a lot of abuse, so I chose to make a butcher block work surface. All wood will warp over time, a butcher block surface aims to inhibit as much warping as possible by being dimensioanlly stable. What this means is that by cutting our wood into slats, and aligning the grain of the slats, we can provide stability to each naighbouring piece and attempt to counteract warping.
To start I squared up each piece of wood, chopped them in half to make them more managable, and then cut the planks into 1"x1" strips.
To get the most stability from the work surface each strip was aligned so that the grain was facing vertical. You can see this easily by looking at the ends of each strip.
Step 3: Glue Strips


With the grain pattern aligned it was time to glue up the work surface.
I started by putting down a sheet of protective paper under the slats to prevent gluing the wood to the workbench. Then I clamped the pieces together using plenty of clamps to ensure a good bond between each slat. I also used a few clamps on lateral pieces of squared wood to ensure the slats were lying flat on the workbench while the glue was curing, giving me the most level surface to work with after the glue had dried.
Step 4: Remove Clamps, Scrape Dried Glue

After letting the glue dry overnight I removed all the clamps, and the paper backing. There was some glue overflow that dried on the surface which can be easily removed with a scraping edge. Removing any dried glue will make sanding and leveling the work surface easier.
Step 5: Trim Ends


The work surface is ready to be trimmed to the final length. I used a circular saw and a fence to trim the ends square.
Step 6: Rough Sanding

The belt sander does a great job of smoothing out any rough transitions between the strips.
Go slow and be careful, as the belt sander removes a lot of material and can gouge the surface. Also, make sure to clamp your surface before you start sanding.
Step 7: More Sanding


After a rough sanding to smooth the transitions between strips you can switch over to an orbital sander. Start with a coarse grit and work your way up to a finer grit to get a nice smooth surface.
Step 8: Chamfer Edges

To ease the sharp edges of the work surface I chamfered the edges. You can do this easily with a small hand plane, or use the orbital sander.
The hand plane does a great job as it will take off an even shaving over the entire edge, while the orbital sander may have an uneven chamfer along the entire edge. Either way, we're aiming to just knock off the sharp edge on teh work surface.
Step 9: Measure and Mark Dog Openings

This workbench will have bench dog openings. Bench dogs are posts that stick into the work surface, these posts are great for stopping whatever you are working on from sliding around all over the place while you are working on it. You can also get hold down clamps that fit into the dog openings, or make your own dog attachments (as I did).
You can make your dog openings anywhere you like on your workbench, there are no rules. I decided to make my dogs in two parallel rows about 2" from the lengthwise edges, and spaced about 9" apart. With a ruler and square I marked out an array of where I wanted my dog openings.
Step 10: Drill Dog Openings

Typically dog openings are 3/4" or 1" in diameter. I chose to make my dogs 3/4" in diameter. Using a drill press so the openings would be squared to the work plane I drilled through the entire surface at each mark with a 3/4" drill bit.
Step 11: Rout Dog Openings


I decided to ease the transition for each dog opening with a roundover bit in a hand router. This is optional, but makes the work surface much nicer and reduces potential tearout at each dog opening after use.
After I gave another quick fine grit sanding to the work surface to clear any pencil marks and prepare the surface for sealing.
Step 12: Seal Work Surface


To protect the work surface I used boiled lindseed oil. Protecting the work surface before I began, I applied a liberal coat of the oil all over the butcherblock surface. After a few minutes of letting the wood soak up the oil I wiped the surface with a clean rag, then applied another coat.
Step 13: Work Top Frame


To attach the work surface to the rolling too cabinet there will need to be a frame. Most rolling tool cabinets have a flange on the top portion, this is if you want to inset a piece of wood there for a work surface. The work surface I made is much larger than the inset of the flange for a larger work area, and also so I can clamp stuff to the lip of the new work surface.
This frame was made with scraps of maple from making the work surface. I measured the interior of the rolling tool chest top and cut strips to match. Each piece was milled to the same height as the flange inset, that way the work surface can rest on top of the flange, level with the wood frame.
The frame will be installed to the underside of the work surface first, then set into the flange and screwed in place.
Step 14: Attach Frame to Worktable Underside


Maple is a really hard wood, so I had to drill pilot holes of almost the same diameter as the screws I was using. To ensure the screw heads sat flush I countersunk each hole drilled.
The rails were installed on the underside of the work top frame first, then the entire assembly was flipped over and placed into the rolling work cabinet top.
Step 15: Install Work Surface

Carefully align the work surface rails with the inside of the rolling cabinet top, ensuring a tight fit.
Step 16: Attach Work Surface

Drill into the flange from the outside of the rolling cabinet through the metal and into the maple rail under the work surface, countersink the hole, then install a long screw to secure the rail and work surface in place. Repeat this along the entire perimeter of the flange.
Your work top is now securely installed on top of the rolling tool cabinet.
Step 17: Vise


No tool bench is complete without a bench vise.
This inexpensive vice was installed on one end of the work surface and mounted with screws from below. Using wood inside a metal vise is a good method to avoid marring anything you hold in the vise. I used more scrap maple leftover from the table top to make an insert for each side of the vise. I used epoxy to hold them in place, and followed up with beefy screws to ensure the inserts would be firmly installed.
Step 18: Magnetic Tool Rack

Having drawers for all your tools is great, but what about items you want quick access to? Adding a magnetic tool rack on the side of your tool chest allows you to keep things handy and organized.
The magnetic tool rack I got was 18" and had openings for screws that lined up with the upright structure of my tool chest. Screwing into the hollow upright support allows for a secure connection without interfering with the drawer action.
Step 19: Electrical

What good is having all your power tools in one place if you don't have a way to run them? I installed an electrical powerbar under the work surface on the opposite side from the vise. Almost all powerbars come with slide opening on the back that allow you to install them onto screws.
I measured where these openings were and drilled two holes on the underside of the work surface, then installed screws to hold the powerbar. To ensure a good connection I used epoxy on the backside of the powerbar and then installed it into the screws, making a permanent bond.
Step 20: Peg Board


For all the other tools you want to keep around, but don't fit into the drawers or on the magnetic rack, there's a peg board to hang things from.
I measured the width of my tool cabinet then scribed the width onto the pegboard, then cut it to size with a circular saw. I used more scrap maple to make standoffs so that the peg board would stick out a little from the tool cabinet, this is so that peg hooks could be inserted. The wood standoffs were again screwed into the hollow upright support and didn't interfere with the drawer action.
Step 21: Modify Bench Dogs


With the vise installed we can start using the tool bench to help us build out the bench dog modifications.
These inexpensive bench dogs are 3/4" and have a rubberized insert in the top which are removable. I wanted to modify these dogs to hold lights, which have a post in the bottom that is a little less than 1/2" in diameter, the articulating lights would then be able to be placed anywhere on the table and serve double-duty as bench dogs.
With the rubberized top removed from the bench dogs I placed the dogs in the bench vise and drilled a 7/16" hole inside the dog about 1/4 of the way into the dog, just enough to securely hold the post of the articulating light. The rubberized insert already had an opening, so no modification was needed there.
Step 22: Looks Good; Now, Get to Work!


With the workbench complete you're ready to get started on your next project, big or small. With a rolling tool cabinet combined with a custom top and tool racks you can tackle jobs anywhere without having to make multiple trips back to the shed for tools you forgot.
Of course, what Ishow here is just a sample of the ways you can customize your ultimate tool bench. Other additions might be a movable fence on one side, small hanging baskets on the work surface end to keep your smaller tools, or even a back guard which can hold even more tools.
What ways will you modify your workbench? Share a picture in the comments below!
Happy making :)


