

Introduction: Jewelry Class: Wire


Class table of contents:
- Tools, Materials, and What You'll Learn
- Beads
- Wire (you are here)
- Piercing Sheet Metal
- Torch Soldering & Going Further
Welcome to wire! These wire wrapped and beaded earrings are a great first project to make with wire. You'll learn to manipulate wire with your hands and pliers, shape wire with a hammer and bench block, and open and close jump rings to attach your creations to ear wires.
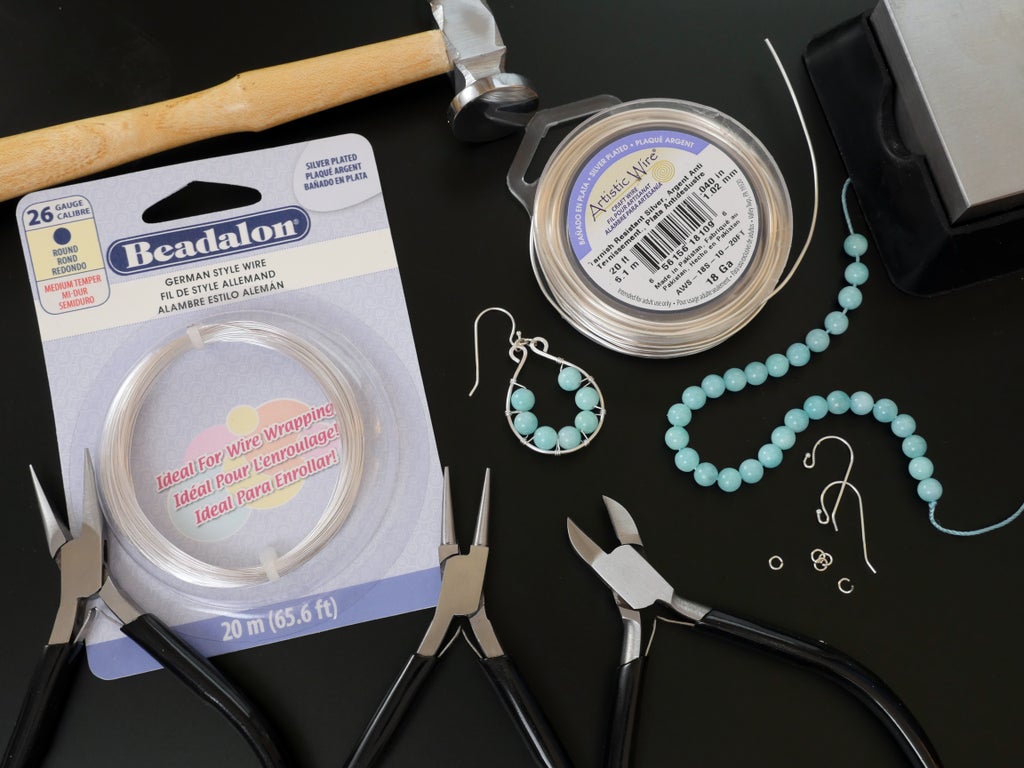
For this project, you will need:
- Beads (round 6mm Amazonite, jade, etc.)
- Smooth jaw pliers (set including flush cutters)
- Safety glasses
- Silver-plated wire (26ga and 18ga) (If you prefer a different wire color, go for it!)
- Ear wires
- Jump rings
- Small ruler
- Calipers (optional)
- Bench block (optional)
- Chasing hammer (optional)
- Rawhide mallet (optional)

For each earring, you'll need a 4 inch (10cm) piece of your larger gauge wire, about an arm's length of the wrapping wire, seven beads, three jump rings, and one ear wire. The wire used here is silver plated, which is affordable enough to encourage experimentation. However, due to many people's skin sensitivities, sterling silver ear wires are recommended.


A dedicated set of jewelry pliers is essential for making jewelry with wire. Make sure you at least have two sets of smooth-jawed needle nose, a set of round nose, and a set of flush snips.

When cutting wire with flush cutters, bits can go flying in any direction. Even when wrapping, the wire tail can fly in unexpected places. Be sure to wear protective eyewear when working on wire projects.

Though the effect is subtle, this lesson will also cover the optional hammering-flat of the larger gauge wire, achieved with a polished chasing hammer.

When you're looking to expand your wire-shaping abilities beyond the grasp of your round nosed pliers, small ring mandrels come in handy for forming a wide variety of loops, jump rings, and spirals.
Step 1: Cut and Curl Wires

After donning your safety glasses, use a pair of flat-nosed pliers to gently straighten a section of your heavier wire from the spool. As an alternative method of straightening your wire, place it on a bench block and rap on it gently with a rawhide mallet. Line up the straight wire with a small ruler and use your flush snips to cut two 4 inch (10cm) pieces of wire. The length of these wire determines the overall size of the earrings, so feel free to experiment but make sure the two wires match.


Notice the shape of the cut end of wire. The flush side of your snips will produce a less pointy wire end, so you may wish to trim your wires to make the ends more flat.


Now it's time to curl the ends of the wires. Pick up your round-nosed pliers and grasp the wire firmly as close to its end as possible. Since the pliers are tapered, the position of the wire will determine the size of the resulting loop as you twist it around.

Twist the pliers and/or wrap the wire around them tightly to form a loop. If the wire doesn't quite reach to meet itself, reposition your grasp and apply gentle twisting pressure to close the gap.


Repeat to form a loop at the other end of the wire, being sure to keep the loops aligned to the same plane. Repeat both end loops with the second piece of wire.

As an optional finishing detail, use a chasing hammer and bench block to flatten the loops. Keeping your fingers clear of the path of the hammer, give the wire loops six or seven good even thwacks, then flip it over and strike it a few more times so that it looks evenly flattened on both sides. This has an obvious visual effect on shape of the metal, but it also has a strengthening effect. Hammering work-hardens the metal, making it stiffer, and also the new profile of the metal in the loop is like a tiny I-beam, which is a stronger shape than the previously round wire profile.
Step 2: String Beads and Begin Wrap


Use pliers and your fingers to shape the wires into teardrop shape.

You can use the handle of your hammer or other round object to help get your shape started, or freehand it. It's ok if they don't exactly match the shape of the wire in the photos; it's more important to try to make your two earrings match each other. Optionally use nylon-jawed pliers or a rawhide mallet and bench block to flatten out any unwanted twist, and to work-harden the metal so it keeps its shape while being worn in everyday life.


Now that we have an earring shape we can work on the bead wire. String seven beads onto an arm's length of thinner wrapping wire, and kink one end to prevent the beads from falling off.

Lay the unkinked wire end across the teardrop shape (near an end loop as shown) and wrap it five or six times with the help of some pliers. I like to wrap clockwise, but you may prefer counterclockwise. It's important that you wrap the same direction throughout, so stick with whichever wrapping direction you pick.

The wire end should wrap towards the larger loop, so that the main body of wire does not have to cross over any loops to continue on it's way around the earring.


Trim the excess wire with flush snips and give the cut end a squeeze with pliers to snug it against its neighbors (and prevent it from feeling scratchy or snagging).

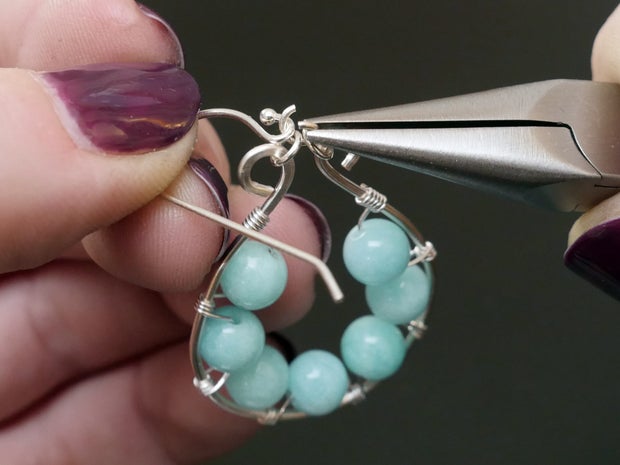
Step 3: Incorporate Beads

Slide one bead down its wire until it reaches the larger wire loop. Hold the bead in place at the inside of the loop with one hand, and wrap the wire around the larger wire twice, repositioning the slack to dodge the other end of the wire as necessary. I like to do this wrapping with my fingers, but you may find pliers to be helpful or more comfortable.


Bring another bead into position and repeat the wrapping process to fill the shape with beads. As you go, try to keep your bead spacing even and your wires snug. Flat-nosed pliers can help pinch loops closer to one another.


After all seven beads have been added, wrap the remaining wire five or six times around before trimming the tail short and pinching it flush as you did at the start.

If this is your first time working with wire, it's likely your technique improved even after just seven repetitions of adding beads and wrapping the wire. If your first earring looks less than great, that's ok! Try again on your second earring and compare the results. Then you can remake the first by clipping and removing the thin wrapping wires and harvesting the beads. When you have two complete beaded shapes, you can proceed to turn them into earrings.
Step 4: Finish Up With Jump Rings

To complete these earrings, we'll use jump rings to attach ear wires. Jump rings are small loops of wire, often with an opening (but also available as solid rings). You can find jump rings in many sizes and diameters of wire, as well as other shapes besides circles.


To open a split jump ring, grasp the two wire ends using two hands and two sets of pliers. Twist your wrists in opposite directions to twist the wire ends apart laterally.


After opening the jump ring, loop one end of your wire masterpiece onto the jump ring and close it the same way you opened it: grasp both ends with two pairs of pliers and twist the ends towards each other until they are aligned.

Repeat to add a jump ring to the other wire loop.

Open a third jump ring and use it to hook both of your previous jump rings. Also slide on an ear wire, and carefully use two pairs of pliers to close the last jump ring.

Repeat to add jump rings and an ear wire to complete your second earring.

Step 5: You Did It!

Congratulations, you finished your wire wrapped earrings! Wear them yourself, or give them as a gift, and whip up a few more pairs while you've got your tools out. Your technique will only improve with more practice!

Try switching up the colors of wire or beads, the size of the wire loop and number of beads, or even align the beads to the outside of the wire loop for a different look. Snap a photo of your finished work and share it with us in the imadeit section below.
Class table of contents:


