

Introduction: Hammer Restoration


The humble hammer is a cornerstone of a carpentry kit. When your trusty tool handle breaks or in need of repair you could just go to the store and buy a new one, or maybe even buy a replacement handle. But not you, you're a maker. You fix and mend, you personalize your toolkit as it's a reflection of who you are, giving you maker cred that gets you noticed whenever you brandish it.
When the handle on my hammer broke I knew it was time to not only fix my tool, but make it uniquely mine. I made a new handle from sturdy ash, which has excellent shock resistance, making it ideal for a tool handle. I decided to model my handle after the shape of a hatchet handle which would give me maximum leverage when striking, and even added a little embellishment to the handle to let everyone know it was mine.
Step 1: Break Hammer

I'm pretty good at breaking things. This inexpensive hammer broke where the head meets the handle after a particularly rigorous session of hammer time.
Upon closer inspection it appears that the handle is some kind of plastic or epoxy. I've had this hammer for some time, and I'm a little surprised it lasted this long. In some ways I was happy this ugly hammer broke, giving me an opportunity to remake it into something awesome.
Step 2: Sketch New Handle


Referencing the old handle for rough sizing, I sketched out a new handle design on a scrap piece of ash from an earlier project.
Knowing I didn't want a straight handle shape, I printed some pictures of hatchet handles as reference and sketched onto the wood until i had a profile I was happy with.
Step 3: Cut Profile


With the design penciled on the wood I went to the bandsaw and cut the rough shape out.
Step 4: Check Dimensions

After the rough shape has been cut I compared the new rough shape to the old handle for sizing, ensuring that my handle was approximately the same length as the original and meets the new design I was going for. With everything checking out I could move on to shaping the rough handle into something more ergonomic.
Step 5: Trim Width


Depending on the scrap you have, you may have to reduce the width of your handle. You can rip your scrap piece before you start roughing out the profile, but I chose to do it after. The caveat to trimming down the width after shaping the profile is to ensure you have enough material to safely feed it through your table saw.
Step 6: Shaping the Handle

Once I has happy with the sizing I could start shaping the handle on the bandsaw. Holding the piece at a 45 degree angle I carefully trimmed off the edges and began shaping the handle to match the design I had sketched.
Step 7: Shaping the Eye


The eye of the hammer is where the handle is inserted into the head. I made a few measurements of the eye opening from the head and transferred it to the eye of the handle. I cut the rough shape for the eye deliberately large, then shaped it to the correct profile with a hand rasp.
Step 8: Trimming Body

With the head fit to the handle I made marks where I could trim the handle profile down near the head.
Step 9: Refining Handle Shape

Back at the bandsaw the shape was refined further, careful not to remove too much material as the final shape will be refined by hand with the rasp.
Step 10: Rasp


With the majority of the bulk removed from the handle and the rough shape made a hand rasp was used to smooth out the contours of the handle and give it the final shape.
Taking time here will yield the best results. Starting with the rough side of the rasp the handle shape was refined, take break from the rasp and hold your handle to determine how it fits in your hand. When you're happy with the progress switch to the fine side of the rasp and work the handle until it's smooth.
Step 11: Compare

After shaping with the rasp I compared the new handle with the design intent and the old hammer handle. My handle was slightly longer and had a more ergonomic shape.
The final shaping was done with the fine end of the rasp until I was satisfied with the shape.
Step 12: Hanging Opening


I wanted the option to hang my hammer from a peg board, or tie something to the handle. I drilled a small hole through the base of the handle, then used a countersink bit afterwards to smooth the hole transition and enlarge the opening.
Step 13: Sanding


The fine end of the rasp leaves a decent finish, but you can really make the grain of your wood handle stand out by sanding it smooth.
Starting with 100 grit sandpaper, then working up to 220, and then 320, I sanded the handle completely smooth and free of any rasp marks.
Step 14: Make Wedge Slit

With the handle shape finished the wedge slit can be cut into the handle eye.
Use the bandsaw to cut a slit down the majority of the eye of the handle. A steel wedge will be inserted into this slit when the hammer head is on to hold the head in place.
Step 15: Steel Wedge


To ensure the head stayed on the handle we'll drive a metal wedge into the eye slit when the head is installed. This steel wedge was made from a scrap of steel bar stock that was about as wide as the eye. I ground a taper in one end of the steel wedge with an angle grinder.
After the wedge has been tapered the head can be put onto the handle eye, then the wedge can be inserted.
Protecting the wood handle from damage with a shop rag, then brace the hammer in a bench vice and drive the wedge into the handle eye forcing the eye apart and holding the head to the handle with friction.
Step 16: Trim Wedge


With the steel wedge securely hammered into the eye and holding the hammer head in place the excess can be trimmed. Using the angle grinder trim the top of the eye and excess wedge from the hammer.
Step 17: Epoxy


After trimming the excess wedge I filled in the small voids in the eye with 2-part epoxy. This will help secure the wedge in place, but is more to fill in any cavities and make a clean top.
Allow epoxy to cure completely before moving on.
Step 18: Finishing the Head


Using a sanding disc or flap wheel the hammer head top can be smoothed out. If your hammer head is in rough shape like mine was you can also use the sanding disc to clean up the head and bring it back to a nice shiny finish. This is also a good time to fix any hammer head imperfections. My hammer had a slight slope on the hammering face that I squared up with the angle grinder and sanding wheel.
After I used a scouring pad to smooth out the finish left by the sanding disc.
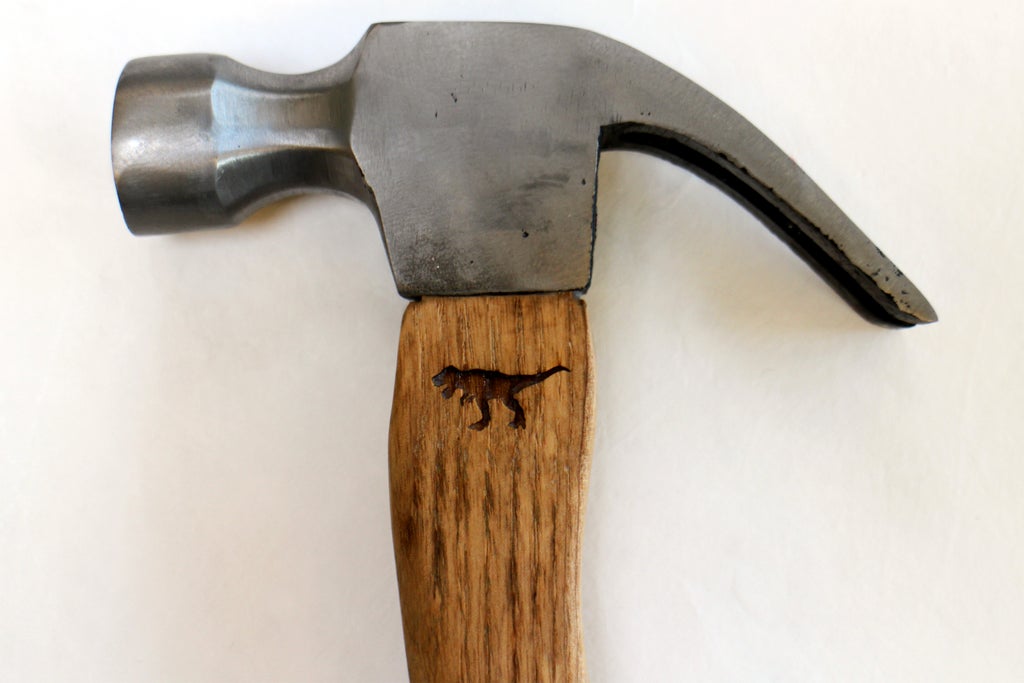
Step 19: Laser Etch (optional)


Your hammer is done! Or, is it?
I decided to go the extra step and laser etch in a design on my hammer, totally personalizing it. Having access to a laser cutter is pretty rad, but you could also use a wood branding iron to burn in your own design.
I'm into dinosaurs and wanted one on the handle of my hammer.
Step 20: Apply Coating

The last step is to protect your piece. I decided to to coat my ash hammer handle with paste wax.
Using a shop rag I rubbed the paste wax into the handle. This gave the wood a deeper colour, and helps seal the wood from staining.
Step 21: Hammer Time!


All done; time to hammer some things!
Drive a nail, flatten some metal, pry something apart. This restored hammer has a new lease on life, and will fill you with pride whenever you use it. Your hammer is a tool that needs to be used to be loved, so get out there and get hammering!
Have restored your own hand tool? I want to see it!
Happy making :)

Participated in the
Homemade Gifts Contest

Participated in the
Wood Contest

Participated in the
On a Budget Contest


