

Introduction: Grad Dyed Yarn Using Fiber Reactive Dye


I love grad dyeing things!!!!! Yarn, baby wraps, shirts, skirts, shoes, etc., all look beautiful with a smooth gradation dye. Another commonly used term for gradation dyeing of going from light to dark, or from one color to another color is called an ombre dye. Whatever you call it, it's lovely to see a color transition and adds a unique visual quality to dye projects. There are a couple different grad dyeing techniques, the one I chose to use for this project is a dipped grad dye.
I wanted to dye some weft yarn for a shawl I am weaving. I'm weaving with a clasped weft, and was curious what a clasped weft would look like with two wefts grad dyed two different colors with the grad dye going from light to dark.
In this Instructable you will learn about preparing your yarn for dyeing, preparing your dye, dip grad dyeing your yarn, rinsing and removing excess dye from your yarn, and tips for getting smooth vibrant results.
The processes described in this Instructable can be used not only to grad dye yarn, but to grad dye many other natural fiber items such as clothing, towels, blankets, baby wraps, and shoes. So grab your natural fiber item, and grad dye something beautiful for yourself or as a gift for a friend.
Enjoy!
Step 1: Supplies Needed

-Yarn- All Natural Fibers including cotton, rayon/viscose, linen, hemp. In this Instructable I am using 100% Viscose from Rose yarn.
-Fiber Reactive Dye- I used fiber reactive dye from Dharma Trading Company in Maroon and Pagoda Red. Dharma has awesome dyes! Other fiber reactive dyes that are more readily available at craft stores are Dylon Or Tulip powder dyes.
-Soda Ash or Washing Soda- either works
-Non-Iodized Salt
-Measuring Spoons and Cups- after being used for dyeing these should not be used on food again.
-Container for Dyeing- I used 2 shoe box totes.
-Gloves- to protect your hands from dye and chemicals.
-Face Mask- for protection while using powder dyes.
-Blue Dawn Dish Soap or Synthrapol Textile Soap- either works great.
-Water
-Optional- Hanger for dyeing 2 skeins.
-Time- All together it took about an hour and a half to prepare and dye the yarn, then more time to rinse it, then 2 days to dry because my skeins were thick.
Step 2: Measure, Tie, and Scour Your Yarn

If your yarn is in skeins, untwist it into hanks and tie it. If your yarn is in cones, you'll need to measure it out then tie it to get it ready to be dyed.
-Measure your yarn. Decide how much yarn you will need for your project and divide that out into however many hanks you would like to dye. I'm using 8/2 Rose Viscose yarn for my project and needed 8 oz., so I measured out two 4 oz. hanks on my Amish Swift.
-Tie figure 8s and loops loosely around your yarn to keep it from coming undone and to keep it from getting into a tangled mess during dyeing and rinsing. Don't tie too tightly or the dye might not get to that part.
-Scour your yarn if it needs to be scoured. This is a very important step. Many natural fiber yarns such as cotton and linen need to be scoured before dyeing to remove dirt and oils that can prevent the dye from properly attaching to the yarn.
My yarn is a viscose and doesn't need to be scoured so I skipped this step. A good way to determine whether or not your yarn needs to be scoured is by setting a hank of yarn on top of some water and observing how well it absorbs the water. If your yarn just sits on top of the water and doesn't absorb it easily, it's a good sign that your yarn needs to be scoured before moving on to the next step. If your yarn sinks and easily absorbs the water, then it's a good sign that your yarn does not need to be scoured and you can move on to the next step of preparing the yarn for dyeing.
Here is an instructable I wrote about speckle dyeing yarn. It has clear instructions on measuring, tying, and scouring your yarn. Follow those instructions to scour your yarn. https://www.instructables.com/id/Speckled-Dyed-Ya...
Step 3: Prepare Your Yarn


Before you can start dyeing your yarn, you need to prepare your yarn to absorb the dye and have it fix to the yarn. This is done by soaking the yarn hanks in a mixture of water and soda ash.
-Determine how much water you will need in your container to be able to fully submerge your yarn in the mixture.
-Add 1 cup of soda ash per gallon of water you plan to use into your soaking container.
-Add enough warm water to the soaking container to fully submerge the yarn.
-Stir the water and soda ash until all of the soda ash has dissolved.
-Add yarn to the water/soda ash mixture in your container and submerge it so the yarn absorbs the mixture.
-Let your yarn soak in the mixture for 30 minutes or more stirring occasionally.
-Prepare your dye. (See next step.)
-When you are ready to dye your hanks, drain the soaking water and squeeze as much water out of the hanks as you can. They should still be slightly damp.
-Setup your yarn to be dyed. You can hold the end of the yarn while dyeing it, or attach it to something that you hold. You can also set up some sort of pulley system if that works better for you. I wanted to dye my 2 hanks each a different color and decided that by attaching each hank to opposite sides of a hanger, I could then just hold onto the hanger and it made for easy dyeing of both hanks at the same time.
Step 4: Prepare Your Dye


Now it's time to prepare your dye.
-Wear gloves and a face mask for protection. Be very careful with the powder dye, it tends to easily disperse. Dye outside, or if you dye inside, make sure that when you are done dyeing that you clean the area you dyed in very well.
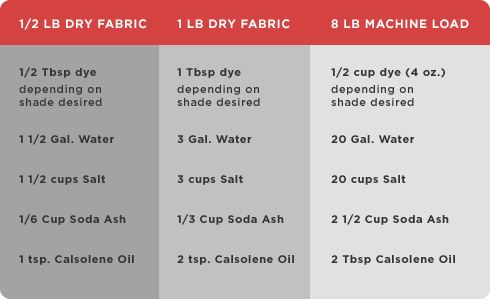
-Determine how much dye, water, soda ash, and salt to use in your dye mixture. Here is a chart by Dharma Trading Company that I use to help me determine these amounts: https://www.dharmatrading.com/images/public/instr...
I am dyeing 1/2 pound of yarn total (1/4 pound of yarn per hank/container), since it's better for grad dyeing to use more dye, I followed the measurements for 1/2 pound dry fabric for each container (I don't always follow them exactly, but they are a great starting point to go from).
-Measure out your dye powder and add it to a corner of your dyeing container. To get really saturated colors, you should add a little more dye powder than the chart calls for. For my dye solution, I measured out 1/2 Tablespoon of dye and added it to my container.
-Add a little bit of warm water to the dye and stir to make a paste.
-Add a little more warm water and stir until all of the dye is fully mixed into the water and none is floating on top of the water.
-Add enough warm water so that the yarn will be fully submerged and stir well. For my dye solution, I added about 1.5 gallons of warm water to my dye container.
-Add salt to your dye water and stir well. I added about 1 cup of salt to my dye solution. Salt is very important to the dye solution because it helps drive the dye into the yarn.
-When your yarn is ready to be dyed, the excess water has been squeezed out and is all set up, add soda ash to your dye solution and stir until all of the soda ash is dissolved. I added about 1/6 to 1/4 cup of soda ash to my dye solution.
Soda ash is a fixative and what causes the dye to attach to the yarn. Once added it has a time limit. I find that after about an hour the dye no longer works as well, and has exhausted. So wait until your yarn is completely set up and everything is ready to go before adding the soda ash to your dye mixture.
Hooray, everything is ready and now it's time to dye!!!
Step 5: Dye Your Yarn


Now that your yarn and dye are prepared and you've added and mixed your soda ash into your dye solution, it's time to dye your yarn!
-Holding your yarn hank by one end (or holding the hanger the yarn is attached to), dip the other end down into the dye solution an inch or so and let it sit for a couple minutes there.
-Lower your yarn another inch or so and let it sit.
-Continue to lower your yarn more into the dye every couple of minutes.
-Bob the hank of yarn up and down slowly while dyeing and stir regularly to avoid making lines and to help create a smooth color grad.
-Total dyeing time should be between 30 to 45 minutes total. The dye exhausts after about an hour and will not dye the yarn as well. I let all the dye sit submerged in the dye solution for the last 5 minutes of my dyeing time. Total dyeing time for me from when I first put an inch of yarn in the dye solution until all the yarn was done dyeing was about 45 minutes.
Step 6: Rinse Your Yarn


Now that your yarn is dyed, it's time to rinse out the excess dye. This is important so that the color doesn't run later in the wash.
-Drain your dye solution into a sink.
-Rinse your yarn under cold water until the water runs clear.
-Turn your water to hot and continue to rinse your yarn while your water warms up to hot. As the water warms up you will see more excess dye run off.
-When your water is hot plug your sink and squirt a small amount of Blue Dawn into the sink.
-Fill the sink with hot water and stir so the water is sudsy.
-Add the yarn to the hot sudsy water and swish it around.
-Let the yarn soak in the studsy water for 10 minutes or more.
-Drain your water and refill your sink with more hot water without soap.
-Swish your yarn around in the hot water and soak for another 10 minutes.
-Continue to drain, refill, and soak in hot water until the hot water is runs clear.
-When the hot water runs clear, squeeze out as much water as you can and hang the hanks to dry.
Step 7: Make Something Beautiful!


You're done!!! Admire your lovely dyed yarn and then go use it to make something beautiful!
I used mine for weaving so after my yarn was dry I wound the maroon yarn onto my pirns, and wound the orange yarn onto a tube. I then set the tube of orange on the ground to the left of my loom and as I wove pulled the yarn up from the orange to clasp with the maroon yarn in my shuttle.
I love how it turned out!!! The grad dye really added a unique aspect to the clasped weft.

Runner Up in the
Fiber Arts Contest 2017

Participated in the
Homemade Gifts Contest 2017


