

Introduction: Intricate Wood Inlays Made Super Easy

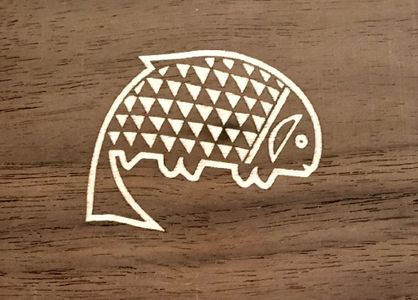


If you want to make a very intricate wood inlay, but you lack patience or fine motor control, here is an easy way to accomplish beautiful work with a laser cutter. The technique differs from prior Instructables on inlays, such as this one. I believe it’s a bit easier and allows for much finer detail, provided you have access to a laser engraver. The width of the bear and fish outlines in the images is about one millimeter. If you want to know how I make the wooden bowls check my two Instructables: Bandsaw Wooden Bowl and Angled Wooden Bowls.
Step 1: Materials and Tools
Tools:
- Software to design your inlay; or a ready .dxf or .svg vector file for laser engraving.
- Laser cutter
- Band saw and table saw
- Orbital or palm sander, and/or benchtop belt sander
Materials:
- Two contrasting hardwoods, e.g. maple and walnut
- Wood glue or epoxy
- Sand paper: 100/220/320 grits
This Instructable assumes that you know how to design and cut an engraving on a laser cutter.
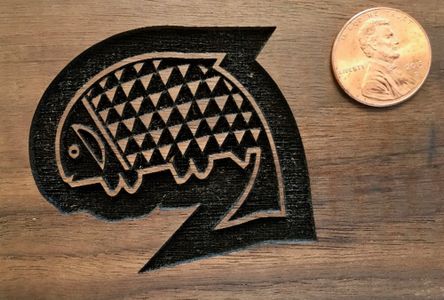
If you want to try my technique I highly recommend you make a smaller trial inlay before embarking on your actual project. It will give you a feel about the designing, engraving, glueing, and sanding before starting a larger project. The pictures shown in my Instructable are two small 2.5" by 3.5" pieces to demonstrate the technique. You can also see the visual effect of switching from a dark in light colored inlay to a light in dark inlay.
Step 2: Prepare Your Main Board for the Inlay

Prepare your wooden board - the one you’ll set the inlay into. Let’s call that the main board. Make it square, round, a rectangle, whatever you need. It could be for a cutting board, a bowl, a box lid, a box side, a tray, a coaster, a picture, a frame, a cabinet door panel, etc. Make sure the surface is flat and sanded to at least 100 grit.
Use the laser cutter to engrave your design into the main board. Start with an inlay design no bigger than 3” by 3”. Once you get familiar with the technique you can try to make larger inlays. The engraving should be at least 1/16” to 1/8” deep, but not much deeper. Use blue painter’s tape to cover the wood before lasering; it keeps the surface cleaner. In the examples shown I used an Rabbit Technology 60W CO2 laser (speed 120, power 37, 1x engrave).
Step 3: Prepare the Inlay Piece
Now prepare your second piece of hardwood, the piece to be inlayed. It should be about 3/16” to 1/4” thick, or a little thicker than the engraving is deep. You don’t want the engraving to cut through this piece. The wood piece should be large enough so you can engrave a perimeter (5 mm or so) around the image or design. Choose a wood with a nice color contrast to your main board. Maple/walnut or maple/cherry make pretty color combinations. The surface should be flat and sanded to 100 grit.
On your computer make the following two changes to your design file:
- Mirror your design horizontally
- Draw a rectangle, a circle, or an offset perimeter around the entire design. This will cause the engraving to come out in reverse: areas that are high in your main board will be cut low, and areas that were low before will remain high. It’s a complete reverse from the engraving you made in step 2. It will look like a stamp!
Do not change the size of the design!
Laser engrave this reversed design into the second piece of hardwood. Again the engraving should be 1/16” to 1/8” deep. Use the same laser cutter settings as before.
Step 4: Get Ready for the Inlay


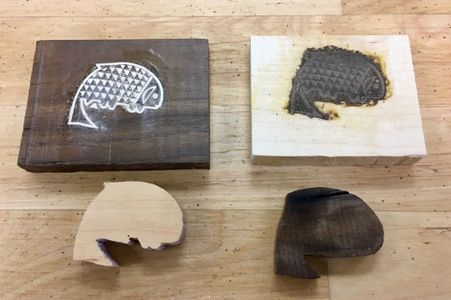
Using a band saw or scroll saw cut around the perimeter of the engraving you just did in the prior step. What you end up with is like a ‘stamp’ of your design.
Clean any pitch/burn off the surfaces of the main board and the inlay piece, and clean out any debris left from the engraving. The inlay piece will fit (or mate) snugly into the engraving on your main board. Do a ‘dry fit’, but don’t push it down too hard; it might get stuck!
If the fit feels right, apply wood glue or epoxy to the engraving on the main board to fill all the low spaces. Then insert the inlay piece and tap it down into the main board engraving. Use a clamp or weights to push it in as far as it will go - which is not very much! Let the glue dry. Be patient.
Step 5: Trim and Finish


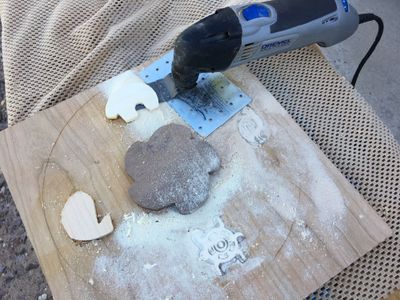
Depending on how much your inlay piece sticks out from the main board, slice off the excess (band saw, scroll saw, oscillating tool, sharp chisel), or carefully sand it off with a belt sander or orbital sander. Once you get close to the surface of the main board, go easy; use a palm sander, or hand sand.
Magically, your inlay will appear after you remove the solid part of the inlay piece. It’s really awesome!! Sand or scrape off any glue that may have leaked to the surface, then sand the surface smooth to 220/320 grit. Just be mindful not to sand too deep or your inlay will just as magically disappear.
Your inlay is done! Finish your board as you like!
Step 6: Step by Step Visual Example


The attached pictures show a step by step example of an inlayed bottom for a wooden bowl.
Step 7: More Thoughts
By engraving the inlay piece and not cutting it all the way through the wood you can keep very fine details together, and assemble the whole inlay as one piece. For example, the pupil of the fish eye shown in the pictures of step 5 is the diameter of a small sewing needle; yet it shows up in both the walnut/maple and the maple/walnut inlay. Try to do that by hand!
For larger designs, try to do the inlays as several separate pieces in different areas of the main board; as shown in the visual example (prior step).
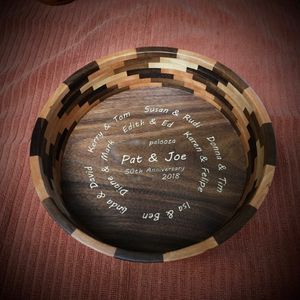
Engrave and inlay text for a commemorate gift or plaque. The bowl shown is maple (text) in walnut.
Do two inlays with different colors on the same main board. After the first inlay, repeat the process on the main board with a different inlay wood; just remember you don't have much depth to work with before you sand through the first inlay.
Experiment with the laser to determine the best settings for a clean engraving, and try different depths.
Create inlays for a wooden bowl, cutting board, a box lid, a box side, a tray, coasters, a picture, a picture frame, a cabinet door panel, a drawer front, a table top, etc.
And finally, if you try this, share your work and any improvements of the technique with me and others!

Runner Up in the
Homemade Gifts Contest 2017


