

Introduction: Hack Your Bread Starter With a Poolish!


I have had many friends who have made Mark Bittman and Jim Lahey's no-knead bread but have been hesitant to make the jump to a natural starter. I have met other people who have tried making their own starter unsuccessfully. Learning how to use a starter is very simple, and after many years I have come up with my own method of kickstarting my starter. Whenever I go through a period of months when I have no time to make bread, and I find my starter in the back of my fridge all black and smelly, I begin anew and make make a poolish. A poolish is essentially a starter made of equal parts (by weight) of flour and water and a pinch of yeast. After a few cycles of feeding and interacting with the wild yeasts in the air, the starter takes on a more acidic and yeasty aroma that develops increasing complexity and flavor over time.
To be clear this "hack" might not technically give you a "sourdough" starter, but should help you understand the rhythm of maintaining a starter. If you can keep your poolish alive for a week, and you learn to subtract the amount of the starter from your bread recipe, then you are ready to make your own wild yeast starter from scratch!
Step 1: Begin With Equal Parts Flour and Water (by Weight)


If you are going to do any kind of bread baking you should go ahead and spend $13 on a kitchen scale. In this Instructable I will to stick with volume measurements to illustrate how easy this process is and stay consistent with the original recipe. Mix equal parts flour and water (by weight):
- 3/4 cup flour (118 g according to my scale)
- 4 oz water (118 g)
Usually for my starter I like to use equal parts whole wheat and bread flour, but in this picture I used only whole wheat flour because I had run out of bread flour at home.
I use cold filtered water from the refrigerator, which slows the fermentation considerably, but that also lets the yeast flavor develop more fully.
Step 2: Add a Pinch of Yeast...


Add a pinch of yeast. Mix the poolish with a spoon. It will be sticky to the touch. Cover with a cloth or plastic wrap and set aside until it doubles in size and has lots of small bubbles on top, approx 6-12 hours depending on the amount of yeast and temperature of water you used.
Step 3: After 6-12 Hours the Poolish Is Ready to Use


The poolish will double in size and have lots of air bubbles in it. Now your poolish is ready to use!
Empty the poolish into a large mixing bowl or stand mixer. A little bit of sticky dough will remain in the bottom of the container. The yeast remaining in the mixture in the container, plus whatever yeast is in the air in your house will grow to be the starter for your next batch of bread. Now you are going to feed your starter. Add 3/4 cup flour (118 g according to my scale) and 4 oz water to the starter container. Mix with a spoon. Cover with plastic wrap or a cloth.
- Within 24 hours at room temperature, your starter is ready for your next batch of bread.
- You can also refrigerate the mixture for up to a week and remove 2-4 hours before using
- After 4-5 feedings the starter should take on more wild yeast aromas and your bread will take on increasing complexity and flavor
Step 4: Now You Need to Do a Tiny Bit of Math

To complete your bread recipe you need to do a little arithmetic. For example the original no-knead bread recipe is:
- 3 cups all purpose flour
- 1 5/8 cups water
- 1 1/4 tsp salt
- 1/4 tsp instant yeast
You need to subract the amount of flour (3/4 cup), water (1/2 cup), and yeast that you already used for your poolish, which leaves you with:
- 2 1/4 cups all purpose flour
- 1 1/8 cups water
- 1 1/4 tsp salt
The same logic applies if you are using weights instead of volume for your measurements. Subtract the weight you used in the poolish from the recipe to find out what to add. For example if:
- The recipe calls for 500 g flour and 350 g water
- You use 100 g flour and 100 g water (+ a pinch of yeast) to mix your poolish
The remaining flour and water to add would be 400 g flour and 250 g water to complete your recipe.
The rest of the steps for baking are the same as if you did not use the poolish.
Step 5: Blend the Ingredients in the Wet Dough


This step is what gives the "no knead" recipe its name.The long bulk rise (12-18 hours) in the next step allows for gluten formation, which omits the need for extensive needing when you mix the ingredients.
Combine the poolish, flour, water, and salt in a large mixing bowl. If you use a stand mixer run it on slow for 1-2 minutes until all the ingredients are fully blended.You will have a wet, sticky batter.
Some people mix the poolish, flour, and water first, and let the dough rest for 15-20 minutes before adding the salt. This step is called the autolyse and makes the dough easier to handle.
Transfer the dough to a large mixing bowl with a dash of olive oil on the bottom. I like to turn the dough a few times by hand within the bowl so it forms a neat ball with some olive oil on the surface.
Step 6: The Bulk Rise: Slower Is Better


This step is called the bulk rise. Cover the mixing bowl with plastic wrap or a clean cloth and leave it to rest in a cool location that is not exposed to drafts or extensive sunlight.
- In Mark Bittman's recipe he recommends 12-18 hours of bulk rise time.
- I have had the best results letting the dough rise for 2 hours at room temperature then transferring the whole container to to the refrigerator overnight.
When the bulk rise is complete the dough will have doubled in size and have lots of bubbles on the side from the gluten formation. If the dough has not doubled then it will need more time to rise; leave it out at room temperature for a few more hours.
Step 7: Shaping and Proof


Remove the dough from the refrigerator and shape into a ball through by folding the dough into itself, forming a ball and building the surface tension at the surface of the dough.
Dust with flour and let rest about 15 minutes. This is called the bench rest.
After 15 minutes, shape again and place the dough seam-side up in a proofing basket for 2-3 hours. If you do not have a proofing basket place the loaf seam side down on a flour-coated cutting board, dust again with flour, and cover with a cotton (non-terry) towel.
At least 30 minutes before the dough is read, start pre-heating the oven to 450 degrees with a dutch oven inside. I have used a six-quart enameled lodge dutch oven for hundreds of loaves of bread, not to mention mac and cheese, stews, and soups. I have always wondered if I will get more oven spring with a 3.2 quart combo cooker as Chad Rodgers recommends in the Tartine Bread cookbook. Some day I will try it, but first I would need to get rid some barely used wedding presents in my kitchen cabinet such as the ice cream maker or deep fryer.
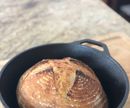
Step 8: Bake and Enjoy!

Remove the dutch oven from pre-heating when you are ready to bake.
Remove the lid and carefully transfer the dough to the hot dutch oven. At this point you can score the bread in any pattern you choose.
Cook the bread in the dutch oven at 450 degrees with the lid on for 30 minutes, then another 15 minutes with the lid off.
Step 9: Care and Feeding for the Starter

This is what my starter looks like after 24 hours in the refrigerator. You see that some bubbles have formed. I will store it for up to a week in the refrigerator and I remove it 2-4 hours before using it for my next loaf. If you do not have time to bake, then you can feed the starter without baking a loaf:
- Dump most of the mixture in the garbage
- Add 3/4 cups flour and 4 oz water to the container
- Mix and cover with plastic wrap or a cloth
After 4-5 feedings the starter takes on increasing complexity and aroma as the originally bakers yeast mixes with the wild yeasts in the air in your house.
Step 10: Variations on the No-knead Bread

Over time I have developed my own recipe that I prefer for no-knead bread, primarily by adjusting the mix of flours for the optimal texture. Adding wheat flour adds a more rustic feel to the bread. Bread flour gives the bread a more chewy texture like a bagel. Higher percentages of all-purpose flour make the crumb and crust more light and refined. The mixture that I prefer is roughly:
- 50 g wheat flour (which is used in the starter)
- 100 g bread flour (50g from the starter, and an additional 50 g when you mix the ingredients)
- 350 g all purpose flour
- 10 g salt
- 350-375 g water
And that is it! Thanks for making it to step 10 of this Instructable.
Baking bread is a lifetime learning process. Thanks in advance for any comments or feedback you may have.


