

Introduction: 11' Sailing Dinghy for the Trunk


After abandoning my last years summer project, a folding sailboat, I came up with a boat that fits my needs much better. The plan was a nesting boat in four parts that would fit in the trunk of my car, a VW Sharan.
In the PT-11 sailing dinghy I found a boat that I really like and that is small enough to fit.
I will try to explain in detail what I did, which mistakes happened and what could be done differently.
Step 1: Considering Various Splitting Configurations


The hull is ~330cm with a beam of 125cm. There is a nesting version (2 parts) available but that would not fit the width of the car (114cm).
Obviously the first idea is to reduce the beam of the boat to fit the normal nesting version in. That would have been possible by keeping the bottom in the original size and only changing the boat above the waterline (changing the angle of the above 2 panels.)
The second idea was to part the nesting halves longitudinal.
Both ideas would require me to take out the 2nd row seats, including 3 kids seats.
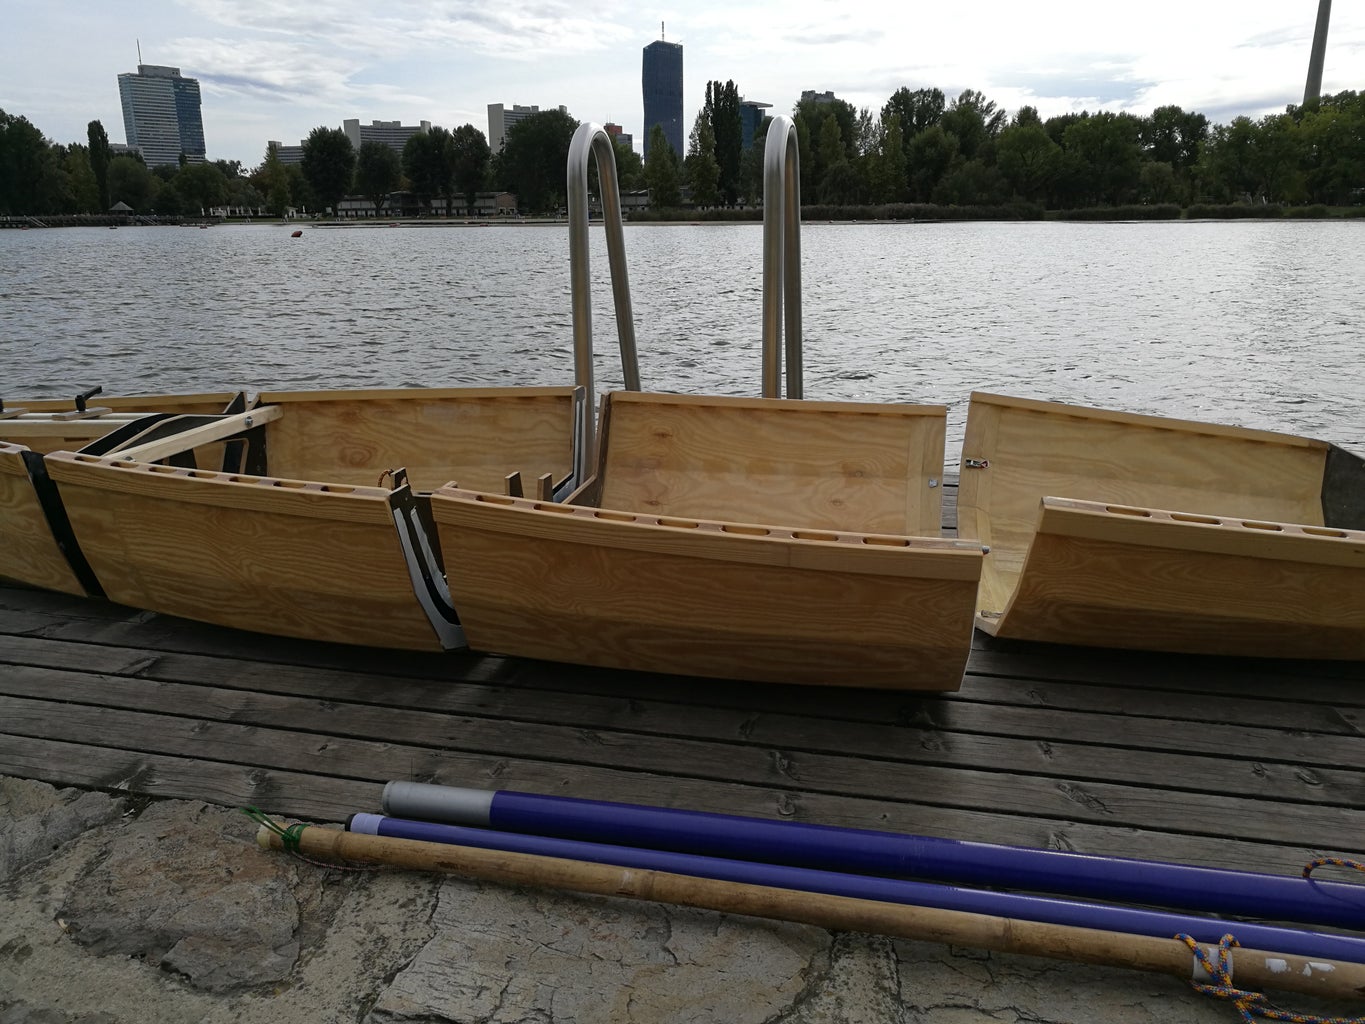
The last option was to split the boat in 4 parts. Nesting 4 parts is a non trivial challenge but even if not totally nested the parts do fit my trunk without taking out the second row.
Step 2: Some Planing


Like with all my building attempts I rely on CAD to print 1:1 templates for parts and to take measurements from a virtual model. Sometimes my drawings aren't quite detailed enough to deal with all complications that arise during the built but I guess that is ok for a one off prototype.
The PT-11 is only available as a CNC cut kit. They don't sell plans so it was necessary to redraw the hull from everything I could find online. There was a previous design comparison from another boat builder (also from Vienna, check out his One-sheet, Two-sheet and Three-sheet designs!!!), but he didn't try to copy the PT-11 like I was going to.
I had a very near copy before I found a crucial piece of drawing, a very small CAD drawing of the hull panels, in the background of one of their sites.
In Rhino it is possible to unroll an object. I altered and unrolled my hull until I was ~2-5mm close to the original. Angles at the transom and the middle of the hull are measured from photos I found online.
After splitting the virtual hull I tried to stack the parts and enclose them with a the "bounding box" command until I found the smallest stacking configuration.
In reality there are more ways to fit the boat in the trunk, it really doesn't matter much if more or less space is left when everything is in.
Step 3: A 1:1 Cardboard Model


Sometimes I need more than a CAD model to decide weather the hull is right for me so I had my brother cut the panels from cardboard and made a 1:1 mock up.
This was an older model and so he had to cut new templates for cutting ply.
Step 4: Bill of Materials.
The hull is made from 2 full panels of plywood. The bottom and the first row fit on one, the upper strakes on another panel. So it is possible to make them from two different thicknesses like I did.
My bottom and first row are 6mm, the upper panels are 4mm.
The frames are made from 12mm "Siebfilm-Platte" which is phenol coated plywood, might translate to MDO?
The foils (rudder and daggerboard) also 12mm MDO, the daggerboard trunk and the rudder cassette are made from 9mm MDO.
I choose the cheap pine ply for the hull.
I used ~5kg of epoxy resign in total and some sqm of glass I already had at home.
The mast is an epoxy windsurf mast I got for 20€ used (including a windsurf boom I don't need), the boom is bamboo.
The sail is made from Tyvek.
Like always I didn't really count the money spent...wanted to but lost track somewhere...
Rough estimate.
70€ ply
60€ MDO
50€ Epoxy
30€ glass (only because I found 1sqm patches of 280g glass for 2€ each.)
7€ bamboo
20€ mast
20€ Tyvek
~150€ for more wood, hardware, tools and consumables (gloves+brushes)
~400€ total (which I will beat on my next 4 part boat...I'll explain on the end of this post)
Step 5: Tools
I generally use what is on hand. You can do this with less tools though.
I will explain in every step which tools I used and which tools worked best for me.
Here's just a list what I used.
Jigsaw, Japanese pullsaw, router, beltsander, orbit sander, handplanes, multitool, dremel with a cut of disk, sureform, rasps, drill, drillpress, bandsaw, scrollsaw, tablesaw, clamps (which you can never have enough of in boatbuilding).
Step 6: The Panels


You could loft the plan on your panels by hand. Another method I used in previous builds is to print templates on the largest printer that is available to you and stitch them together with tape if necessary. If you are lazy you can always go to a copy shop and have them print you plans in full size.
I am lazy but got a brother that can CNC cut cardboard ;) so I just got templates to trace on my plywood.
I clamped together the matching hull parts and cleaned them up with a plane and beltsander.
The panels were joined with scarf joints that were unnecessarily long. A good scarf joint should have a ratio of 1:8 - ply thickness to length of the joint. I just used the 10cm I had available. The bevel was cut with a jig for my little edge-router and a 16mm bit. If you are confident enough this is faster done with a sharp No.5 plane.
You could also join the panels before cutting but that's a more wasteful approach.
The panels are then glued and clamped. Don't apply too much pressure to not starve the joint of glue. Epoxy will fill any voids and doesn't need a totally exact fit. In fact some sloppiness on the surface of the glue-faces isn't bad so you could rough them up with 40 grit sandpaper before gluing.
**********************************
At this point you could preglass your panels. The original PT-11 plan calls for preglassing the panels inside and out. The hull is only connected by glass-strips (inside and out) after stitching.
In hindsight I would opt for glassing the inner hull at this point.
Step 7: Stitching


I tried copper wire and zip ties. Zip-ties worked best for me but they leave rather large holes to be filled afterwards (drilled 2.5mm for 2mm zips).
I also used screws at the stem to hold everything together. Quite sure there are people that are more skilled in stitching plywood hulls than me.
I also didn't bevel the edges at all since my CAD model had zero thickness for the hull and so I figured (rightly) it would be most accurate to join the sharp edges and just fill the outside gaps.
Step 8: Transom and Frames.


What I did and what I will change next time.
My transom is beveled exactly after my CAD model and did fit wonderfully. I also beveled the frames by cutting them with the plunge saw at an angle. Then I screwed them together with a piece of cardboard in between so that the Japanese saw would fit in between for cutting the hull.
I measured them in as good as I could and used markings on the panels to align them.
I built the cockpit frames from 20mm plywood that I cut to size on the bandsaw.
I used tape to mask the surface between the parts where I didn't want glue to stick.
********************************
Better to do your markings with a knife and fine liner...pencil marks tend to come off when sanding the flat panels.
If you plan on using nuts and bolts to join your parts, install everything in advance. you can't drill from forward when the hull is blocking your path...especially when you need a bigger hole for a sunk nut from forward.
Don't use any spacer between the frames....just mark your cutline on the outside of your hull by dilling 1mm holes from the inside. Then you can cut the hull from the outside right between your frames without going between the frames and possibly scratching or cutting the surface. Next time I will also install all the sealing prior to gluing in everything.
Step 9: Glassing.


I planed on glassing each part individually so that I wouldn't have to cut through the glass later. It would have been easier to glass the empty hull first and then just do fillets along the frames. Instead I did the fillets first and glassed over them to get a stiffer bond between the hull and the frames.
I used 280g glass on the inside that I had bought some weeks earlier for 2€/sqm. The fact that it came in 1mX1m pieces might have contributed to the idea of glassing each section (~90cm) individually.
I didn't precoat the ply but just layed out the glass and rolled in the epoxy and applied it with a foambrush to the corners. The inside bottom got two layers of glass.
This is the work I hate most (and why I didn't do plywood boats before...only SkinOnFrame). I am always building under time pressure and glassing needs lots of time and a calm mind. After I had glassed the cockpit sections started taping things and preparing more thoroughly...which you should always do.
Filling and fairing the hull is next.
There are commercial fillers (like Microballoons) you can use for thickening epoxy or get a lighter compound for fairing. Other people use wood flour. I use wheat flour, never got enough wood flour to sieve and I am way too cheap to buy microballons/microspheres for 35€/kg. Flour and epoxy sands fine and I also use it for structural gluing (fillets).
On the outside I used lighter glass that I had used 10 years ago for doing surfboards (140g-160g if I remember correctly.) Glassing the outside went much better. I also switched to plastic squeegee that introduces no bubbles like the foam roller.
I didn't do a gloss coat. Might look nice but also adds weight. After all this is a very experimental hull.
The hotter it is, the faster your resign will set! I sometimes use a second cup filled with ice to slow my resign but this is not really possible when glassing...you could spill water on your fresh glass. Might not ruin it but it is a hassle anyways.
Note: wear glasses and Nitrile gloves, I always wear 3 gloves on one hand...if I need to I can just dump a layer. I reuse gloves that don't get dirty.
Step 10: Gunnels (gunwales)


This is something I played around on most of my boats. This time I tried contrasting scupper blocks from oak.
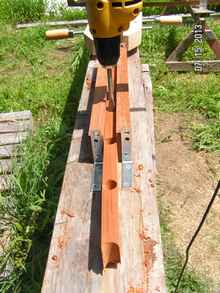
This can be done in many different ways. Some people use a spade bit to drill between strips. That way you get a half rounded scupper hole. I like fully rounded blocks so I can go around the hole with a roundover bit.
The pictures show how I've done it.
Note: There are (debatable) easier ways to do these blocks. One way is to cut rectangular blocks and run the side against a round router bit. (I was again too lazy to set up my bigger router)
Another way is shown in that picture from that article.
Step 11: Sealing the Sections.


The cockpit section is the most critical since all other seams are over the water line and basically don't require sealing.
My (expandable) garden hose exploded this summer and I found a silicone hose inside. After sealing and fairing the faces (only 0.15mm air left in between) and installing 4 latch clamps at the aft seam I just stapled the cut open hose to one side. I tried to glue it with double sided tape but it just didn't stick.
I will try foam rubber next time. The silicone tube is almost watertight, just some drops got pressed through the first hour I sailed the boat.
I also applied silicone caulking to the other frames...that might not be enough (here is where I will try foam rubber) because I had some drops coming through my connection bolts, though the swelling of the plywood stopped that after some minutes (I didn't bother to coat the boltholes).
Some other sealing will be needed next time when I won't use bolts.
Step 12: Foils


The rudder and daggerboard are made from double 12mm MDO (I just planed away the coating.), planed to shape with a Stanley No.5 and coated with epoxy (applied with a foam brush). Note that the original foils are CNC cut and glassed in vacuum bagging...much nicer than my crude attempt.
They get a rope through the top so that they can be handled easier and don't slide too deep into the daggerboard trunk or rudder cassette.
Step 13: Maststep and Mastpartner


I want to be able to test different sails. To do this I need to be able to flexibly position my mast and use different rake.
I glued a mounting plate into the bow and screwed down a variable mast step. My mast is filled with wood and a rod lets my mast pivot forward and aft freely. The mast partner is just two clamps that hold the mast into position.
This is not final and just temporarily till I find the best sailing configuration.
It also obscures my oaken bresthook.
Step 14: Sails


I opted for the Bermuda rig also featured on the original PT-11.
Mine is 6sqm and a little too big. The boom is also too low. The sail is performing nicely but I really need a higher boom (and sailbattons...)
I might try a Leg-O-Mutton sail for a change, used a balanced lug on my last boat.
The sail is made from cheap Tyvek so you can try a lot of sails without breaking the bank. Some people use Polytarp but I like Tyvek since you can just stick it together with double sided tape.
Sails are not my expertise. I designed my sail with Sailcut, a free design software, after studying everything I could find online.
Here is a good starting point if you want to learn something about sailmaking,
http://forum.woodenboat.com/showthread.php?187975-...
and the best guide on cutting Polysails with traditional sailmaking techniques by Todd Bradshaw (a PDF, also from the thread).
Step 15: Next.


So what is next?
A 4 part (almost) nesting boat is definitely a nice thing for space constrained would be sailors. If your car is big enough you can even store your boat in a flat and get on the water in no time.
I am already planning the next Dinghy/4.
If I can reasonably nest all 4 parts, the boat could end up only needing half of my trunk (to free up my 6th seat).
Things that will change.
During my built I learned about the Reverso, a commercial 4 part sailing dinghy from France.
It is wider than my design and wouldn't fit my trunk but I can copy some good ideas from it's construction.
There are some design iterations the Reverso went through (you can watch their older Youtube videos) till they arrived at this (final?) solution.
They now use draw latches in the gunnels and a spanner belt, that doubles as hiking straps, along the bottom to draw the parts together. The sections are sealed with rubber foam. I will have to have a watertight seam, the Reverso on the other hand floats higher and has flotation built into the bottom of the hull.
There are round extrusions for indexing (I used 10mm aluminium rods in the gunnels to align the cockpit sections.)
That's a combination I will try on my next version.
Epoxy and fiberglass.
I am a teacher and fiberglass and epoxy is not a good mix with 10-14yr old students. I try to develop my designs with students and their building needs/abilities in mind.
I got two contestants for my next hull.
- The Mayfly 12 (last year I tried a folding Mayfly 14) by Jim Michalak which is basically built with nails and normal glue (only fiberglass over the outer seams...that can be changed). The Mayfly floats very high and you can cut down the sheerline considerably.
- The second boat is the Summer Breeze by David Beede, no fiberglass at all and also only 3 simple panels.
The longer Mayfly only got 121cm beam so it would fit my needs perfectly.
My idea is to first build a frame with all bulkheads (facing frames) installed and then glue the panels on each part separately. That way you even avoid scarfing or joining panels before building the hull.
Some layers of house paint or cheap, water based, acrylic paint (like I use on my SkinOnFrame designs) are enough for protecting a boat that is not permanently on the water.
Assembly time (with some pre-made parts provided by the teacher) should not exceed 18-20h and the total material budget has to stay under 200€. I consider this doable...(this time I won't promise another Instructable soon...).
Another consideration for an adventurous and slightly more experienced builder, is a hybrid SkinOnFrame/Plywood hull. The bottom would have to be plywood (covered with cloth) since you can't have dividing frames perpendicular to the length of the hull when stretching cloth over a frame.
Epoxy would probably be wise for gluing and it would be wise to cover the plywood under the cloth with epoxy.
I am open to any questions, suggestions and collaborations on design or building of boats.
Thank you for reading.
I added a DWG file and my final plans for the panels.
This are my last files I have and in no way comprehensive plans for the boat. Some changes have been made on the way while building.


Grand Prize in the
Outside Contest 2017


