

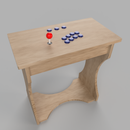
Introduction: Bike Entry Table


I had made this a while ago but wanted to do a tear down now that I am a part of Instructables in case anyone would be interested in making one. This came about because I had an old bike that wasn't being used and I was wanting an entry table and it is way cheaper to make one then go buy one. And a lot more fun and unique.
This is actually more of a shelf as it is mounded to the wall and the bike does not provide any support but it serves the purpose of an entry table so you will need to take that into account depending where you want to put it.
Materials required:
a Bike of your choosing
Wood for the top (I used two 2 x 8's that were 47 in long)
Brackets to attach to the wall (I used these brackets)
Clamp connectors for attaching the bike to the top
3/4 in Dowel rod
Wood screws
Rectangular brackets (optional)
Iron piping (optional)
Paint and wood stain (optional)
Step 1: Starting With the Bike

This entry table is built around the bike so first of all you need a bike to use for it. Mine was an old AMC 3-speed that I had but you can use whatever bike you would like. You will need to remove the seat and its post along with the handlebars. I also removed all of the cables to the brakes and shifter just to clean it up.
Note: Everything that I removed can be added back to make this bike usable again.
Step 2: Mounts for the Bike


Now that everything has been removed from the bike it is time to make it so that the bike can be attached to the bottom of the table. To create the mounts for the bike I cut the dowel rod into two smaller lengths. These lengths will depend on the bike you use but as a rule of thumb you will want the one that fits in the handle bar area to be very short and the one that goes where the seat is to be long enough to match the height of the other one. These may require some sanding to make them fit depending on the bike you use.
I used these clamps to clamp onto the dowel rod and then I drilled holes in the wings of them and bent the tabs so that I can put screw through them and use these to attach the bike to the table top. These were then painted black so that they would not stand out but could be painted or stained any color you want.
Note: The bike is not structural so these mounts are just to hold the bike upright and in place.
Step 3: The Table Top


This table top can be made many ways depending on that tools you have. I did not have much at this time so I used brackets to attach them but you could easily make this a solid table top if you have the equipment.
For mine I used a 2 x 8 board from another project I had around and I cut it into two 47 in pieces. You can vary this length depending on your desire. This length resulted in about a foot of the bike wheels sticking out from underneath the top. I had originally did this because I was going to add a basket onto one end to hold mail but never got around to it. Once cut, I did a quick sanding to smooth them out and then I stained them with a dark stain and used some rectangular brackets to keep them together.
Step 4: Wall Mounts


As I mentioned in the beginning this is more of a shelf than a table. Because of this you will need some shelf brackets that fit the design you are looking for. When mounding the shelving mounts you will need to measure the height of the bike brackets that the top will sit on and use the height in placing those.
Note: The dowel rods in the bike can always be extended some to reach the table but the bike can't be made shorter. It's best to mount the brackets a little higher then you measure just in case.
Because this is being supported by the shelf brackets I made sure to screw them directly into the studs instead of using drywall anchors. After mounting the first bracket you will want to use a level to make sure the table top will be level and you wont have things rolling off of it.
Step 5: Mounting the Top


Now that the shelf mounts are on the wall and you have the table top complete it is time to put the top on. This is a pretty easy process as you just need to set the top where you want on the brackets, mark where the screw holes are, pre drill the holes, and then screw it together.
Step 6: Mounting the Bike


Right now you just have an entry shelf/table but whats the fun in that. It's time to add the bike. To mount the bike you need to position it under the top wherever you would like it to be, pre drill the holes, and then just screw it up onto the top. Now you have a cool bike table shelf thing.
Step 7: Adding Support


Once I had this all complete I noticed the brackets weren't strong enough and the furthest board from the wall would bend down under some weight. To fix this I made a small support out of some iron pipe and screwed one on either end of the table. I used the iron pipe because I already had other furniture I made for my living room that was made of that pipe so it would fit in. You could use a thicker bracket or any other method if you want it to match your existing style if you have this same issue.
Step 8: Finished


Thank you guys for checking this out. I hope it helped you so you can make this table or gave you some inspiration for a different design. If you have any question on making this, need help, or have some input on how this could be made better/improved please let me know.

Participated in the
Furniture Contest 2017

Participated in the
Reclaimed Contest 2017


