

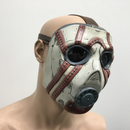
Introduction: Build an Iron Man Helmet for Cheap!


![Gameboy Advance: Tingle Tuner [Wind Waker]](https://content.instructables.com/FR5/T76P/KCF3U75R/FR5T76PKCF3U75R.png?auto=webp&crop=1%3A1&frame=1&width=130)

I recently received a commission from a college friend of mine to make her a wearable Iron Man helmet without breaking the bank and was given complete control of the design and outcome. For this project, I chose to replicate the MK3 Iron Man from the first Iron Man movie (easily the most recognizable design) and I'll teach you how to make one as well!
This helmet is foam based so it's super light, flexible and surprisingly strong too! All of this makes for a tough helmet that can be dropped and squished without any signs of wear and damage!
This build was lots of fun for me to make and it also challenged me to make a good looking finished piece with my limited budget.
This project is a lot of fun to do and reasonably easy to follow along as well and can be an excellent piece if you put the effort in. You can spend as little or as much as you like on this but remember, it's your skill that gets you the best results, not the budget.
Like I mentioned, this 'Ible is a budget build, spending the least amount of money possible whilst still producing a quality prop that isn't hindered by the budget, therefore, things like mechanics and electronics are not included in this Instructable but can still be accomplished if you wish to add those features.
Step 1: Supplies!


List of pretty everything you'll need:
Materials:
- 6-8mm Closed Cell Foam (EVA, camping mat, craft foam)
- 10mm EVA foam (For Ears)
- 2mm craft foam
- Pair of sunglasses for lenses
- Adhesive (Contact cement, hot glue, superglue)
- Red Plasti-dip (latex spray paint)
- Gold Spray Paint
- Plasti-dip Clear (Completely Optional)
- Black and Silver Model Paint
- Flexible Decorators Caulk
- Bottle of PVA
Tools:
- Cutting tools (Stanley knife, X-acto blade, snap-off blades)
- Scissors
- Respirator (for contact cement and paint fumes)
- Painters Tape
- Dremel tool (Optional)
- Sharpies
- Heat Gun
- Work/Protective gloves
- Steel Ruler
- Paint Brushes; assorted
- Filler Knife
Step 2: The Templates!


Included in this Instructable are the templates you'll need to make the helmet; they can be downloaded as a PNG or SVG and if you wish, you can modify the SVG to suit the helmet for yourself, whether you want to add pieces or adjust the scale is up to you! The scale is made to fit up to a 24" head so bear that in mind.
Note: Most of the pieces are symmetrical, however a few pieces have only 1 side for the template and are marked with an "L" for the left side. For these templates, simply trace the left side and flip the template for the right side! Make sure to transfer the cut notes to the foam so you know what cuts are needed.
Post Note: I have decided to upload a chopped up PDF of both A4 and Letter templates so you can directly print the templates in segments with no hassle.


Step 3: Cutting the Pieces


Once you've acquired the templates, they'll need to printed, cut out and transferred to your choice of foam. To transfer the templates to your foam, cut out the template, trace the outline onto the foam and jot down the notes on each line of the template. For the construction of the helmet, I'm using camping mat foam.
This has a few benefits over the favorable EVA foam as camping mat foam is flat on both sides and good quality mats are made of two pieces which shows a dividing line so for some areas, the thickness can be trimmed off easily. Lastly, camping mats can be cut a lot cleaner than EVA foam and don't leave ugly edges when your blades get dull.
You'll notice that all the faces have notes that say either "IN", "OUT" or "F" for flat. These are how each line need to be cut. A "flat" cut means you cut perpendicular and straight down the foam for a flat cut, an "in" cut is to run the blade along the line but to cut at an inside angle towards the foam piece and lastly, an "out" cut is to run the blade along the line but to cut at an outwards angle away from the foam piece.
Every in, out or flat cut has a corresponding face that it glues to, so two pieces that are "in" will have a sharp defining corner when glued together and flat cut will join flat to make one piece.
You'll also notice some lines are colour coded and each colour has a different purpose. Red lines are "fold in" lines where the foam needs to be bent in or cut inwards just like an "IN" cut; this depends on the thickness of the foam. Blue lines are "fold out" lines where the foam piece needs to bend out.
Green lines are score lines where you don't cut all the way through, yellow lines are overlap lines where the foam pieces are glued directly on top and lastly, cyan lines are areas that need to be trimmed to 4mm thickness as the pieces overlap and utilizes the thickness of the foam itself.
Step 4: Assembling: Pt 1


When all of your pieces are cut out, it's time to put it all together! It may seem a little daunting at first as it might not be initially clear what pieces go where but hopefully, the images will guide you in the right direction and each piece is labeled to help show what piece goes where.
To join your pieces, you've gotta stick 'em together of course! Your choice of adhesive is critical here as the quality of the joins depends on your adhesive and your skill level.
I'm using contact cement to apply my pieces together. It's extremely strong, it's a flexible adhesive, it relatively easy to work with and the joining is near seamless if lined up properly. You can use hot glue if you wish as many people are familiar with hot glue, I just personally prefer the results of contact cement.
To use contact cement, both contact points of foam needs a small amount of contact cement applied. Both sides are left to dry for 5 minutes and when both sides are tacky, join the pieces and the glue will bond instantly. Read the label as different contact cements may behave differently.
I like to start with the faceplate of the helmet as it's easy to make out. Simply line up your pieces and glue together; a good idea is to test your adhesives and your skill on gluing, using scrap pieces and seeing what results you get, plus you can get some practice out of it too!
To shape the foam pieces, a heat source is needed to shape the foam; that's where the heat gun comes in. The foam becomes pliable when heat is applied and can be formed into shape with your hands; just heat the piece, form it and let it cool down. If you didn't get the shape you want, just reheat and try again.
From the faceplate, I glued the top piece of the helmet together, then the sides and then the mouth area. I left the back pieces last as they required more attention in my case. The foam was too thick for some areas so I had to trim off half of the foam on the edges with enough space for the extra amount to glue onto. Using the templates I provide shows what areas need to be trimmed to the correct thickness.
Step 5: Assembling: Pt 2


With the majority of the helmet constructed, next is to focus on the small details, all of which is made of white craft foam. If you noticed in the last step, there's a gap between the chin and the ridge of the faceplate that needs to be covered up. I don't have templates for this as the top mouth piece needed to be glued on first and it's just a case of cutting pieces of craft foam to fit and trim until it fits perfectly. Using superglue to join craft foam is easier than contact cement as there is more control.
For the mouth piece, I actually cut the mouth piece out twice and glued them together to thicken the mouth piece, as I preferred the look more.
During the assembly process, I actually screwed up a little on the piece that overlaps on the top of the helmet, resulting in an ugly dent. To fix this as cleanly and simply as possible, I applied some contact cement to both the affected area and a cut out piece of craft foam, waited for both sides to dry and placed the craft foam on top, applying pressure until the glue set.
With the fix done, next was the ears. To accommodate for the thickness of the ears, I decided to use some thick 10mm EVA foam for this. To shape these ears, I actually used a couple power tools to do this; this is the only time I used power tools and can be worked around easily by just using the same camping foam which is softer.
I used a portable belt sander to sand the texture off the foam pucks and I used a Dremel rotary tool with a sanding bit it bevel the edges. I scored the round detail on the surface of the foam and by using a heat gun on the score line, the score line separates, making the score visible and more defining.
Attaching the ears to the helmet is the same procedure; contact cement on both surfaces, wait until tacky, bond together.
Step 6: Prep for Paint


With the foam helmet complete, we're almost ready for paint, however, we need to do some prep work first. Because I'm painting with Plasti-dip (Latex based spray paint) I wanted to see how it behaves such as how it grabs to the foam, how it takes masking tape, if it reacts with top coats and so on so I made some test samples.
What I found was a coat of PVA on the foam provides a much nicer and slicker surface quality look and feel compared to raw foam. I also found that the gold top coat bonds nicely and masking tape sticks properly and removes cleanly. During these tests, one of the pieces (the only one without a PVA base coat) corners lifted up and the layer just ripped off so based on these results, coating the helmet in PVA glue is vital.
One last thing I tested was spraying regular acrylic gold spray paint on 2 test pieces: one with PVA and one without. the PVA coated piece bonded nicely and even made the paint a little bit flexible whereas the uncoated piece didn't bond at all and the paint actually flaked off when I touched it.
I applied 3 coats of PVA, spreading it as thin as I can and letting each coat thoroughly dry before the next coat; you can thin it down if you want thinner coats but I felt the thickness of my PVA was just fine as is.
If you happen to have a few areas where the pieces didn't join perfectly, now is the time to use flexible decorators caulk. The caulk is flexible once dried and can be painted as well, making it ideal for filling small areas on foam. I applied a small amount on affected areas with a small spatula an used water to smooth and blend the area. Simply leave to dry and you're set.
When all of your PVA is dry, leave for at least 24 hours before moving onto the next step to ensure the PVA has cured and won't affect the paint.
Step 7: Red Paint and Masking


It's time to paint! My approach was to apply red first then the gold as the red Plasti-dip provides a flexible base coat as well as the red colour we are looking for. Plasti-dip is extremely durable, long lasting and leaves and doesn't wrinkle when foam is squished or creased; it costs a little more than acrylic spray paint but it is so worth it. If you're not using Plasti-dip and have opted for regular acrylic spray paint, just carry on with the steps as normal.
Note: Working in a well ventilated area is key for spray painting; work outside or in a big open area to vent the fumes. If you do use Plasti-dip, I HIGHLY recommend wearing a respirator as Plasti-dip contains more harmful chemical than most other paint cans.
Tip: Spray paint cans work best when they're warm, so soaking your spray paint cans in warm water before spraying evenly heats the paint, making it flow better out of the can!
3-4 layers of wet but thin coats of Plasti-dip is good for this helmet. The layers provide a nice base coat for the gold in the next step and the paint is just generally stronger when multiple coats are applied. Regardless of what paint you're using, ALWAYS read the label; every can of spray paint behaves differently and if you're unsure, always do tests. Leave for at least 24 hours to ensure the paint has cured before moving onto the masking.
Now that we have the red on the helmet, we want to apply the gold but we need to mask off the red areas first.
I'm using "FrogTape Delicate Surface" painters tape to mask my helmet. I chose a delicate low tack tape to prevent any chance that the tape would rip off the red paint, and because painters tape leaves a crisp clean edge and doesn't leave residue like regular masking tape. Again, spending a little extra for painters tape is well worth it.
Tape up all red areas, being sure you are up against the seam lines for the best results. Use the straight edges of the tape and cut to length for all areas. Run your thumb/fingers along the edges of the tape to make sure they are stuck down to the surface to prevent paint seeping under the tape.
The more time you put into masking, the better your results will be; this took me about 2 hours before I was happy with my masking.
Step 8: Gold Paint, Weathering and Clear Coat


With the tape on, it's time for that sweet shiny gold! I'm using Rustoleum Metallic Bright Gold because it's a gold I've used before and I always like the way it looks (plus I got a couple cans for free so that's even more reason to use them!)
As always, read the label on your can first then get to spraying! I did 3 light coats of gold on the faceplate and mouth and like the Plasti-dip, I left it to cure for 24 hours.
The tape can now be removed and it's time for details and weathering!
Before weathering, a few areas need a lick of paint. The top strips and the cheek parts need painting black and the gap between the faceplate and the mouth is also supposed to be black, however I painted a little silver on top as I didn't like the look of flat black; paint your helmet however you wish, it's up to you how you want to finish it!
I kept the details and weathering to a minimum on this helmet but I wanted to add something to this helmet to break up the flat red and gold. Using black model paints, you can apply a small amount on the seams between the helmet and the faceplate and wipe off most of the wet paint, leaving the black paint to seep into the seam. This "separates" the helmet and faceplate to be two distinct pieces instead of one melded piece, as Iron Man's faceplate lifts up and is not permanently attached.
Using silver model paint, you can use a simple technique called "dry-brushing" where you take a bit of paint of your brush, dab out most of it and scuff the edge of the paintbrush on certain areas on the helmet. This makes it look like scratched paint, "revealing" the metal underneath when it reality it's just paint.
These simple paint techniques really transform a painted piece and makes it believable as an actual item in the real world.
Once all of your painting is done, a protective coat of clear coat is ideal for protecting your paint job. I had another can of Plasti-dip (this time clear) to spray over my helmet; Just like before, Plasti-dip is completely optional, I just prefer it for its flexibility.
Step 9: Lenses


The helmet may be painted but wait! We still have one more step: The lenses. I decided to leave the lenses 'til last because I didn't want the lenses in the way during painting so doing it last makes sense to me.
I chose to use cycling lenses that I purchased for just £1 at a pound shop. This saves having to makes lenses for yourself and the clarity is pure on the lenses so it just makes sense to use existing lenses in this case.
The lenses are good but are too big in their current state so if you use enses, you'll most likely have to remove some of the material for a better fit.
To get a template of the helmet eye, place masking tape over the lens, push against the inside of the helmet and trace around the boarder, resulting in an outline. Remove excess material around the trace leaving a 6-8mm space around the trace so you have some material left to glue to.
Before removing the excess masking tape, I retraced the eye outline to be sure and used an X-Acto knife to remove the tape around the trace. Leaving the tape on just the area you will see out of is to make sure no glue gets on the lens later.
Since I had contact cement from earlier, I used that to adhere the lens on the inside, but hot glue will work just as well. When the glue sets up, carefully remove the masking tape from the lens.
Step 10: Complete!


Huzzah! The helmet is complete!
This budget project turned out really well and I am pretty pleased with the outcome. If I had the time and wasn't trying to keep costs to a minimum, wiring some LED lights and making the eyes glow would of been an awesome edition; if you guys make this helmet and decide to add light be sure to share!
If you have any questions or suggestions on this build, be sure to leave a comment and I'll address them!

First Prize in the
Heroes and Villains Contest

Participated in the
Maker Olympics Contest 2016

Participated in the
Halloween Costume Contest 2016


