

Introduction: Color Memory - Family Game - Woodwork - 3D Printing


I made this game as a gift for my granddaughter for Christmas. The idea is not new but it is certainly unique in this version!
There were 4 children (aged 3-8) present on Christmas Eve and after the presents were given this game was played all evening with great enthusiasm, not only by the children ... but also by the adults!
It's a family game for up to 6 people that is suitable for children aged 3 and older. It can be used as a support for memory training. It helps children to learn details and attention.
The game consists of:
- wooden game board (250 x 250 x 18 mm)
- 24 3D printed tiles (6 color groups - red, yellow, blue, green, black, white - with 4 tiles each. Colors that I had at my disposal)
- 3D printed 6 color dice
- 3D printed dice holder
- 3D printed name-of-the-game label
- rules of the game
Age recommendation: from 3-4 years
Supplies
For this project you'll need:
- board 250 x 250 x 18 mm (minimum thickness: 15mm)
- stop angle
- saw/jigsaw
- drilling machine (I used a stationary drill to ensure that the holes were drilled vertically)
- 8mm drill bit
- 1.5 mm drill bit
- pencil
- draw compass
- set squares
- grid paper
- router (not absolutely necessary. It is also sufficient to break the edges of the board with sandpaper)
- 3D printer
- 6 different filament colors
- 6 self tapping screws Ø 2 x 5 mm
- Phillips screwdriver
- sanding paper
- cutter
- pricker
- wood oil
- rag or brush
- scotch tape
- glue/superglue


Step 1: Saw Wooden Board to Size


I still had some leftover wooden panels, including a bamboo solid wood panel. This is a very hard wood with a striking grain. Of course, other types of wood are also suitable!
We start the project by sawing the game board to size:
- board 250 x 250 x 18 mm (minimum thickness: 15mm)
- saw/jigsaw
- stop angle
- pencil
Step 2: Edit Edges


Before you continue working on the panel, you should determine the center point by placing the ruler diagonally against the corners and marking the center point.
I have two options for editing the edges. As I have a router, I will use it to cut the edges first and then finish them with sandpaper. I assume that hardly anyone owns a router ... it will of course be enough to break the edges with sandpaper alone.
Step 3: Marking Drill Holes


To prepare the drilling, you need:
- the board (250 x 250 x 18 mm)
- grid paper
- pencil
- draw compass
- set squares
- pricker
The game has a total of 24 slots.
16 holes must be drilled for the outer hole circle (Ø 160 mm) and 8 holes for the inner one (Ø 90 mm). This means that you have to divide 360° by 16 for the outer circle. This results in 22.5°.
Once this division has been made, the division for the inner bolt circle (8 holes = 45°) can be derived.
To avoid having to draw too much on the board, it is a good idea to make a template on paper beforehand and then use this template to transfer the drilling points to the board.
Please note: the attached pdf drawing can unfortunately not be used as a template, as the hole circles are shown in a reduced size.
However, there is a possibility to select a user-defined scale in the print job. I tried it with 102% and it worked. The size corresponds to the original!
Once the template has been completed, it must be aligned and fixed to the wooden panel.
So that later on the game name plaque does not have to be attached to the outer edge of the board, the center point is offset about 6 mm along one axis. If you want to do without the game nameplate, you can of course use the predefined center point.
Now you can mark the 24 holes with a pricker.
Attachments

Step 4: Drill Holes


For this step you need:
- drilling machine (I used a stationary drill to ensure that the holes were drilled vertically)
- 8mm drill bit (for wood)
The colored parts of the tiles (the pins that disappear into the board) are approx. 10 mm long. This means that the holes should be drilled at least 12 mm deep.
To achieve an even drilling depth, it is essential to work with a depth stop!
Of course, the holes can also go through the board. It doesn't spoil the look! However, you must then make sure that the holes on the back do not fray. This can be prevented by placing a wooden board underneath when drilling.
Step 5: Oil Game Board


This is what you need:
- wood oil
- rag or brush
- sandpaper
After the wood oil has been shaken well, it can be applied with a rag or brush. All auxiliary lines and markings must first be removed, preferably with sandpaper!
Step 6: 3D Printing


You have to print the following files:
- CM_dice.stl
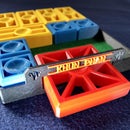
- CM_tile_color insert 4pcs+dice color insert.stl (6x print in different colors) To avoid having to make a separate print for the color inserts for the dice, I have integrated the small insert into this print (see picture 2).
- CM_tile_color insert.stl
- CM_tile_handle_4pcs.stl (6x)
- CM_dice_holder.stl
- CM_game name Inscription plate.stl (optional: I made the label with a 2 color print. My printer is a Prusa Mk3s. I do not have a multicolor unit (MMU)! But even without this, you can specify in the slicer from which or in which height range another color should be used. I have described it in more detail in another project: https://www.instructables.com/Spiral-Puzzle-3D-Printed-Wire-Bending/)
Print settings:
- printer brands: Prusa/ Flashforge
- printer: MK3S/Prusa MIni/Finder
- supports: no
- resolution: 0,2
- infill: 15%
- filament brand: Prusa; ICE; Sunlu
- filament color: Galaxy Black; Romantic Red, Young Yellow, Bold Blue, Wintershine White; Green
- filament material: PLA
Remark: As all parts are designed to fit very precisely, it may happen that you have to rework one or the other part a bit with sandpaper and/or cutter due to different dimensional accuracy of the printers and the different behavior of the filaments.
Step 7: Assemble Game Tiles


Now you need
- "CM_tile_handle_4pcs.stl" (6x)
- "CM_tile_color insert 4pcs+dice color insert.stl" (print 6x, each print in a different color)
- glue/super glue
Step 8: Assemble Six Color Dice


To assemble the dice you'll need:
- "CM_dice.stl"
- 6 different "dice color inserts" (are part of the print "CM_tile color inserts 4pcs_dice color insert.stl). To avoid having to make a separate print for the color inserts for the dice, I have integrated the small insert into this print.
- glue/super glue
Use the glue very sparingly so that it does not spill out of the sides!
Step 9: Attach Dice Holder and Game Label


The dice holder can be easily aligned as it has a hole in the middle.
It is important that the holes are pre-drilled, as the heads of the small screws can easily be twisted off if too much force is applied.
To align the nameplate, you have to make a mark in the middle of both the game board and the nameplate and then place the marks next to each other (see picture).
For this step you need:
- "CM_ dice_holder.stl"
- "CM_name-of-the-game_label.stl"
- 6 self tapping screws Ø 2 x 5 mm
- pricker
- drilling machine
- 1 or 1.5 mm drill bit
- Philips screw driver
Center nameplate … pre-drill holes …. screw tight. Do the same with the dice holder.
For those of you who are familiar with editing stl files - e.g. in Tinkercad - you can quickly turn this label into a personalized name label (see last image).
Step 10: Storage Game Rules


A good place to put the rules of the game is on the underside of the game board. However, this space must first be created. I did this with the help of felt glides. These fulfill two tasks at once: they create space and protect the surface on which the game board is placed.
Depending on the size, the felt glides create a "space" of approx. 2 mm in height.
- felt glides (mounted here are Ø 22 x 2 mm)
- stable foil
- electric stapler
- staples (H 6mm)
- laminator
- laminating flim
I made the foil with a laminator. It’s a DIN A4 (210 × 297 mm) laminating film, 125 micron. If this laminating film is hot laminated, the result is a very stable foil. I cut a suitable piece out of it.
Step 11: How to Play
You will find the rules of the game in the attached pdf file.
Have fun playing!
And remember ... as an adult you have little chance of winning if you play this game with children.
Attachments
Step 12: Color and Wood Variants


... and last but not least: perhaps you prefer a different color design. Here are a few suggestions.

Participated in the
Anything Goes Contest


