

Introduction: Design a Fancy GUI for Your Project


This instructables show how to use LVGL and SquareLine Studio design a fancy Graphic User Interface(GUI) for you project.
Step 1: Why Need Design UI?
The user experience substantially determines how successful a project can be. And a good UI can give a good user experience.
Since the raise of smart phone, user familiar with fancy GUI. Most end user expected a good GUI now even a tiny simple project.
Step 2: LVGL & SquareLine Studio
In contrast, design a GUI from scratch is so time consuming. We need some tools help to simplify the job.
LVGL is a good graphics library for making fancy GUI easily. It helps to manipulate how to draw each widget, how to manage draw buffer efficiently with very limited resources, handle user interaction, animation timing, etc. But it still have a learning curve if write code from scratch.
Fortunately, it have a tools free for personal use called SquareLine Studio. It reduces much coding required. In other words, it helps you generate all GUI initial code after you draw the design.
Ref.:
Step 3: Software Preparation
Arduino IDE
Download and install Arduino IDE latest 1.x version if not yet:
https://www.arduino.cc/en/software
Arduino-ESP32 (Optional)
Follow installation step to add Arduino-ESP32 support if not yet:
https://docs.espressif.com/projects/arduino-esp32/en/latest/installing.html
Arduino-Pico (Optional)
Follow installation step to add Arduino-Pico support if not yet:
https://github.com/earlephilhower/arduino-pico
Arduino_GFX Library
Open Arduino IDE Library Manager by selecting "Tools" menu -> "Manager Libraries...". Search "GFX for various displays" and press "install" button.
You may refer my previous instructables for more information about Arduino_GFX.
LVGL Library
Open Arduino IDE Library Manager by selecting "Tools" menu -> "Manager Libraries...". Search "lvgl", select "lvgl" and press "install" button.
After LVGL library installation, it requires some configurations:
1.Browse to your Arduino IDE libraries folder
2.Copy libraries/lvgl/lv_conf_template.h to libraries/lv_conf.h
3.In lv_conf.h around line 15, enable config file by changing 0 to 1:
#if 1
4.Find "LV_COLOR_DEPTH" and set value to 16:
#define LV_COLOR_DEPTH 16
5.find "LV_TICK_CUSTOM" and enable it by changing 0 to 1:
#define LV_TICK_CUSTOM 1
6.If using SPI or parallel 8 display, 16-bit color swap byte can help improve performance a little bit. Find "LV_COLOR_16_SWAP" and enable it by changing 0 to 1:
#define LV_COLOR_16_SWAP 1
If you don't know where the Arduino IDE libraries folder yet, please refer to:
Step 4: LVGL Hello World!
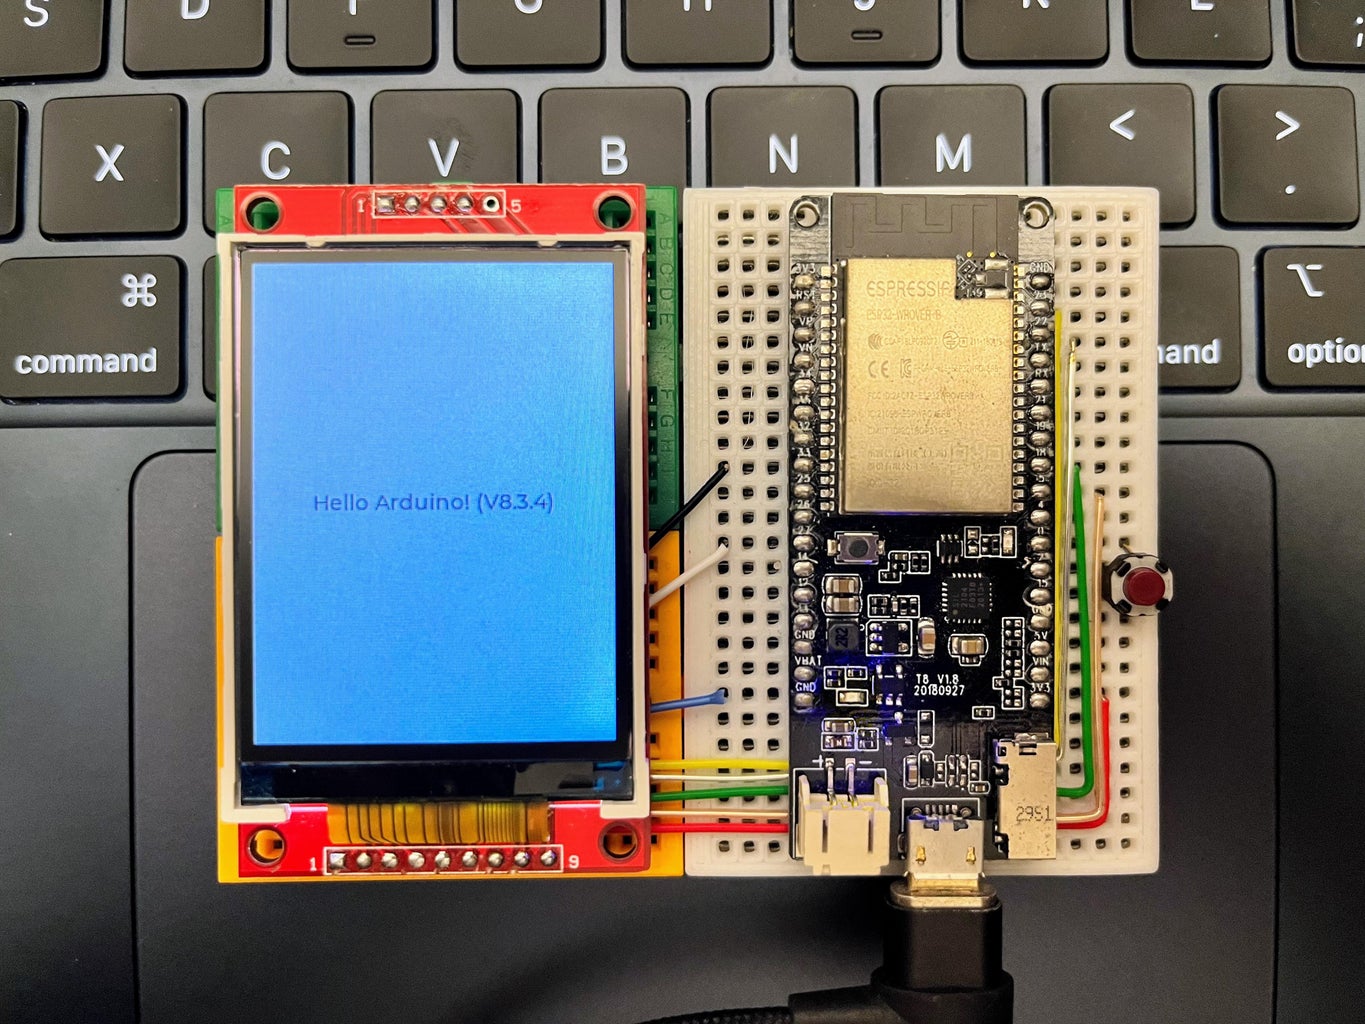
- Open the Arduino IDE
- Select menu item: "File" -> "Examples" -> "GFX for Arduino" -> "LVGL" -> "LvglHelloWorld"
- Scroll to Arduino_GFX setting section and follow the Wiki to setup your display
- Connect you dev device to computer and press "Upload" button in Arduino IDE
- If everything runs well, you can see the "Hello Arduino" in the middle
- Save the project with your project name, more UI added in the following steps
Note:
The middle text is called label in LVGL, it is dynamic generate by 3 lines of code:
  /* Create simple label */
  lv_obj_t *label = lv_label_create(lv_scr_act());
  lv_label_set_text(label, "Hello Arduino! (V" GFX_STR(LVGL_VERSION_MAJOR) "." GFX_STR(LVGL_VERSION_MINOR) "." GFX_STR(LVGL_VERSION_PATCH) ")");
  lv_obj_align(label, LV_ALIGN_CENTER, 0, 0);
If you design UI with SquareLine Studio, these code will be generated by export function.
Ref.:
Step 5: Download SquareLine Studio
After test and saved the LVGL Hello World sketch, its time to design the GUI. Start from simple, I will use a tiny breadboard project to demonstrate the design process.
First of all, you need download and install the SquareLine Studio at: https://squareline.io/downloads
After installation, you need fill some registration for the first run.
Step 6: Create SquareLine Studio Project
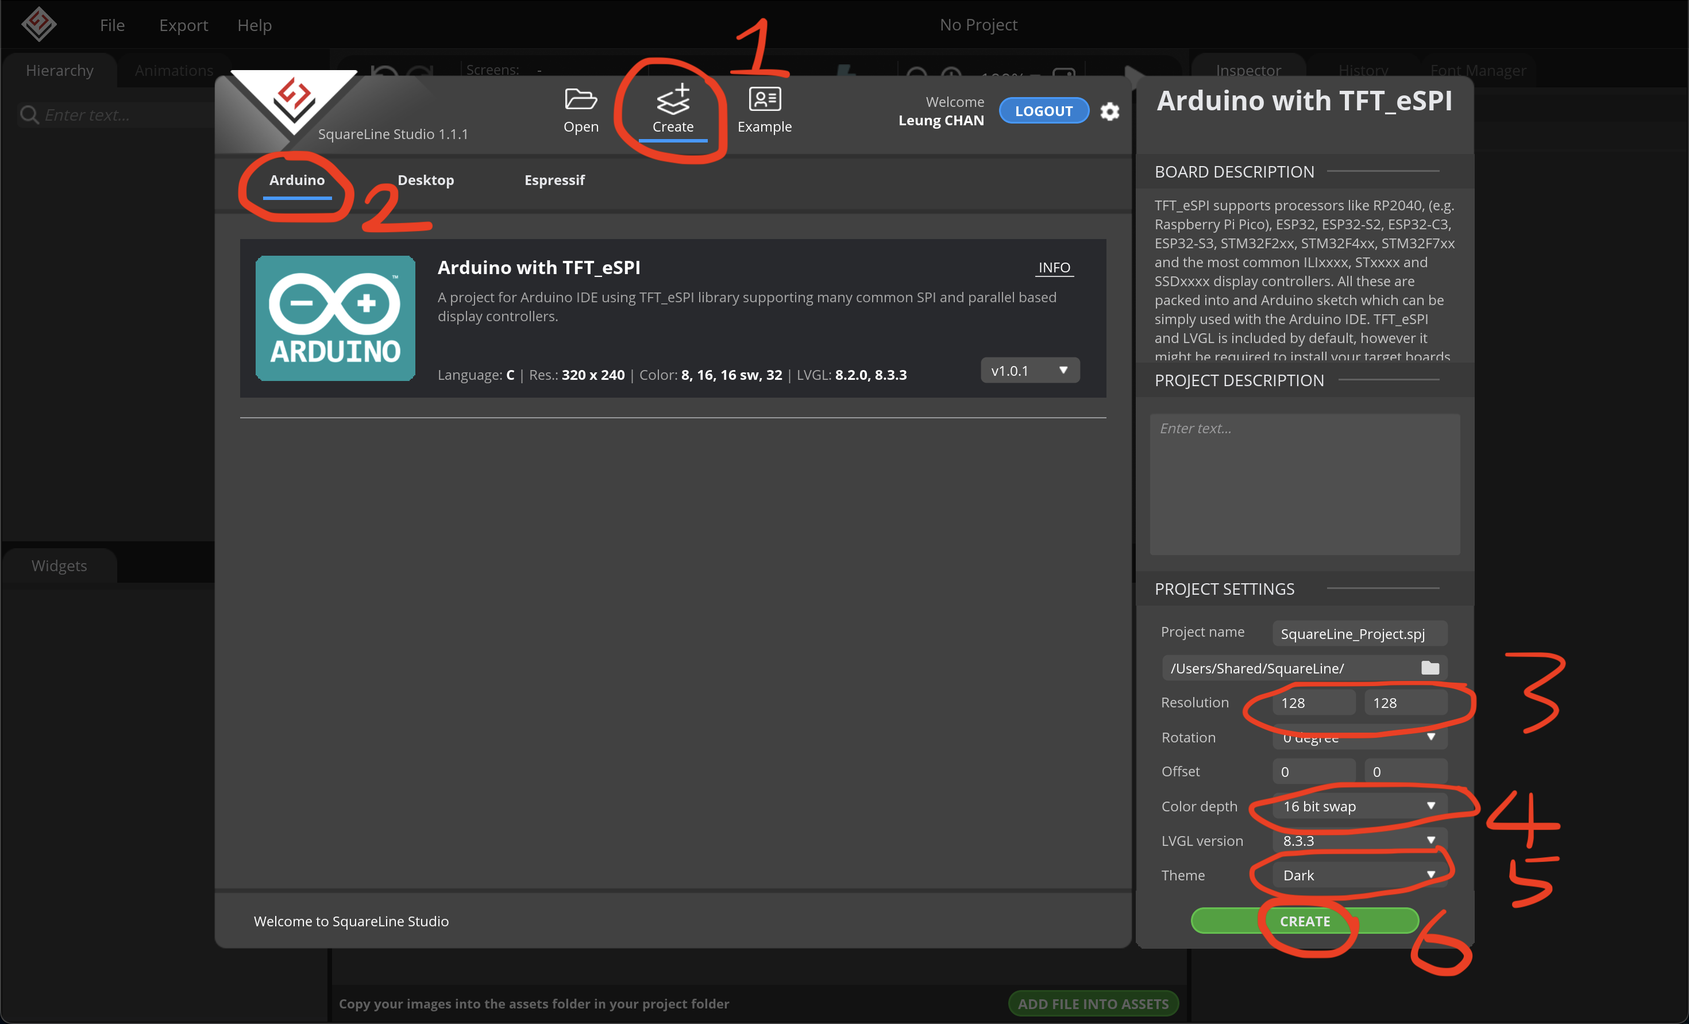
Open SquareLine Studio
- Select "Create"
- Select "Arduino"
- Fill your screen resolution
- Select "16 bit" or "16 bit swap" in color depth depends on the "LV_COLOR_16_SWAP" setting in lv_conf.h
- Select Theme for your project style
- Press create button
Step 7: Get Started
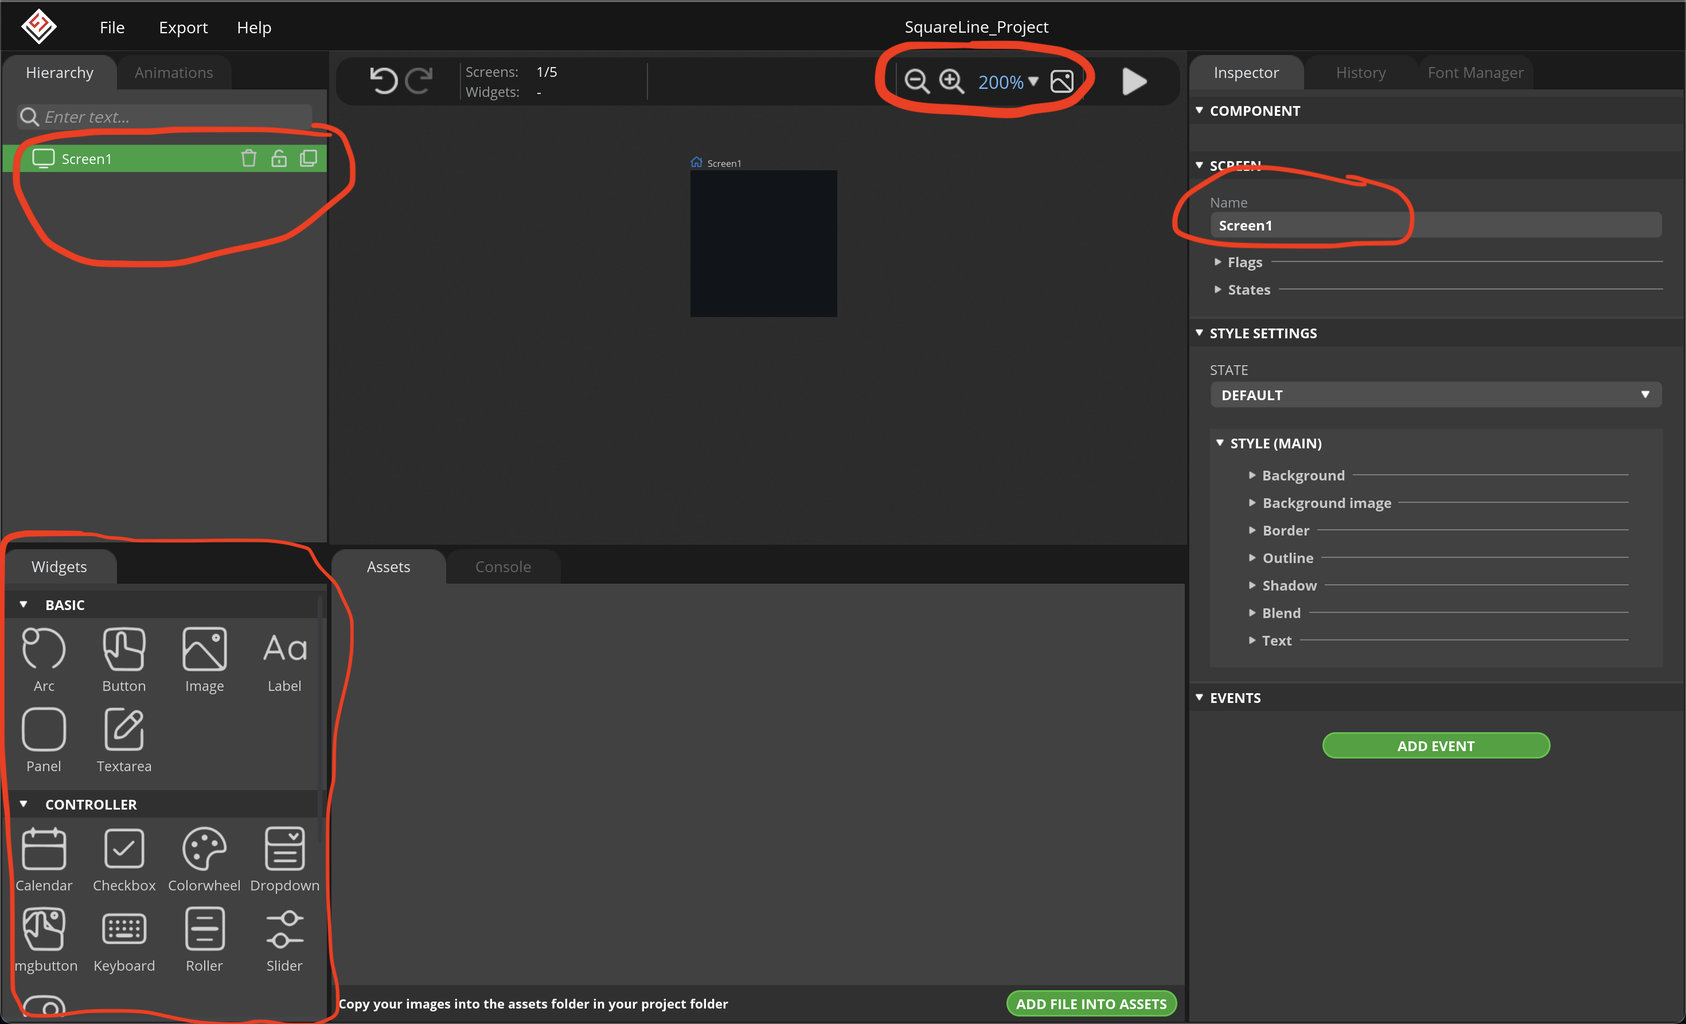
At the middle, there are a black box. It is the first screen you designing. You can adjust the zoom level at the upper bar.
At the left hand side, upper part is the list of all the objects you are using. At the beginning only 1 object, Screen1, here. You will add more object later on. Lower part is various objects you can add to your design.
At the right hand side, you can change the parameters of selected object.
Step 8: Insert First Object

Let's add first object to the screen:
- Select Arc Widget
- An arc object insert to the screen and selected
- On right hand side select adjust some parameters:
- Width: 128 px
- Height: 128 px
- Range max: 50
- Value: 25
- Bg start angle: 270
- Bg end angle: 180
For each parameter change, you can see the arc changed accordingly.
Step 9: Style Settings


Keep selecting the arc object, you can see more style settings at the right bottom by expanding each sub-section. Follow the screen shot change the settings and see the effect in the screen.
Step 10: Add Label


Select the Label Widget to add a label for the arc object. Follow the screen shot change the settings and see the effect in the screen.
Step 11: Add a Value Label


The value label also a normal label, but the label text is intended to change while program running. So it need a meaningful name for a easy read coding. If the name set to "Screen1 Label Temps" then the object pointer name in the program will be "ui_Screen1_Label_Temps". Just add "ui_" at the beginning and replace all space with underscore.
Follow the screen shot change the settings and see the effect in the screen.
Step 12: Export Design
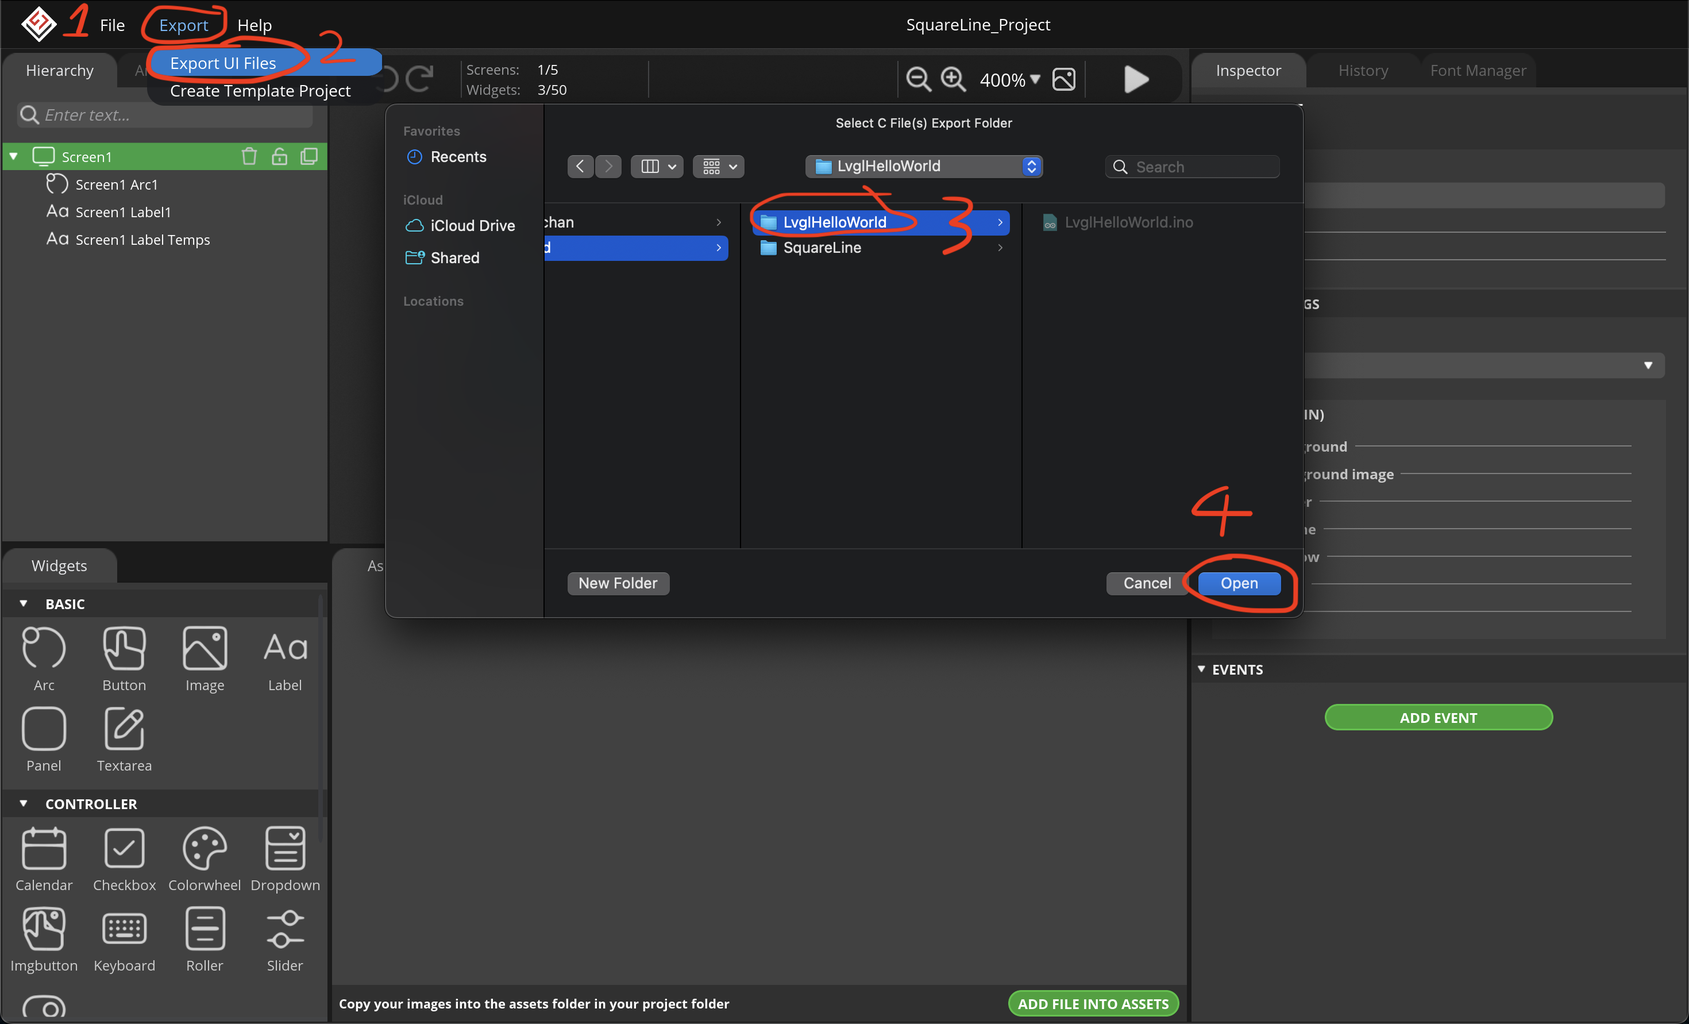
Ok, now already added 3 objects to the first screen. Let's try export the design to Arduino project:
- Select "Export" menu -> "Export UI Files"
- Browse to previously saved LVGL hello world sketch folder
- Press "Open" button
- All design objects exported to the sketch folder
Step 13: Init SquareLine Prepared UI


Open the sketch in Arduino IDE. You can see 4 source files exported from SquareLine Studio.
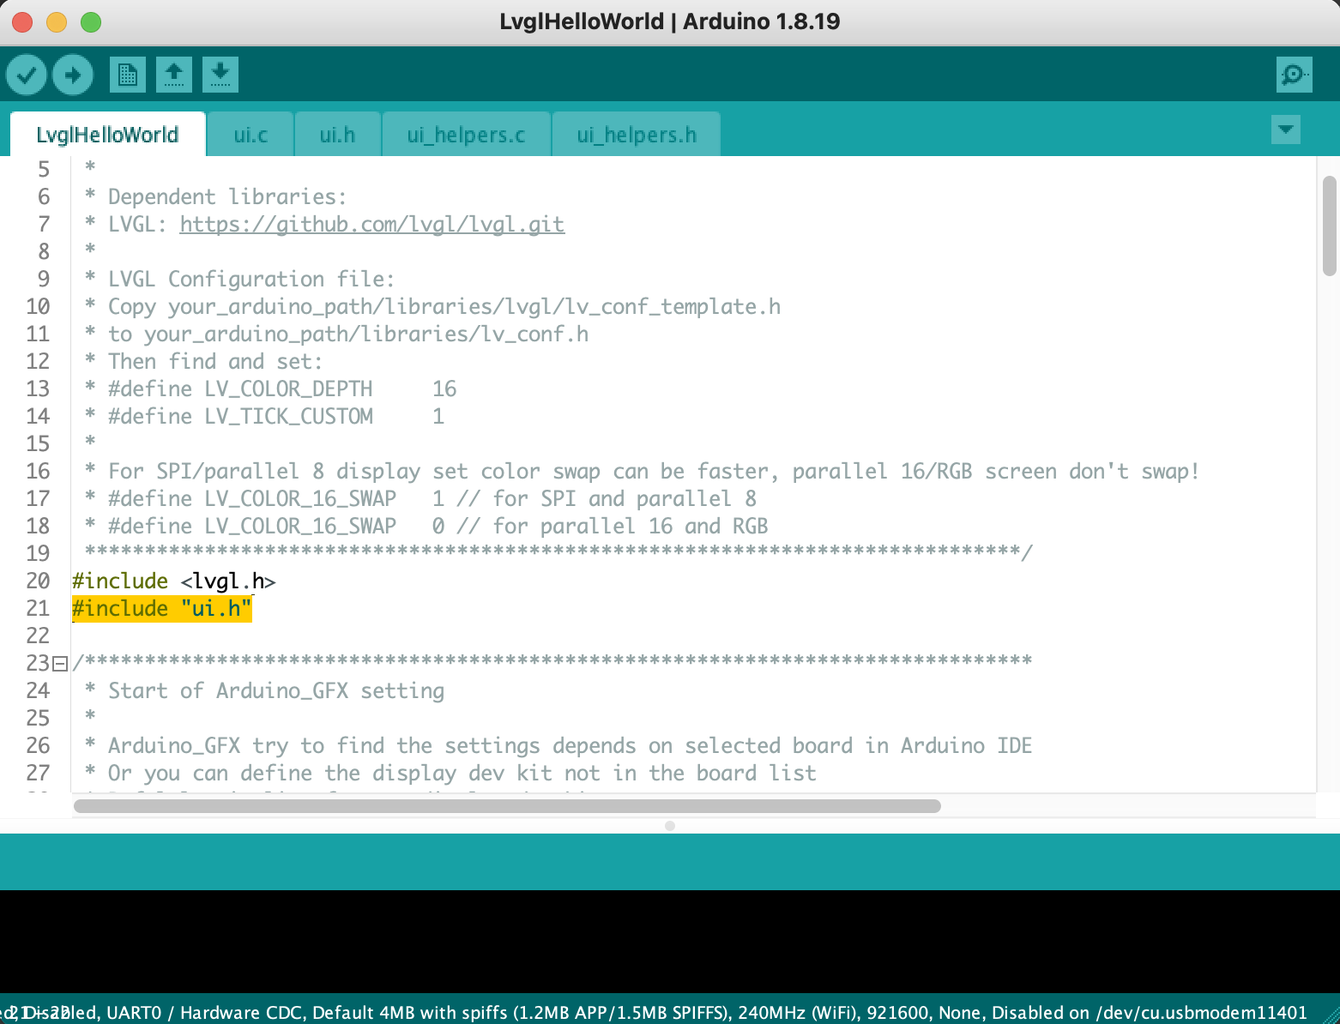
Append #include "ui.h" below #include <lvgl.h>:
#include <lvgl.h>
#include "ui.h"
Search "/* Create simple label */" in sketch ino file and comment out the label code. Then append the "ui_init();" below:
//    /* Create simple label */
//    lv_obj_t *label = lv_label_create(lv_scr_act());
//    lv_label_set_text(label, "Hello Arduino! (V" GFX_STR(LVGL_VERSION_MAJOR) "." GFX_STR(LVGL_VERSION_MINOR) "." GFX_STR(LVGL_VERSION_PATCH) ")");
//    lv_obj_align(label, LV_ALIGN_CENTER, 0, 0);

    /* Init SquareLine prepared UI */
    ui_init();
Then press upload, you can see the display showing the design screen.
Step 14: Update Object Value
The next step is learning how to update the object in custom code.
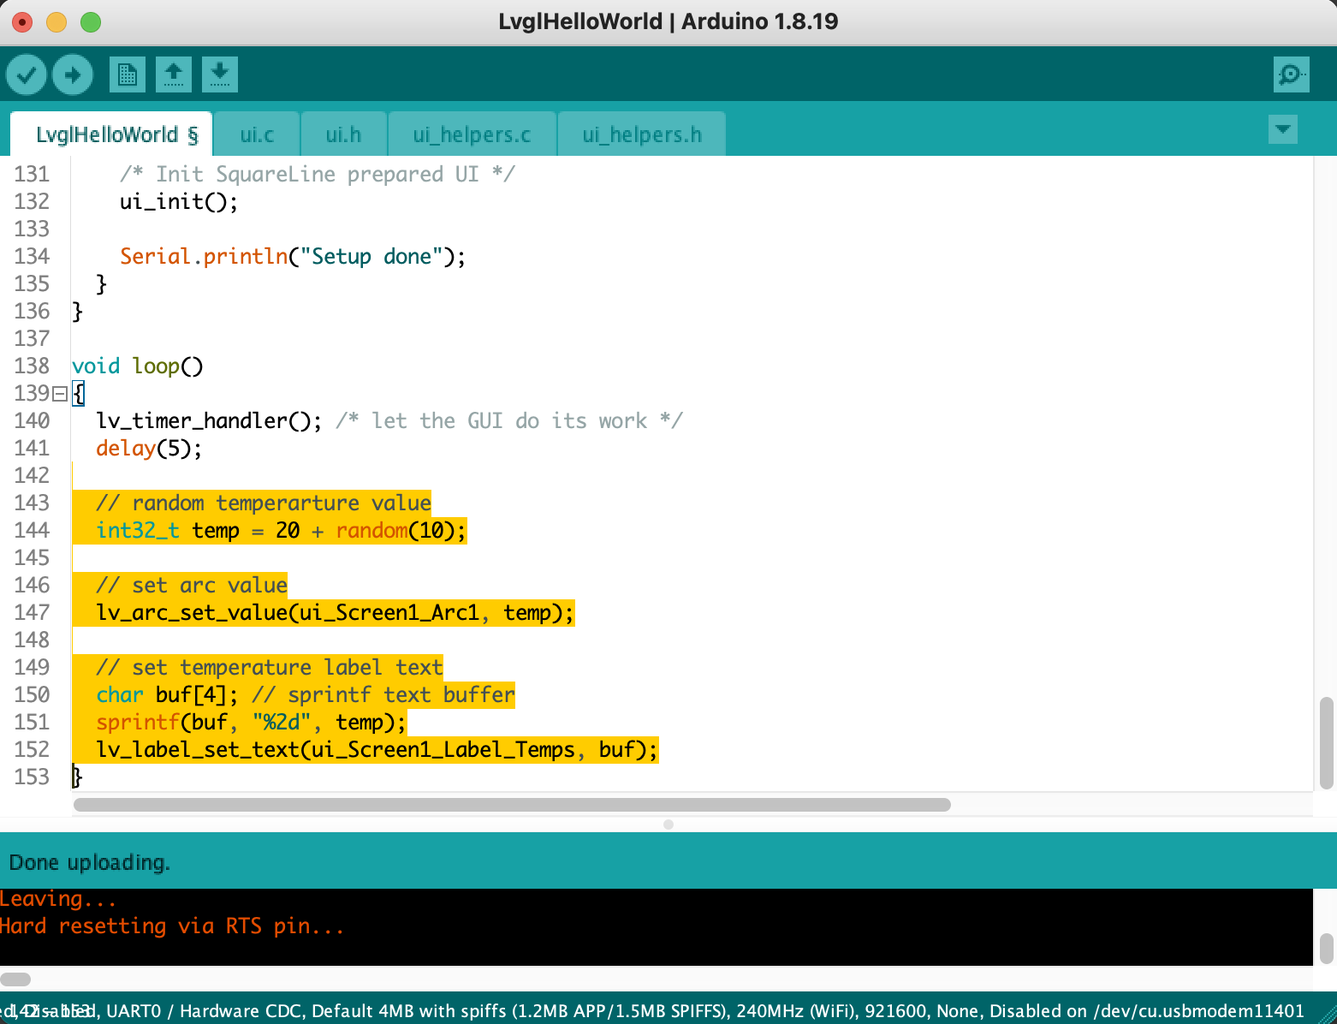
In loop() function, first random a temperature value:
int32_t temp = 20 + random(10);
Then set the value to the arc object:
lv_arc_set_value(ui_Screen1_Arc1, temp);
Set the value to a label need more steps. Label object requires string value, but the temperature is a number. First we need convert the number to string first:
  char buf[4]; // sprintf text buffer
  sprintf(buf, "%2d", temp);
  lv_label_set_text(ui_Screen1_Label_Temps, buf);
Then press upload again, you can see the arc and label changes continuously.
Ref.:
Step 15: Design, Design & Design...

Design is a time consuming job, but it worth if everyone like your project.
This project use a BME680 sensor readings as an example. BME680 can sense temperature, humidity, air pressure and air quality. So the main screen shows 4 realtime sensor values and corresponding arc value bars. Temperature, humidity and air quality vary over time, so 3 more screens show individual chart to present values over time.
Step 16: Transition Animation
Writing the object transition animation yourself is a painful join, calculate the transition, time control, tweeting position and putting all things together...etc. All the things works within the MCU very limited resources.
In LVGL, all things handled by the framework. All you need simply calling a animation command:
lv_scr_load_anim(ui_Screen2, LV_SCR_LOAD_ANIM_MOVE_RIGHT, SCR_LOAD_ANIM_TIME, 0, false);
Step 17: Add Buttons Response
2 buttons design for switching screen. 2 functions added to handle screen transition:
void left_btn_pressed() {
  if ((millis() - last_pressed) >= SCR_LOAD_ANIM_TIME) {
    switch(current_screen) {
      case 1:
        lv_scr_load_anim(ui_Screen4, LV_SCR_LOAD_ANIM_MOVE_RIGHT, SCR_LOAD_ANIM_TIME, 0, false);
        current_screen = 4;
        break;
      case 2:
        lv_scr_load_anim(ui_Screen1, LV_SCR_LOAD_ANIM_MOVE_RIGHT, SCR_LOAD_ANIM_TIME, 0, false);
        current_screen = 1;
        break;
      case 3:
        lv_scr_load_anim(ui_Screen2, LV_SCR_LOAD_ANIM_MOVE_RIGHT, SCR_LOAD_ANIM_TIME, 0, false);
        current_screen = 2;
        break;
      default:
        lv_scr_load_anim(ui_Screen3, LV_SCR_LOAD_ANIM_MOVE_RIGHT, SCR_LOAD_ANIM_TIME, 0, false);
        current_screen = 3;
        break;
    }

    last_pressed = millis();
  }
}

void right_btn_pressed() {
  if ((millis() - last_pressed) >= SCR_LOAD_ANIM_TIME) {
    switch(current_screen) {
      case 1:
        lv_scr_load_anim(ui_Screen2, LV_SCR_LOAD_ANIM_MOVE_LEFT, SCR_LOAD_ANIM_TIME, 0, false);
        current_screen = 2;
        break;
      case 2:
        lv_scr_load_anim(ui_Screen3, LV_SCR_LOAD_ANIM_MOVE_LEFT, SCR_LOAD_ANIM_TIME, 0, false);
        current_screen = 3;
        break;
      case 3:
        lv_scr_load_anim(ui_Screen4, LV_SCR_LOAD_ANIM_MOVE_LEFT, SCR_LOAD_ANIM_TIME, 0, false);
        current_screen = 4;
        break;
      default:
        lv_scr_load_anim(ui_Screen1, LV_SCR_LOAD_ANIM_MOVE_LEFT, SCR_LOAD_ANIM_TIME, 0, false);
        current_screen = 1;
        break;
    }

    last_pressed = millis();
  }
}
Then init buttons GPIO in setup() function:
  /* Init buttons */
  pinMode(LEFT_BTN_PIN, INPUT_PULLUP);
  attachInterrupt(LEFT_BTN_PIN, left_btn_pressed, FALLING);
  pinMode(RIGHT_BTN_PIN, INPUT_PULLUP);
  attachInterrupt(RIGHT_BTN_PIN, right_btn_pressed, FALLING);
Ref.:
https://www.arduino.cc/reference/en/language/functions/external-interrupts/attachinterrupt/
Step 18: Full Example Source Code
The full example source code can find in Github:
https://github.com/moononournation/Design-a-Fancy-GUI-for-Your-Project
Step 19: Enjoy!
It's time to design a fancy GUI for your project!

Participated in the
Anything Goes Contest


![Tim's Mechanical Spider Leg [LU9685-20CU]](https://content.instructables.com/FFB/5R4I/LVKZ6G6R/FFB5R4ILVKZ6G6R.png?auto=webp&crop=1.2%3A1&frame=1&width=306)


